

Strategies for Effective Assignment Design
As students progress through their degree programs, it becomes increasingly important for them to learn the major genres, research strategies, and writing conventions of their field. Because writing expectations vary across disciplinary and professional contexts, students benefit from transparent explanation of what those expectations are, how to achieve them, and why they’re important. This can be accomplished through carefully designed formal assignments.
Experts in Writing across the Curriculum argue that students learn most successfully when formal assignments engage them with “authentic research projects that promote disciplinary ways of inquiry and argument and are written in real disciplinary genres. [1] from the National Survey of Student Engagement shows that deep learning depends less on the amount of writing assigned in a course than on the design of the writing assignments themselves. According to this and other research, effective assignments have the following three features: [2] a meaning-constructing task, clear explanations of expectations, and interactive components.
Engage students in meaning-making
A meaning-constructing task asks students to bring their own critical thinking to bear on problems that matter to both the writer and the intended audience. A meaning-constructing task typically presents students with a disciplinary problem, asks them to formulate their own problems, or otherwise engages them in active critical thinking in a specific rhetorical context.

Provide clear expectations
Effective assignments clearly present the instructor’s expectations for a successful performance. Ideally, the assignment prompt also explains the purpose of the assignment in terms of the course’s learning goals and presents the instructor’s evaluation criteria.
Include interactive components
Interactive activities situate writing as a process of inquiry and discovery, promote productive talk about the writer’s emerging ideas, and encourage multiple drafts and global revision.
Create a Rhetorical Context
Creating a rhetorical context for your assignments means considering the role students will play in their writing, the audience they are meant to address, the format (or genre) of the writing task, and the task they are meant to accomplish. The mnemonic RAFT is helpful to recall these four components. [3]
Having a role helps students understand the kind of change they hope to bring about in their audience’s view of the subject matter. Without a specific role to play other than “student,” writers in your class might assume that their purpose is simply to regurgitate information to the instructor.
Specifying an audience goes hand-in-hand with establishing the student’s role. By identifying an audience, the instructor can help students see how their writing might influence a reader’s stance.
Format/Genre
By specifying a genre (e.g., experimental report, op-ed piece, proposal), the assignment helps students transfer earlier genre knowledge to the current task and make decisions about document design, organization, and style. It also helps instructors clarify expectations about length, citation style, etc. More important still, the rhetorical awareness enabled by writing in a specific genre also creates an awareness of a discourse community at work. To students, college writing assignments often appear to be an isolated transaction between student and teacher. Students assume that strange features of the assignment reflect the idiosyncrasies of the instructor rather than the conventions of a larger community. When instructors assign authentic genres there is an opportunity to make discourse community values and expectations explicit.
Task (Problem-Focused)
The task itself sets forth the subject matter of the assignment. Unlike topic-focused tasks (e.g., research/write about X), which can lead to unfocused papers that merely report information, a truly engaging task is typically embedded in disciplinary “problems” and disciplinary ways of thinking and argumentation. A problem-focused task should give students agency to bring their own critical thinking to bear on the subject matter—that is, to engage them in making their own meaning.
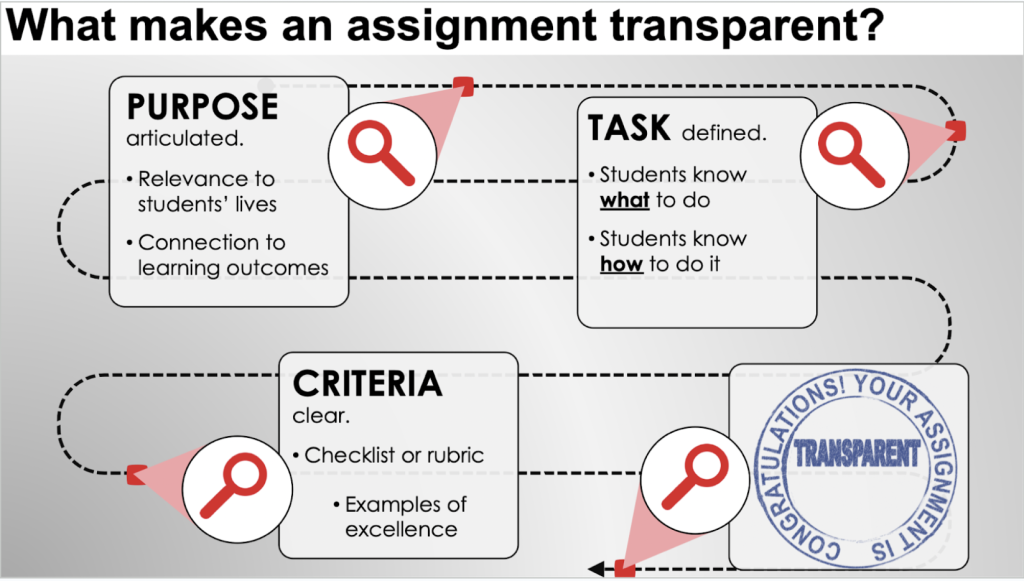
Use Transparent Assignment Design
Often an assignment that seems clear to you can be confusing to your students. While designing your assignments, ask yourself what might be unclear to your students—what assumptions might you be making about their procedural or background knowledge? Scholar Mary Ann Winkelmas
Align writing activities and assignments clearly with learning objectives
The goal of transparent assignment design is to “to make learning processes explicit and equally accessible for all students” (winkelmes et al., 2019, p. 1)., make clear the purpose, task, and criteria for success., for more information visit tilt (transparency in teaching and learning).
Example: Less Transparent
Assignment from an Introductory Communications Course
1. Select a professional in your prospective academic discipline and/or career filed that is considered an expert in an area in which you are interested 2. Secure an interview with the professional for a date and time that is convenient for both of you. 3. Prepare 8-10 questions to ask the professional about their knowledge of a particular academic discipline/career field. 4. Conduct a 20-30 minute, face-to-face interview to gather knowledge that will help you make an informed decision about the major/career you are considering. You will want to audio/video record the interview with the interviewee’s permission 5. Prepare a typed transcript of the questions and answers using the audio/ video recording 6. Write a 400-500 word reflection paper in which you address the following items: a. Who you selected and why? b. What you learned from them that is most interesting? c. What this assignment helped you learn about your major/career decision? 7. What questions you still have? 8. Submit the typed transcript and reflection paper to your instructor
Revised EXAMPLE: More Transparent
Communications 100E, Interview Assignment Used by permission of Katharine Johnson, University of Nevada, Las Vegas
Due dates: - Sept 30 - Draft interview questions - October 15 - Transcript of interviews - November 17 - Report
Purpose : The purpose of this assignment is to help you make an informed decision about the major/career you are considering.
Skills : This assignment will help you practice the following skills that are essential to your success in school and professional life: - Accessing and collecting information from appropriate primary and secondary sources - Synthesizing information to develop informed views - Composing a well-organized, clear, concise report to expand your knowledge on a subject in your major.
Knowledge : This assignment will also help you to become familiar with the following important content knowledge in this discipline: - Issues facing professionals in a field - Scholarly research formats for documenting sources and creating reference pages (i.e., bibliographies).
Task : To complete this assignment you should: 1. Secure an interview with two professionals in hour prospective academic discipline and/or career field who are considered experts. 2. Schedule the interviews with the professionals at a date and time that is convenient for both of you. 3. Prepare 8-10 questions to ask the professionals about their expertise in a particular academic or career field. The questions must be based on a review of the filed using 5 credible sources as defined by the librarian in our research module. Sources should be cited using APA formatting. 4. Conduct a 2 -3 -minute, face-to-face interview with each professional to gather knowledge that will help you make an informed decision about the major/career you are considering. You will want to audio/video record the interview with the interviewee’s permission. 5. Prepare a typed transcript of the interviews 6. Compare and contrast the information provided by both professionals in an 8-page (1.5 spaced, 12point Times New Roman font, 1 inch margins) report that documents the advantages and disadvantages of a career in the selected field.
Criteria for success : Please see the attached rubric.Type your textbox content here.
Information Literacy Skills Needed for Research Writing
Asking students to engage authentic, discipline-specific problems requires a kind of dismantling of the commonly encountered “research paper” culture in which students think of research as going to the library to find sources that can be summarized, paraphrased, and quoted. To move from “research paper” culture to a culture in which research projects are written in disciplinary genres, instructors need to help students develop the following skills related to information literacy: [4]
| The nature of questions differs across disciplines, and fields are often divided by theoretical or methodological differences that affect the way questions are framed. Instructors must model for students how to develop their own questions that are discipline-appropriate, significant, and pursuable at their level of study. | |
| Writers write to an audience for a purpose within a genre. Instructors should consider building these parameters into their assignments. | |
| Students need to develop more sophisticated search strategies, as well as more sophisticated means of evaluating sources. Consider collaborating with a librarian. | |
| Students need to learn that sources are not primarily for long quotations, but for specific purposes that help the researcher to create and share new knowledge. The mnemonic helps to elucidate these different purposes: to serve as a ackground source, as an xhibit (or evidence derived from an exhibit), as a source of rgument or counter-argument, and as a source of ethod | |
| Students need to learn to use sources purposefully within arguments, and learn when to quote, paraphrase, summarize, or reference. | |
| Active note-taking enables critical thinking—something downloading PDFs does not do! Students need to learn that taking notes can help them determine the function of a source, summarize an argument in their own words, and record their own ideas. | |
| Formatting citations is lowest in the hierarchy of skills, but of highest concern to students because they think teachers emphasize it most. |
Click "next" in the bottom right corner to continue reading this chapter.
Consider the Novice-Expert Framework
| Nonacademic writing | Writing a report about ___________ | K-12 |
| Generalized academic | Stating claims, respecting others’ opinions, offering evidence, writing with authority | First-year composition |
| Novice approximations of disciplinary ways of making meaning | Students are beginning to learn a new discipline, beginning to approximate kinds of writing | Upper-division courses |
| Expert, insider prose | Students have become acculturated into a new discipline | Graduate study and some capstone-level courses |
Consider backward design
- Bean and Melzer, p. 64-65 ↵
- All of this section excerpted and paraphrased from Bean and Melzer, pp. 66-68 ↵
- All of this section excerpted and paraphrased from Bean and Melzer, pp. 200-202 ↵
- Bizup, Joseph. “BEAM: A Rhetorical Vocabulary for Teaching Research-Based Writing.” Rhetoric Review, 2008, Vol.27 (1), p.72-86. DOI: 10.1080/07350190701738858 ↵
Locally Sourced: Writing Across the Curriculum Sourcebook Copyright © by [email protected] is licensed under a Creative Commons Attribution-NonCommercial 4.0 International License , except where otherwise noted.
Share This Book
Eberly Center
Teaching excellence & educational innovation, creating assignments.
Here are some general suggestions and questions to consider when creating assignments. There are also many other resources in print and on the web that provide examples of interesting, discipline-specific assignment ideas.
Consider your learning objectives.
What do you want students to learn in your course? What could they do that would show you that they have learned it? To determine assignments that truly serve your course objectives, it is useful to write out your objectives in this form: I want my students to be able to ____. Use active, measurable verbs as you complete that sentence (e.g., compare theories, discuss ramifications, recommend strategies), and your learning objectives will point you towards suitable assignments.
Design assignments that are interesting and challenging.
This is the fun side of assignment design. Consider how to focus students’ thinking in ways that are creative, challenging, and motivating. Think beyond the conventional assignment type! For example, one American historian requires students to write diary entries for a hypothetical Nebraska farmwoman in the 1890s. By specifying that students’ diary entries must demonstrate the breadth of their historical knowledge (e.g., gender, economics, technology, diet, family structure), the instructor gets students to exercise their imaginations while also accomplishing the learning objectives of the course (Walvoord & Anderson, 1989, p. 25).
Double-check alignment.
After creating your assignments, go back to your learning objectives and make sure there is still a good match between what you want students to learn and what you are asking them to do. If you find a mismatch, you will need to adjust either the assignments or the learning objectives. For instance, if your goal is for students to be able to analyze and evaluate texts, but your assignments only ask them to summarize texts, you would need to add an analytical and evaluative dimension to some assignments or rethink your learning objectives.
Name assignments accurately.
Students can be misled by assignments that are named inappropriately. For example, if you want students to analyze a product’s strengths and weaknesses but you call the assignment a “product description,” students may focus all their energies on the descriptive, not the critical, elements of the task. Thus, it is important to ensure that the titles of your assignments communicate their intention accurately to students.
Consider sequencing.
Think about how to order your assignments so that they build skills in a logical sequence. Ideally, assignments that require the most synthesis of skills and knowledge should come later in the semester, preceded by smaller assignments that build these skills incrementally. For example, if an instructor’s final assignment is a research project that requires students to evaluate a technological solution to an environmental problem, earlier assignments should reinforce component skills, including the ability to identify and discuss key environmental issues, apply evaluative criteria, and find appropriate research sources.
Think about scheduling.
Consider your intended assignments in relation to the academic calendar and decide how they can be reasonably spaced throughout the semester, taking into account holidays and key campus events. Consider how long it will take students to complete all parts of the assignment (e.g., planning, library research, reading, coordinating groups, writing, integrating the contributions of team members, developing a presentation), and be sure to allow sufficient time between assignments.
Check feasibility.
Is the workload you have in mind reasonable for your students? Is the grading burden manageable for you? Sometimes there are ways to reduce workload (whether for you or for students) without compromising learning objectives. For example, if a primary objective in assigning a project is for students to identify an interesting engineering problem and do some preliminary research on it, it might be reasonable to require students to submit a project proposal and annotated bibliography rather than a fully developed report. If your learning objectives are clear, you will see where corners can be cut without sacrificing educational quality.
Articulate the task description clearly.
If an assignment is vague, students may interpret it any number of ways – and not necessarily how you intended. Thus, it is critical to clearly and unambiguously identify the task students are to do (e.g., design a website to help high school students locate environmental resources, create an annotated bibliography of readings on apartheid). It can be helpful to differentiate the central task (what students are supposed to produce) from other advice and information you provide in your assignment description.
Establish clear performance criteria.
Different instructors apply different criteria when grading student work, so it’s important that you clearly articulate to students what your criteria are. To do so, think about the best student work you have seen on similar tasks and try to identify the specific characteristics that made it excellent, such as clarity of thought, originality, logical organization, or use of a wide range of sources. Then identify the characteristics of the worst student work you have seen, such as shaky evidence, weak organizational structure, or lack of focus. Identifying these characteristics can help you consciously articulate the criteria you already apply. It is important to communicate these criteria to students, whether in your assignment description or as a separate rubric or scoring guide . Clearly articulated performance criteria can prevent unnecessary confusion about your expectations while also setting a high standard for students to meet.
Specify the intended audience.
Students make assumptions about the audience they are addressing in papers and presentations, which influences how they pitch their message. For example, students may assume that, since the instructor is their primary audience, they do not need to define discipline-specific terms or concepts. These assumptions may not match the instructor’s expectations. Thus, it is important on assignments to specify the intended audience http://wac.colostate.edu/intro/pop10e.cfm (e.g., undergraduates with no biology background, a potential funder who does not know engineering).
Specify the purpose of the assignment.
If students are unclear about the goals or purpose of the assignment, they may make unnecessary mistakes. For example, if students believe an assignment is focused on summarizing research as opposed to evaluating it, they may seriously miscalculate the task and put their energies in the wrong place. The same is true they think the goal of an economics problem set is to find the correct answer, rather than demonstrate a clear chain of economic reasoning. Consequently, it is important to make your objectives for the assignment clear to students.
Specify the parameters.
If you have specific parameters in mind for the assignment (e.g., length, size, formatting, citation conventions) you should be sure to specify them in your assignment description. Otherwise, students may misapply conventions and formats they learned in other courses that are not appropriate for yours.
A Checklist for Designing Assignments
Here is a set of questions you can ask yourself when creating an assignment.
- Provided a written description of the assignment (in the syllabus or in a separate document)?
- Specified the purpose of the assignment?
- Indicated the intended audience?
- Articulated the instructions in precise and unambiguous language?
- Provided information about the appropriate format and presentation (e.g., page length, typed, cover sheet, bibliography)?
- Indicated special instructions, such as a particular citation style or headings?
- Specified the due date and the consequences for missing it?
- Articulated performance criteria clearly?
- Indicated the assignment’s point value or percentage of the course grade?
- Provided students (where appropriate) with models or samples?
Adapted from the WAC Clearinghouse at http://wac.colostate.edu/intro/pop10e.cfm .
CONTACT US to talk with an Eberly colleague in person!
- Faculty Support
- Graduate Student Support
- Canvas @ Carnegie Mellon
- Quick Links
Chart design templates for print, presentations, and more
Plot a course for interesting and inventive new ways to share your data—find customizable chart design templates that'll take your visuals up a level. whether you use charts in research, in presentations, or to keep track of personal projects, there's a chart template that'll help you get started..

Document your data easily with customizable chart designs
Charts serve a lot of purposes: To display data, to keep track of plans and goals, to impart and organize information. Charts can also be kind of a snooze. But they don't have to be. Start all your chart plotting with a designer-created customizable template. Charts aren't strangers to presentations ; businesses of all sizes often find themselves in need of audience-ready charts. Starting with a template is a great way to get clear, quality charts every time. Charts can be a great way to share data quickly and visually at a glance. Try them out in resumes , sales materials , and anywhere else high-level data needs to be organized.
The Cowbell
News and Resources from UWGB's Center for the Advancement of Teaching and Learning
Assignment Design
There’s a fine line between assignment design and assessment strategies . In short, designing good assignments is one means of assessing your students’ learning on a larger scale.
Assignments help measure student learning in your course. Effective assignment design in your course involves aligning your assignments with learning outcomes. When assignments and outcomes are aligned, good grades and good learning go hand in hand ( https://www.cmu.edu/teaching/designteach/design/assessments.html ).
Assessments fall into one of two categories, formative or summative .
Formative assessments are typically low-stakes and help students identify their strengths and weaknesses so that they can improve their learning. Routine formative assessments also help instructors identify the areas where students are struggling and adapt their teaching accordingly.
Summative assessments evaluate student learning (such as at the end of a unit of instruction). Summative assessments are generally higher stakes (like midterm exams and final projects).
Assignments are what students actually ‘do’ as part of those assessments.
Incorporating a mix of assignment activities in your course can help students practice and demonstrate their mastery of outcomes in multiple ways. Consider ways you can design your assignments so that they better mirror the application of knowledge in real-world scenarios. Assignments designed in this way are often referred to as Authentic Assessments ( Authentic-assessment.pdf (uwex.edu)). One type of highly authentic assessment is the long-term project which challenges students to solve a problem or complete a challenge requiring the application of course concepts ( Project_Based_Learning.pdf (uwex.edu) ).
More details and examples can be found in the tabbed content box below. Please also consider signing up for a CATL consultation with one of our instructional designers for some personalized assistance in developing your ideas for assignments and ensuring that they align with your course outcomes .
(Adapted from Carnegie Mellon's: Design and Teach a Course )
Assessments should provide instructors and students with evidence of how well students have mastered the course outcomes.
There are two major reasons for aligning assessments with learning outcomes.
- Alignment increases the probability that we will provide students with the opportunities to learn and practice knowledge and skills that instructors will require students know in the objectives and in the assessments. (Teaching to the assessment is a good thing.)
- When instructors align assessments with outcomes, students are more likely to translate "good grades" into "good learning." Conversely, when instructors misalign assessments with objectives, students will focus on getting good grades on the assessments, rather than focusing on mastering the material that the instructor finds important.
Instructors may use different types of assessments to measure student proficiency in a learning objective. Moreover, instructors may use the same activity to measure different objectives. To ensure a more accurate assessment of student proficiency, many instructional designers recommend that you use different kinds of activities so that students have multiple ways to practice and demonstrate their knowledge and skills.
Formative assessment
The goal of formative assessment is to monitor student learning to provide ongoing feedback that can be used by instructors to improve their teaching and by students to improve their learning. More specifically, formative assessments:
- help students identify their strengths and weaknesses and target areas that need work
- help faculty recognize where students are struggling and address problems immediately
Formative assessments are generally low stakes , which means that they have low or no point value. Examples of formative assessments include asking students to:
- draw a concept map in class to represent their understanding of a topic
- submit one or two sentences identifying the main point of a lecture
- turn in a research proposal for early feedback
Summative assessment
The goal of summative assessment is to evaluate student learning at the end of an instructional unit by comparing it against some standard or benchmark.
Summative assessments are often high stakes , which means that they have a high point value. Examples of summative assessments include:
- a midterm exam
- a final project
- a senior recital
Information from summative assessments can be used formatively when students or faculty use it to guide their efforts and activities in subsequent courses.
Formative Assessments:
- Reading quizzes
- Concept map
- Muddiest point
- Pro/con grid
- Focused paraphrasing
- Reflective journal
- Virtual lab/game
- Webconference
- Debate (synchronous or asynchronous)
- Participant research
- Peer review
Summative Assessments:
- Presentation
- Portfolio project
Carnegie Mellon University on Aligning Assessments with Objectives with examples.
Items to consider when weighing your assessment options:
If you are thinking about using discussions, be sure to think about the following:.
- What kind of questions/situations do you want the students to discuss? Is it complex enough to allow students to build knowledge beyond the textbook? Will the discussion help students meet your objectives (and develop an answer for your essential questions)?
- What are your expectations for discussions? Should students participate (post) a certain number of times, with a certain number of words, and reply to a certain number of people?
- What is your role in the discussion (traffic cop, the person who clarifies issues, will you respond to every post)?
If you are thinking about using quizzes, be sure to think about the following:
- What type of questions will help your students meet the objectives of the course? Are you going to grade essay questions or just let the computer grade multiple choice questions?
- What is the place for academic integrity? Are you going to randomize questions, randomize answers, restrict time, restrict the answers that students can see after completing the exam?
- How are you going to populate your quiz? Are you going to write the questions or use questions that come from a textbook publisher?
If you are thinking of using essays, be sure to think about the following:
- Will these essays/papers help students to meet the course objectives, which ones? Is the length of the essay appropriate?
- What do you think about plagiarism checkers such as TurnItIn?
- To what extent will you allow students to submit drafts, and will you provide feedback on drafts, or will you use a peer review system?
Other items to consider:
- Are you thinking about using an alternative assignment? If so, you may want to talk with an instructional technologist or designer.
- Consider the type of feedback you will provide for each assignment. What should students expect from you; how will you communicate those expectations; and how soon will you provide feedback (realistically)?
Further resources
Small teaching online.
This book (requires UWGB login) contains many tips that are easy to integrate into your distance education class. The chapter on “ surfacing backward design” contains many tips for assessment for online classes, many of which are adaptable to all distance modalities.
CATL Resources
- Collaborative Learning Assignments (Toolbox article)
- Administering Tests and Quizzes (including alternatives) (Toolbox article)
- Writing Good Multiple Choice Questions ( TeAch Tuesday , YouTube)
Tip sheets from UW-System
UW-System put together some tip sheets for common sticking points in assessment for distance education.
- Writing effective multiple choice questions
- Authentic assessments
- Unproctored online assessments
- Project-based learning
Department Info
- Center for the Advancement of Teaching and Learning , CL 405 UW-Green Bay, 2420 Nicolet Drive Green Bay , WI 54311-7001
- (920) 465-2541 [email protected]
- Events & Programs
UW-Green Bay
- University of Wisconsin-Green Bay 2420 Nicolet Drive Green Bay , WI 54311 , USA
- UW-Green Bay Mission
- College Portrait
- Connect with UWGB: facebook twitter flickr youtube
- General Contact: (920) 465-2000 or [email protected]
- Report a website issue
- Privacy Policy
- Emergency Information: emergency.uwgb.edu
- Online Learning
- Arts & Performances
- Cofrin Library
- Departments & People
- Faculty & Staff
- A to Z index
- Departments
Academic Resources
- Academic Calendar
- Academic Catalog
- Academic Success
- BlueM@il (Email)
- Campus Connect
- Desire2Learn (D2L)
Campus Resources
- Campus Security
- Campus Maps
University Resources
- Technology Help Desk
Information For
- Alumni & Friends
- Current Students
- Faculty & Staff
- Teaching Guides
- How Students Learn
- Course Design
- Instructional Methods
- Aligning with Learning Goals
- Critical Thinking
- Deterring Plagiarism
- Integrative Learning
- Feedback & Grading
- Learning Activities
- Flex Teaching
- Online Teaching
- Scholarship of Teaching and Learning
- Reflective Practice
- Inclusive Teaching
- Teaching at DePaul
- Support Services
- Technology Tools
Teaching Commons > Teaching Guides > Assignment Design > Aligning with Learning Goals
Aligning Assignments with Learning Goals

Learning Goals
- Engage course material
- Think critically
- Reflect on learning and practice
- Communicate effectively
- Think creatively
- Develop scholarly skills
- Develop professional skills
- Work together
- Bridge academic and real-world understanding
Engage Course Material
| This kind of assignment... | Helps students learn to... |
|---|---|
| Freewriting | |
| Discussion points | |
| Journal or learning logs | |
| Microtheme | |
| Summary, precis, brief | |
| Business or strategic plan | |
| Course/project blog(s) |
Think Critically
| This kind of assignment... | Helps students learn to... |
|---|---|
| Discussion points | |
| Journal or learning log | |
| Book (or article) review | |
| Argument paper, position paper | |
| Experimental or lab report | |
| Proposal, prospectus for research | |
| Oral argument | |
| Debates | |
| Case studies/scenarios/simulations | |
| Library research |
Reflect on Learning and Practice
| This kind of assignment... | Helps students learn to... |
|---|---|
| Learning plan | |
| Journal or learning log | |
| Reflection paper | |
| Portfolios |
Communicate Effectively
| This kind of assignment... | Helps students learn to... |
|---|---|
| Argument paper, position paper | |
| Experimental or lab report | |
| Oral argument | |
| Debates | |
| Peer review | |
| Course Wiki or website | |
| Course/project blog(s) |
Think Creatively
| This kind of assignment... | Helps students learn to... |
|---|---|
| Performances | |
| Musical compositions | |
| Artistic representations of course material |
Develop Scholarly Skills
| This kind of assignment... | Helps students learn to... |
|---|---|
| Summary, précis, brief | |
| Literature review | |
| Experimental or lab report | |
| Proposal, prospectus for research | |
| Annotated bibliography | |
| Oral history/interviews | |
| Fieldwork | |
| Peer review | |
| Library research |
Develop Professional Skills
| This kind of assignment... | Helps students learn to... |
|---|---|
| Summary, précis, brief | |
| Internships | |
| Case studies/scenarios/simulations | |
| Business or strategic plan | |
| Strategic plan or other plan of action |
Work Together
| This kind of assignment... | Helps students learn to... |
|---|---|
| Service learning | |
| Peer review | |
| Course Wiki or website |
Bridge the Academic and the "Real" World
| This kind of assignment... | Helps students learn to... |
|---|---|
| Journal or learning log | |
| Oral history/interviews | |
| Fieldwork | |
| Internships | |
| Service learning | |
| Case studies/scenarios/simulations | |
| Business or strategic plan |
Adapted from the L&S Program in Writing Across the Curriculum at the University of Wisconsin-Madison.
Assignment Design: Checklist
Careful planning and implementation of assignments will help your students produce what you expected. Consider using this checklist as a tool to trouble-shoot your assignment design and identify possible areas to refine. Other considerations may be required for your specific assignment, but this will give you a great start, no matter what type of assignment you plan to give.
Stage one: Planning
When planning the assignment, decide how it can.
- Fit with main learning objectives for the course, term, and program
- Relate to previous work done in this course and past courses
- Be new and different from the type of assignments given in this course and other courses(e.g., seek alternatives to the proverbial term-paper or problem set)
- Benefit from an audience other than yourself (e.g., peers, community professionals, liaison librarian, politicians)
- Use current topics and current resources
- Be broken into a series of smaller assignments to avoid overwhelming students
- Be completed – in groups, pairs, or individually
- Be completed – in the online environment
- Build on students’ previous experience and current skill set
- Develop important skills for students, both for your course work and beyond (e.g., skills for the workplace, skills for life)
- Require a reasonable amount of work and be successfully completed in the allotted time, given other courses and demands outside of school
- Have value to you (e.g., will be interesting to grade, lead to a research project)
- Require a level of commitment you can meet (e.g., student support, grading)
Also, prepare by considering the support demands students may have
- Identify types of assistance students will require to complete the assignment
- Contact liaison librarian, community professionals, or other people who can assist you and your students in completing the assignment
- Arrange guest lectures relevant to assignment process (e.g., liaison librarian, community professional, colleagues)
- When possible, use class time for activities to help students complete the assignment (e.g., discuss how to write an annotated bibliography, run lab activities to demonstrate a requisite skill, discuss material related to assignment topic)
- Decide if students are required to meet with you or your teaching assistants (TAs) as they complete the assignment and set times and policies for availability to help students avoid procrastinating
Then, make evaluation decisions by choosing the
- Assignment length limitations and due dates
- Type of feedback to give – written, oral, anonymous
- Evaluators – you, peers, community professional, liaison librarian
- Type of grade required (e.g., check mark, pass/fail, numeric grade)
- Parts to evaluate – effort, research process, thinking process, progress, sequence of assignments, drafts, final products
- Weighting of components – how much is each part worth
- Turnaround times for marking to make the assignment meaningful for students
- Policies for possible problems – late or incomplete assignments, missed meetings, poor group work practices, plagiarism
Stage two: Implementing
Prepare an assignment description or handout that.
- Comprises the key parts – situation (background information, audience, relevance), task (what to do), stages (a timeline for completing key stages of the assignment), and evaluation criteria (specific grading scheme, special policies)
- Uses plain language – avoids jargon
- Provides advice from past experiences with the assignment
- Explains proper referencing and acceptable sources for information – be specific and expect to be taken literally
Have a colleague (preferably someone not familiar with your course) read the handout and identify any unclear instructions and jargon, then revise accordingly. As well, do your assignment before giving it to students whenever possible, so you can identify problems before they do. And when you distribute the handout in class, take time to discuss it and allow for questions and clarifications about the task.
Consider giving ongoing support
- Share useful student feedback with the class and TAs
- Keep in touch with support people (i.e., liaison librarian)
- Ask for mid-assignment feedback since no news is not necessarily good news
- Have a backup plan for areas identified as difficult to complete (i.e., if a document is hard to get, have a copy available for reserve) – but take care not to modify the assignment too much from the handout because this confuses students
And when the assignments are all submitted and returned
- List 5 strengths and 5 weaknesses of the assignment and suggest changes for next time
- Ask for evaluative feedback from students and support contacts – find out what worked well, what could be improved, where students had the most difficulty, and how you can better facilitate the process next time
- Use feedback and experiences to modify assignment plan for the next time
If you would like support applying these tips to your own teaching, CTE staff members are here to help. View the CTE Support page to find the most relevant staff member to contact.
This Creative Commons license lets others remix, tweak, and build upon our work non-commercially, as long as they credit us and indicate if changes were made. Use this citation format: Assignment Design: checklist. Centre for Teaching Excellence, University of Waterloo
Catalog search
Teaching tip categories.
- Assessment and feedback
- Blended Learning and Educational Technologies
- Career Development
- Course Design
- Course Implementation
- Inclusive Teaching and Learning
- Learning activities
- Support for Student Learning
- Support for TAs
- Assessment and feedback ,
Assignment Design Checklist
Use this very simple checklist to assess your assignment design.
- What is the assignment asking students to do?
- Does what the assignment asks match the author’s purposes (given the nature of the class, etc.)?
- Is there a discernible central question or task?
- Is the assignment clear?
- Are there words or phrases that might be confusing or unclear to the intended audience?
- Is the assignment itself separate from thought questions or process suggestions?
Format and Organization:
- Look at the layout on the page. Is there a long narrative of unbroken text?
- A long series of questions?
- How is it organized?
- Do the layout and order help the audience understand the assignment?
- Can it be broken into steps or paragraphs?
- Are suggestions separated from the assignment itself?
- If the assignment is a major essay, are there any steps or process work assigned along the way to the final draft?
Adapted from Gail Offen-Brown, College Writing 300, UC Berkeley, Fall 2005
Rubric Best Practices, Examples, and Templates
A rubric is a scoring tool that identifies the different criteria relevant to an assignment, assessment, or learning outcome and states the possible levels of achievement in a specific, clear, and objective way. Use rubrics to assess project-based student work including essays, group projects, creative endeavors, and oral presentations.
Rubrics can help instructors communicate expectations to students and assess student work fairly, consistently and efficiently. Rubrics can provide students with informative feedback on their strengths and weaknesses so that they can reflect on their performance and work on areas that need improvement.
How to Get Started
Best practices, moodle how-to guides.
- Workshop Recording (Spring 2024)
- Workshop Registration
Step 1: Analyze the assignment
The first step in the rubric creation process is to analyze the assignment or assessment for which you are creating a rubric. To do this, consider the following questions:
- What is the purpose of the assignment and your feedback? What do you want students to demonstrate through the completion of this assignment (i.e. what are the learning objectives measured by it)? Is it a summative assessment, or will students use the feedback to create an improved product?
- Does the assignment break down into different or smaller tasks? Are these tasks equally important as the main assignment?
- What would an “excellent” assignment look like? An “acceptable” assignment? One that still needs major work?
- How detailed do you want the feedback you give students to be? Do you want/need to give them a grade?
Step 2: Decide what kind of rubric you will use
Types of rubrics: holistic, analytic/descriptive, single-point
Holistic Rubric. A holistic rubric includes all the criteria (such as clarity, organization, mechanics, etc.) to be considered together and included in a single evaluation. With a holistic rubric, the rater or grader assigns a single score based on an overall judgment of the student’s work, using descriptions of each performance level to assign the score.
Advantages of holistic rubrics:
- Can p lace an emphasis on what learners can demonstrate rather than what they cannot
- Save grader time by minimizing the number of evaluations to be made for each student
- Can be used consistently across raters, provided they have all been trained
Disadvantages of holistic rubrics:
- Provide less specific feedback than analytic/descriptive rubrics
- Can be difficult to choose a score when a student’s work is at varying levels across the criteria
- Any weighting of c riteria cannot be indicated in the rubric
Analytic/Descriptive Rubric . An analytic or descriptive rubric often takes the form of a table with the criteria listed in the left column and with levels of performance listed across the top row. Each cell contains a description of what the specified criterion looks like at a given level of performance. Each of the criteria is scored individually.
Advantages of analytic rubrics:
- Provide detailed feedback on areas of strength or weakness
- Each criterion can be weighted to reflect its relative importance
Disadvantages of analytic rubrics:
- More time-consuming to create and use than a holistic rubric
- May not be used consistently across raters unless the cells are well defined
- May result in giving less personalized feedback
Single-Point Rubric . A single-point rubric is breaks down the components of an assignment into different criteria, but instead of describing different levels of performance, only the “proficient” level is described. Feedback space is provided for instructors to give individualized comments to help students improve and/or show where they excelled beyond the proficiency descriptors.
Advantages of single-point rubrics:
- Easier to create than an analytic/descriptive rubric
- Perhaps more likely that students will read the descriptors
- Areas of concern and excellence are open-ended
- May removes a focus on the grade/points
- May increase student creativity in project-based assignments
Disadvantage of analytic rubrics: Requires more work for instructors writing feedback
Step 3 (Optional): Look for templates and examples.
You might Google, “Rubric for persuasive essay at the college level” and see if there are any publicly available examples to start from. Ask your colleagues if they have used a rubric for a similar assignment. Some examples are also available at the end of this article. These rubrics can be a great starting point for you, but consider steps 3, 4, and 5 below to ensure that the rubric matches your assignment description, learning objectives and expectations.
Step 4: Define the assignment criteria
Make a list of the knowledge and skills are you measuring with the assignment/assessment Refer to your stated learning objectives, the assignment instructions, past examples of student work, etc. for help.
Helpful strategies for defining grading criteria:
- Collaborate with co-instructors, teaching assistants, and other colleagues
- Brainstorm and discuss with students
- Can they be observed and measured?
- Are they important and essential?
- Are they distinct from other criteria?
- Are they phrased in precise, unambiguous language?
- Revise the criteria as needed
- Consider whether some are more important than others, and how you will weight them.
Step 5: Design the rating scale
Most ratings scales include between 3 and 5 levels. Consider the following questions when designing your rating scale:
- Given what students are able to demonstrate in this assignment/assessment, what are the possible levels of achievement?
- How many levels would you like to include (more levels means more detailed descriptions)
- Will you use numbers and/or descriptive labels for each level of performance? (for example 5, 4, 3, 2, 1 and/or Exceeds expectations, Accomplished, Proficient, Developing, Beginning, etc.)
- Don’t use too many columns, and recognize that some criteria can have more columns that others . The rubric needs to be comprehensible and organized. Pick the right amount of columns so that the criteria flow logically and naturally across levels.
Step 6: Write descriptions for each level of the rating scale
Artificial Intelligence tools like Chat GPT have proven to be useful tools for creating a rubric. You will want to engineer your prompt that you provide the AI assistant to ensure you get what you want. For example, you might provide the assignment description, the criteria you feel are important, and the number of levels of performance you want in your prompt. Use the results as a starting point, and adjust the descriptions as needed.
Building a rubric from scratch
For a single-point rubric , describe what would be considered “proficient,” i.e. B-level work, and provide that description. You might also include suggestions for students outside of the actual rubric about how they might surpass proficient-level work.
For analytic and holistic rubrics , c reate statements of expected performance at each level of the rubric.
- Consider what descriptor is appropriate for each criteria, e.g., presence vs absence, complete vs incomplete, many vs none, major vs minor, consistent vs inconsistent, always vs never. If you have an indicator described in one level, it will need to be described in each level.
- You might start with the top/exemplary level. What does it look like when a student has achieved excellence for each/every criterion? Then, look at the “bottom” level. What does it look like when a student has not achieved the learning goals in any way? Then, complete the in-between levels.
- For an analytic rubric , do this for each particular criterion of the rubric so that every cell in the table is filled. These descriptions help students understand your expectations and their performance in regard to those expectations.
Well-written descriptions:
- Describe observable and measurable behavior
- Use parallel language across the scale
- Indicate the degree to which the standards are met
Step 7: Create your rubric
Create your rubric in a table or spreadsheet in Word, Google Docs, Sheets, etc., and then transfer it by typing it into Moodle. You can also use online tools to create the rubric, but you will still have to type the criteria, indicators, levels, etc., into Moodle. Rubric creators: Rubistar , iRubric
Step 8: Pilot-test your rubric
Prior to implementing your rubric on a live course, obtain feedback from:
- Teacher assistants
Try out your new rubric on a sample of student work. After you pilot-test your rubric, analyze the results to consider its effectiveness and revise accordingly.
- Limit the rubric to a single page for reading and grading ease
- Use parallel language . Use similar language and syntax/wording from column to column. Make sure that the rubric can be easily read from left to right or vice versa.
- Use student-friendly language . Make sure the language is learning-level appropriate. If you use academic language or concepts, you will need to teach those concepts.
- Share and discuss the rubric with your students . Students should understand that the rubric is there to help them learn, reflect, and self-assess. If students use a rubric, they will understand the expectations and their relevance to learning.
- Consider scalability and reusability of rubrics. Create rubric templates that you can alter as needed for multiple assignments.
- Maximize the descriptiveness of your language. Avoid words like “good” and “excellent.” For example, instead of saying, “uses excellent sources,” you might describe what makes a resource excellent so that students will know. You might also consider reducing the reliance on quantity, such as a number of allowable misspelled words. Focus instead, for example, on how distracting any spelling errors are.
Example of an analytic rubric for a final paper
| Above Average (4) | Sufficient (3) | Developing (2) | Needs improvement (1) | |
|---|---|---|---|---|
| (Thesis supported by relevant information and ideas | The central purpose of the student work is clear and supporting ideas always are always well-focused. Details are relevant, enrich the work. | The central purpose of the student work is clear and ideas are almost always focused in a way that supports the thesis. Relevant details illustrate the author’s ideas. | The central purpose of the student work is identified. Ideas are mostly focused in a way that supports the thesis. | The purpose of the student work is not well-defined. A number of central ideas do not support the thesis. Thoughts appear disconnected. |
| (Sequencing of elements/ ideas) | Information and ideas are presented in a logical sequence which flows naturally and is engaging to the audience. | Information and ideas are presented in a logical sequence which is followed by the reader with little or no difficulty. | Information and ideas are presented in an order that the audience can mostly follow. | Information and ideas are poorly sequenced. The audience has difficulty following the thread of thought. |
| (Correctness of grammar and spelling) | Minimal to no distracting errors in grammar and spelling. | The readability of the work is only slightly interrupted by spelling and/or grammatical errors. | Grammatical and/or spelling errors distract from the work. | The readability of the work is seriously hampered by spelling and/or grammatical errors. |
Example of a holistic rubric for a final paper
| The audience is able to easily identify the central message of the work and is engaged by the paper’s clear focus and relevant details. Information is presented logically and naturally. There are minimal to no distracting errors in grammar and spelling. : The audience is easily able to identify the focus of the student work which is supported by relevant ideas and supporting details. Information is presented in a logical manner that is easily followed. The readability of the work is only slightly interrupted by errors. : The audience can identify the central purpose of the student work without little difficulty and supporting ideas are present and clear. The information is presented in an orderly fashion that can be followed with little difficulty. Grammatical and spelling errors distract from the work. : The audience cannot clearly or easily identify the central ideas or purpose of the student work. Information is presented in a disorganized fashion causing the audience to have difficulty following the author’s ideas. The readability of the work is seriously hampered by errors. |
Single-Point Rubric
| Advanced (evidence of exceeding standards) | Criteria described a proficient level | Concerns (things that need work) |
|---|---|---|
| Criteria #1: Description reflecting achievement of proficient level of performance | ||
| Criteria #2: Description reflecting achievement of proficient level of performance | ||
| Criteria #3: Description reflecting achievement of proficient level of performance | ||
| Criteria #4: Description reflecting achievement of proficient level of performance | ||
| 90-100 points | 80-90 points | <80 points |
More examples:
- Single Point Rubric Template ( variation )
- Analytic Rubric Template make a copy to edit
- A Rubric for Rubrics
- Bank of Online Discussion Rubrics in different formats
- Mathematical Presentations Descriptive Rubric
- Math Proof Assessment Rubric
- Kansas State Sample Rubrics
- Design Single Point Rubric
Technology Tools: Rubrics in Moodle
- Moodle Docs: Rubrics
- Moodle Docs: Grading Guide (use for single-point rubrics)
Tools with rubrics (other than Moodle)
- Google Assignments
- Turnitin Assignments: Rubric or Grading Form
Other resources
- DePaul University (n.d.). Rubrics .
- Gonzalez, J. (2014). Know your terms: Holistic, Analytic, and Single-Point Rubrics . Cult of Pedagogy.
- Goodrich, H. (1996). Understanding rubrics . Teaching for Authentic Student Performance, 54 (4), 14-17. Retrieved from
- Miller, A. (2012). Tame the beast: tips for designing and using rubrics.
- Ragupathi, K., Lee, A. (2020). Beyond Fairness and Consistency in Grading: The Role of Rubrics in Higher Education. In: Sanger, C., Gleason, N. (eds) Diversity and Inclusion in Global Higher Education. Palgrave Macmillan, Singapore.
18 Best Types of Charts and Graphs for Data Visualization [+ Guide]
Published: May 22, 2024
As a writer for the marketing blog, I frequently use various types of charts and graphs to help readers visualize the data I collect and better understand their significance. And trust me, there's a lot of data to present.

In fact, the volume of data in 2025 will be almost double the data we create, capture, copy, and consume today.

This makes data visualization essential for businesses. Different types of graphs and charts can help you:
- Motivate your team to take action.
- Impress stakeholders with goal progress.
- Show your audience what you value as a business.
Data visualization builds trust and can organize diverse teams around new initiatives. So, I'm going to talk about the types of graphs and charts that you can use to grow your business.
And, if you still need a little more guidance by the end of this post, check out our data visualization guide for more information on how to design visually stunning and engaging charts and graphs.
.png "assignment design in chart")
Free Excel Graph Templates
Tired of struggling with spreadsheets? These free Microsoft Excel Graph Generator Templates can help.
- Simple, customizable graph designs.
- Data visualization tips & instructions.
- Templates for two, three, four, and five-variable graph templates.
Download Free
All fields are required.
You're all set!
Click this link to access this resource at any time.
Charts vs Graphs: What's the Difference?
A lot of people think charts and graphs are synonymous (I know I did), but they're actually two different things.
Charts visually represent current data in the form of tables and diagrams, but graphs are more numerical in data and show how one variable affects another.
For example, in one of my favorite sitcoms, How I Met Your Mother, Marshall creates a bunch of charts and graphs representing his life. One of these charts is a Venn diagram referencing the song "Cecilia" by Simon and Garfunkle.
Marshall says, "This circle represents people who are breaking my heart, and this circle represents people who are shaking my confidence daily. Where they overlap? Cecilia."
The diagram is a chart and not a graph because it doesn't track how these people make him feel over time or how these variables are influenced by each other.
It may show where the two types of people intersect but not how they influence one another.

Later, Marshall makes a line graph showing how his friends' feelings about his charts have changed in the time since presenting his "Cecilia diagram.
Note: He calls the line graph a chart on the show, but it's acceptable because the nature of line graphs and charts makes the terms interchangeable. I'll explain later, I promise.
The line graph shows how the time since showing his Cecilia chart has influenced his friends' tolerance for his various graphs and charts.

Image source
I can't even begin to tell you all how happy I am to reference my favorite HIMYM joke in this post.
Now, let's dive into the various types of graphs and charts.
Different Types of Graphs for Data Visualization
1. bar graph.
I strongly suggest using a bar graph to avoid clutter when one data label is long or if you have more than 10 items to compare. Also, fun fact: If the example below was vertical it would be a column graph.

Best Use Cases for These Types of Graphs
Bar graphs can help track changes over time. I've found that bar graphs are most useful when there are big changes or to show how one group compares against other groups.
The example above compares the number of customers by business role. It makes it easy to see that there is more than twice the number of customers per role for individual contributors than any other group.
A bar graph also makes it easy to see which group of data is highest or most common.
For example, at the start of the pandemic, online businesses saw a big jump in traffic. So, if you want to look at monthly traffic for an online business, a bar graph would make it easy to see that jump.
Other use cases for bar graphs include:
- Product comparisons.
- Product usage.
- Category comparisons.
- Marketing traffic by month or year.
- Marketing conversions.
Design Best Practices for Bar Graphs
- Use consistent colors throughout the chart, selecting accent colors to highlight meaningful data points or changes over time.
You should also use horizontal labels to improve its readability, and start the y-axis at 0 to appropriately reflect the values in your graph.
2. Line Graph
A line graph reveals trends or progress over time, and you can use it to show many different categories of data. You should use it when you track a continuous data set.
This makes the terms line graphs and line charts interchangeable because the very nature of both is to track how variables impact each other, particularly how something changes over time. Yeah, it confused me, too.

Line graphs help users track changes over short and long periods. Because of this, I find these types of graphs are best for seeing small changes.
Line graphs help me compare changes for more than one group over the same period. They're also helpful for measuring how different groups relate to each other.
A business might use this graph to compare sales rates for different products or services over time.
These charts are also helpful for measuring service channel performance. For example, a line graph that tracks how many chats or emails your team responds to per month.
Design Best Practices for Line Graphs
- Use solid lines only.
- Don't plot more than four lines to avoid visual distractions.
- Use the right height so the lines take up roughly 2/3 of the y-axis' height.
3. Bullet Graph
A bullet graph reveals progress towards a goal, compares this to another measure, and provides context in the form of a rating or performance.

In the example above, the bullet graph shows the number of new customers against a set customer goal. Bullet graphs are great for comparing performance against goals like this.
These types of graphs can also help teams assess possible roadblocks because you can analyze data in a tight visual display.
For example, I could create a series of bullet graphs measuring performance against benchmarks or use a single bullet graph to visualize these KPIs against their goals:
- Customer satisfaction.
- Average order size.
- New customers.
Seeing this data at a glance and alongside each other can help teams make quick decisions.
Bullet graphs are one of the best ways to display year-over-year data analysis. YBullet graphs can also visualize:
- Customer satisfaction scores.
- Customer shopping habits.
- Social media usage by platform.
Design Best Practices for Bullet Graphs
- Use contrasting colors to highlight how the data is progressing.
- Use one color in different shades to gauge progress.
4. Column + Line Graph
Column + line graphs are also called dual-axis charts. They consist of a column and line graph together, with both graphics on the X axis but occupying their own Y axis.
Download our FREE Excel Graph Templates for this graph and more!
Best Use Cases
These graphs are best for comparing two data sets with different measurement units, such as rate and time.
As a marketer, you may want to track two trends at once.
Design Best Practices
Use individual colors for the lines and colors to make the graph more visually appealing and to further differentiate the data.
The Four Basic Types of Charts
Before we get into charts, I want to touch on the four basic chart types that I use the most.
1. Bar Chart
Bar charts are pretty self-explanatory. I use them to indicate values by the length of bars, which can be displayed horizontally or vertically. Vertical bar charts, like the one below, are sometimes called column charts.

2. Line Chart
I use line charts to show changes in values across continuous measurements, such as across time, generations, or categories. For example, the chart below shows the changes in ice cream sales throughout the week.

3. Scatter Plot
A scatter plot uses dotted points to compare values against two different variables on separate axes. It's commonly used to show correlations between values and variables.

4. Pie Chart
Pie charts are charts that represent data in a circular (pie-shaped) graphic, and each slice represents a percentage or portion of the whole.
Notice the example below of a household budget. (Which reminds me that I need to set up my own.)
Notice that the percentage of income going to each expense is represented by a slice.

Different Types of Charts for Data Visualization
To better understand chart types and how you can use them, here's an overview of each:
1. Column Chart
Use a column chart to show a comparison among different items or to show a comparison of items over time. You could use this format to see the revenue per landing page or customers by close date.

Best Use Cases for This Type of Chart
I use both column charts to display changes in data, but I've noticed column charts are best for negative data. The main difference, of course, is that column charts show information vertically while bar charts show data horizontally.
For example, warehouses often track the number of accidents on the shop floor. When the number of incidents falls below the monthly average, a column chart can make that change easier to see in a presentation.
In the example above, this column chart measures the number of customers by close date. Column charts make it easy to see data changes over a period of time. This means that they have many use cases, including:
- Customer survey data, like showing how many customers prefer a specific product or how much a customer uses a product each day.
- Sales volume, like showing which services are the top sellers each month or the number of sales per week.
- Profit and loss, showing where business investments are growing or falling.
Design Best Practices for Column Charts
- Use horizontal labels to improve readability.
- Start the y-axis at 0 to appropriately reflect the values in your chart .
2. Area Chart
Okay, an area chart is basically a line chart, but I swear there's a meaningful difference.
The space between the x-axis and the line is filled with a color or pattern. It is useful for showing part-to-whole relations, like showing individual sales reps’ contributions to total sales for a year.
It helps me analyze both overall and individual trend information.

Best Use Cases for These Types of Charts
Area charts help show changes over time. They work best for big differences between data sets and help visualize big trends.
For example, the chart above shows users by creation date and life cycle stage.
A line chart could show more subscribers than marketing qualified leads. But this area chart emphasizes how much bigger the number of subscribers is than any other group.
These charts make the size of a group and how groups relate to each other more visually important than data changes over time.
Area charts can help your business to:
- Visualize which product categories or products within a category are most popular.
- Show key performance indicator (KPI) goals vs. outcomes.
- Spot and analyze industry trends.
Design Best Practices for Area Charts
- Use transparent colors so information isn't obscured in the background.
- Don't display more than four categories to avoid clutter.
- Organize highly variable data at the top of the chart to make it easy to read.
3. Stacked Bar Chart
I suggest using this chart to compare many different items and show the composition of each item you’re comparing.

These charts are helpful when a group starts in one column and moves to another over time.
For example, the difference between a marketing qualified lead (MQL) and a sales qualified lead (SQL) is sometimes hard to see. The chart above helps stakeholders see these two lead types from a single point of view — when a lead changes from MQL to SQL.
Stacked bar charts are excellent for marketing. They make it simple to add a lot of data on a single chart or to make a point with limited space.
These charts can show multiple takeaways, so they're also super for quarterly meetings when you have a lot to say but not a lot of time to say it.
Stacked bar charts are also a smart option for planning or strategy meetings. This is because these charts can show a lot of information at once, but they also make it easy to focus on one stack at a time or move data as needed.
You can also use these charts to:
- Show the frequency of survey responses.
- Identify outliers in historical data.
- Compare a part of a strategy to its performance as a whole.
Design Best Practices for Stacked Bar Charts
- Best used to illustrate part-to-whole relationships.
- Use contrasting colors for greater clarity.
- Make the chart scale large enough to view group sizes in relation to one another.
4. Mekko Chart
Also known as a Marimekko chart, this type of chart can compare values, measure each one's composition, and show data distribution across each one.
It's similar to a stacked bar, except the Mekko's x-axis can capture another dimension of your values — instead of time progression, like column charts often do. In the graphic below, the x-axis compares the cities to one another.

Image Source
I typically use a Mekko chart to show growth, market share, or competitor analysis.
For example, the Mekko chart above shows the market share of asset managers grouped by location and the value of their assets. This chart clarifies which firms manage the most assets in different areas.
It's also easy to see which asset managers are the largest and how they relate to each other.
Mekko charts can seem more complex than other types of charts, so it's best to use these in situations where you want to emphasize scale or differences between groups of data.
Other use cases for Mekko charts include:
- Detailed profit and loss statements.
- Revenue by brand and region.
- Product profitability.
- Share of voice by industry or niche.
Design Best Practices for Mekko Charts
- Vary your bar heights if the portion size is an important point of comparison.
- Don't include too many composite values within each bar. Consider reevaluating your presentation if you have a lot of data.
- Order your bars from left to right in such a way that exposes a relevant trend or message.
5. Pie Chart
Remember, a pie chart represents numbers in percentages, and the total sum of all segments needs to equal 100%.

The image above shows another example of customers by role in the company.
The bar chart example shows you that there are more individual contributors than any other role. But this pie chart makes it clear that they make up over 50% of customer roles.
Pie charts make it easy to see a section in relation to the whole, so they are good for showing:
- Customer personas in relation to all customers.
- Revenue from your most popular products or product types in relation to all product sales.
- Percent of total profit from different store locations.
Design Best Practices for Pie Charts
- Don't illustrate too many categories to ensure differentiation between slices.
- Ensure that the slice values add up to 100%.
- Order slices according to their size.
6. Scatter Plot Chart
As I said earlier, a scatter plot or scattergram chart will show the relationship between two different variables or reveal distribution trends.
Use this chart when there are many different data points, and you want to highlight similarities in the data set. This is useful when looking for outliers or understanding your data's distribution.

Scatter plots are helpful in situations where you have too much data to see a pattern quickly. They are best when you use them to show relationships between two large data sets.
In the example above, this chart shows how customer happiness relates to the time it takes for them to get a response.
This type of chart makes it easy to compare two data sets. Use cases might include:
- Employment and manufacturing output.
- Retail sales and inflation.
- Visitor numbers and outdoor temperature.
- Sales growth and tax laws.
Try to choose two data sets that already have a positive or negative relationship. That said, this type of chart can also make it easier to see data that falls outside of normal patterns.
Design Best Practices for Scatter Plots
- Include more variables, like different sizes, to incorporate more data.
- Start the y-axis at 0 to represent data accurately.
- If you use trend lines, only use a maximum of two to make your plot easy to understand.
7. Bubble Chart
A bubble chart is similar to a scatter plot in that it can show distribution or relationship. There is a third data set shown by the size of the bubble or circle.

In the example above, the number of hours spent online isn't just compared to the user's age, as it would be on a scatter plot chart.
Instead, you can also see how the gender of the user impacts time spent online.
This makes bubble charts useful for seeing the rise or fall of trends over time. It also lets you add another option when you're trying to understand relationships between different segments or categories.
For example, if you want to launch a new product, this chart could help you quickly see your new product's cost, risk, and value. This can help you focus your energies on a low-risk new product with a high potential return.
You can also use bubble charts for:
- Top sales by month and location.
- Customer satisfaction surveys.
- Store performance tracking.
- Marketing campaign reviews.
Design Best Practices for Bubble Charts
- Scale bubbles according to area, not diameter.
- Make sure labels are clear and visible.
- Use circular shapes only.
8. Waterfall Chart
I sometimes use a waterfall chart to show how an initial value changes with intermediate values — either positive or negative — and results in a final value.
Use this chart to reveal the composition of a number. An example of this would be to showcase how different departments influence overall company revenue and lead to a specific profit number.

The most common use case for a funnel chart is the marketing or sales funnel. But there are many other ways to use this versatile chart.
If you have at least four stages of sequential data, this chart can help you easily see what inputs or outputs impact the final results.
For example, a funnel chart can help you see how to improve your buyer journey or shopping cart workflow. This is because it can help pinpoint major drop-off points.
Other stellar options for these types of charts include:
- Deal pipelines.
- Conversion and retention analysis.
- Bottlenecks in manufacturing and other multi-step processes.
- Marketing campaign performance.
- Website conversion tracking.
Design Best Practices for Funnel Charts
- Scale the size of each section to accurately reflect the size of the data set.
- Use contrasting colors or one color in graduated hues, from darkest to lightest, as the size of the funnel decreases.
10. Heat Map
A heat map shows the relationship between two items and provides rating information, such as high to low or poor to excellent. This chart displays the rating information using varying colors or saturation.

Best Use Cases for Heat Maps
In the example above, the darker the shade of green shows where the majority of people agree.
With enough data, heat maps can make a viewpoint that might seem subjective more concrete. This makes it easier for a business to act on customer sentiment.
There are many uses for these types of charts. In fact, many tech companies use heat map tools to gauge user experience for apps, online tools, and website design .
Another common use for heat map charts is location assessment. If you're trying to find the right location for your new store, these maps can give you an idea of what the area is like in ways that a visit can't communicate.
Heat maps can also help with spotting patterns, so they're good for analyzing trends that change quickly, like ad conversions. They can also help with:
- Competitor research.
- Customer sentiment.
- Sales outreach.
- Campaign impact.
- Customer demographics.
Design Best Practices for Heat Map
- Use a basic and clear map outline to avoid distracting from the data.
- Use a single color in varying shades to show changes in data.
- Avoid using multiple patterns.
11. Gantt Chart
The Gantt chart is a horizontal chart that dates back to 1917. This chart maps the different tasks completed over a period of time.
Gantt charting is one of the most essential tools for project managers. It brings all the completed and uncompleted tasks into one place and tracks the progress of each.
While the left side of the chart displays all the tasks, the right side shows the progress and schedule for each of these tasks.
This chart type allows you to:
- Break projects into tasks.
- Track the start and end of the tasks.
- Set important events, meetings, and announcements.
- Assign tasks to the team and individuals.

I use donut charts for the same use cases as pie charts, but I tend to prefer the former because of the added benefit that the data is easier to read.
Another benefit to donut charts is that the empty center leaves room for extra layers of data, like in the examples above.
Design Best Practices for Donut Charts
Use varying colors to better differentiate the data being displayed, just make sure the colors are in the same palette so viewers aren't put off by clashing hues.
14. Sankey Diagram
A Sankey Diagram visually represents the flow of data between categories, with the link width reflecting the amount of flow. It’s a powerful tool for uncovering the stories hidden in your data.
As data grows more complex, charts must evolve to handle these intricate relationships. Sankey Diagrams excel at this task.

With ChartExpo , you can create a Sankey Chart with up to eight levels, offering multiple perspectives for analyzing your data. Even the most complicated data sets become manageable and easy to interpret.
You can customize your Sankey charts and every component including nodes, links, stats, text, colors, and more. ChartExpo is an add-in in Microsoft Excel, Google Sheets, and Power BI, you can create beautiful Sankey diagrams while keeping your data safe in your favorite tools.
Sankey diagrams can be used to visualize all types of data which contain a flow of information. It beautifully connects the flows and presents the data in an optimum way.
Here are a few use cases:
- Sankey diagrams are widely used to visualize energy production, consumption, and distribution. They help in tracking how energy flows from one source (like oil or gas) to various uses (heating, electricity, transportation).
- Businesses use Sankey diagrams to trace customer interactions across different channels and touchpoints. It highlights the flow of users through a funnel or process, revealing drop-off points and success paths.
- I n supply chain management, these diagrams show how resources, products, or information flow between suppliers, manufacturers, and retailers, identifying bottlenecks and inefficiencies.
Design Best Practices for Sankey Diagrams
When utilizing a Sankey diagram, it is essential to maintain simplicity while ensuring accuracy in proportions. Clear labeling and effective color usage are key factors to consider. Emphasizing the logical flow direction and highlighting significant flows will enhance the visualization.
How to Choose the Right Chart or Graph for Your Data
Channels like social media or blogs have multiple data sources, and managing these complex content assets can get overwhelming. What should you be tracking? What matters most?
How do you visualize and analyze the data so you can extract insights and actionable information?
1. Identify your goals for presenting the data.
Before creating any data-based graphics, I ask myself if I want to convince or clarify a point. Am I trying to visualize data that helped me solve a problem? Or am I trying to communicate a change that's happening?
A chart or graph can help compare different values, understand how different parts impact the whole, or analyze trends. Charts and graphs can also be useful for recognizing data that veers away from what you’re used to or help you see relationships between groups.
So, clarify your goals then use them to guide your chart selection.
2. Figure out what data you need to achieve your goal.
Different types of charts and graphs use different kinds of data. Graphs usually represent numerical data, while charts are visual representations of data that may or may not use numbers.
So, while all graphs are a type of chart, not all charts are graphs. If you don't already have the kind of data you need, you might need to spend some time putting your data together before building your chart.
3. Gather your data.
Most businesses collect numerical data regularly, but you may need to put in some extra time to collect the right data for your chart.
Besides quantitative data tools that measure traffic, revenue, and other user data, you might need some qualitative data.
These are some other ways you can gather data for your data visualization:
- Interviews
- Quizzes and surveys
- Customer reviews
- Reviewing customer documents and records
- Community boards
Fill out the form to get your templates.
4. select the right type of graph or chart..
Choosing the wrong visual aid or defaulting to the most common type of data visualization could confuse your viewer or lead to mistaken data interpretation.
But a chart is only useful to you and your business if it communicates your point clearly and effectively.
Ask yourself the questions below to help find the right chart or graph type.
Download the Excel templates mentioned in the video here.
5 Questions to Ask When Deciding Which Type of Chart to Use
1. do you want to compare values.
Charts and graphs are perfect for comparing one or many value sets, and they can easily show the low and high values in the data sets. To create a comparison chart, use these types of graphs:
- Scatter plot
2. Do you want to show the composition of something?
Use this type of chart to show how individual parts make up the whole of something, like the device type used for mobile visitors to your website or total sales broken down by sales rep.
To show composition, use these charts:
- Stacked bar
3. Do you want to understand the distribution of your data?
Distribution charts help you to understand outliers, the normal tendency, and the range of information in your values.
Use these charts to show distribution:
4. Are you interested in analyzing trends in your data set?
If you want more information about how a data set performed during a specific time, there are specific chart types that do extremely well.
You should choose one of the following:
- Dual-axis line
5. Do you want to better understand the relationship between value sets?
Relationship charts can show how one variable relates to one or many different variables. You could use this to show how something positively affects, has no effect, or negatively affects another variable.
When trying to establish the relationship between things, use these charts:
Featured Resource: The Marketer's Guide to Data Visualization

Don't forget to share this post!
Related articles.

9 Great Ways to Use Data in Content Creation

Data Visualization: Tips and Examples to Inspire You

17 Data Visualization Resources You Should Bookmark
![An Introduction to Data Visualization: How to Create Compelling Charts & Graphs [Ebook]](https://53.fs1.hubspotusercontent-na1.net/hubfs/53/data-visualization-guide.jpg "assignment design in chart")
An Introduction to Data Visualization: How to Create Compelling Charts & Graphs [Ebook]

Why Data Is The Real MVP: 7 Examples of Data-Driven Storytelling by Leading Brands
![How to Create an Infographic Using Poll & Survey Data [Infographic]](https://53.fs1.hubspotusercontent-na1.net/hubfs/53/00-Blog_Thinkstock_Images/Survey_Data_Infographic.jpg "assignment design in chart")
How to Create an Infographic Using Poll & Survey Data [Infographic]

Data Storytelling 101: Helpful Tools for Gathering Ideas, Designing Content & More
Tired of struggling with spreadsheets? These free Microsoft Excel Graph Generator Templates can help
Marketing software that helps you drive revenue, save time and resources, and measure and optimize your investments — all on one easy-to-use platform
Have a language expert improve your writing
Run a free plagiarism check in 10 minutes, generate accurate citations for free.
- Knowledge Base
Methodology
- What Is a Research Design | Types, Guide & Examples
What Is a Research Design | Types, Guide & Examples
Published on June 7, 2021 by Shona McCombes . Revised on November 20, 2023 by Pritha Bhandari.
A research design is a strategy for answering your research question using empirical data. Creating a research design means making decisions about:
- Your overall research objectives and approach
- Whether you’ll rely on primary research or secondary research
- Your sampling methods or criteria for selecting subjects
- Your data collection methods
- The procedures you’ll follow to collect data
- Your data analysis methods
A well-planned research design helps ensure that your methods match your research objectives and that you use the right kind of analysis for your data.
Table of contents
Step 1: consider your aims and approach, step 2: choose a type of research design, step 3: identify your population and sampling method, step 4: choose your data collection methods, step 5: plan your data collection procedures, step 6: decide on your data analysis strategies, other interesting articles, frequently asked questions about research design.
- Introduction
Before you can start designing your research, you should already have a clear idea of the research question you want to investigate.
There are many different ways you could go about answering this question. Your research design choices should be driven by your aims and priorities—start by thinking carefully about what you want to achieve.
The first choice you need to make is whether you’ll take a qualitative or quantitative approach.
| Qualitative approach | Quantitative approach |
|---|---|
| and describe frequencies, averages, and correlations about relationships between variables |
Qualitative research designs tend to be more flexible and inductive , allowing you to adjust your approach based on what you find throughout the research process.
Quantitative research designs tend to be more fixed and deductive , with variables and hypotheses clearly defined in advance of data collection.
It’s also possible to use a mixed-methods design that integrates aspects of both approaches. By combining qualitative and quantitative insights, you can gain a more complete picture of the problem you’re studying and strengthen the credibility of your conclusions.
Practical and ethical considerations when designing research
As well as scientific considerations, you need to think practically when designing your research. If your research involves people or animals, you also need to consider research ethics .
- How much time do you have to collect data and write up the research?
- Will you be able to gain access to the data you need (e.g., by travelling to a specific location or contacting specific people)?
- Do you have the necessary research skills (e.g., statistical analysis or interview techniques)?
- Will you need ethical approval ?
At each stage of the research design process, make sure that your choices are practically feasible.
Here's why students love Scribbr's proofreading services
Discover proofreading & editing
Within both qualitative and quantitative approaches, there are several types of research design to choose from. Each type provides a framework for the overall shape of your research.
Types of quantitative research designs
Quantitative designs can be split into four main types.
- Experimental and quasi-experimental designs allow you to test cause-and-effect relationships
- Descriptive and correlational designs allow you to measure variables and describe relationships between them.
| Type of design | Purpose and characteristics |
|---|---|
| Experimental | relationships effect on a |
| Quasi-experimental | ) |
| Correlational | |
| Descriptive |
With descriptive and correlational designs, you can get a clear picture of characteristics, trends and relationships as they exist in the real world. However, you can’t draw conclusions about cause and effect (because correlation doesn’t imply causation ).
Experiments are the strongest way to test cause-and-effect relationships without the risk of other variables influencing the results. However, their controlled conditions may not always reflect how things work in the real world. They’re often also more difficult and expensive to implement.
Types of qualitative research designs
Qualitative designs are less strictly defined. This approach is about gaining a rich, detailed understanding of a specific context or phenomenon, and you can often be more creative and flexible in designing your research.
The table below shows some common types of qualitative design. They often have similar approaches in terms of data collection, but focus on different aspects when analyzing the data.
| Type of design | Purpose and characteristics |
|---|---|
| Grounded theory | |
| Phenomenology |
Your research design should clearly define who or what your research will focus on, and how you’ll go about choosing your participants or subjects.
In research, a population is the entire group that you want to draw conclusions about, while a sample is the smaller group of individuals you’ll actually collect data from.
Defining the population
A population can be made up of anything you want to study—plants, animals, organizations, texts, countries, etc. In the social sciences, it most often refers to a group of people.
For example, will you focus on people from a specific demographic, region or background? Are you interested in people with a certain job or medical condition, or users of a particular product?
The more precisely you define your population, the easier it will be to gather a representative sample.
- Sampling methods
Even with a narrowly defined population, it’s rarely possible to collect data from every individual. Instead, you’ll collect data from a sample.
To select a sample, there are two main approaches: probability sampling and non-probability sampling . The sampling method you use affects how confidently you can generalize your results to the population as a whole.
| Probability sampling | Non-probability sampling |
|---|---|
Probability sampling is the most statistically valid option, but it’s often difficult to achieve unless you’re dealing with a very small and accessible population.
For practical reasons, many studies use non-probability sampling, but it’s important to be aware of the limitations and carefully consider potential biases. You should always make an effort to gather a sample that’s as representative as possible of the population.
Case selection in qualitative research
In some types of qualitative designs, sampling may not be relevant.
For example, in an ethnography or a case study , your aim is to deeply understand a specific context, not to generalize to a population. Instead of sampling, you may simply aim to collect as much data as possible about the context you are studying.
In these types of design, you still have to carefully consider your choice of case or community. You should have a clear rationale for why this particular case is suitable for answering your research question .
For example, you might choose a case study that reveals an unusual or neglected aspect of your research problem, or you might choose several very similar or very different cases in order to compare them.
Data collection methods are ways of directly measuring variables and gathering information. They allow you to gain first-hand knowledge and original insights into your research problem.
You can choose just one data collection method, or use several methods in the same study.
Survey methods
Surveys allow you to collect data about opinions, behaviors, experiences, and characteristics by asking people directly. There are two main survey methods to choose from: questionnaires and interviews .
| Questionnaires | Interviews |
|---|---|
| ) |
Observation methods
Observational studies allow you to collect data unobtrusively, observing characteristics, behaviors or social interactions without relying on self-reporting.
Observations may be conducted in real time, taking notes as you observe, or you might make audiovisual recordings for later analysis. They can be qualitative or quantitative.
| Quantitative observation | |
|---|---|
Other methods of data collection
There are many other ways you might collect data depending on your field and topic.
| Field | Examples of data collection methods |
|---|---|
| Media & communication | Collecting a sample of texts (e.g., speeches, articles, or social media posts) for data on cultural norms and narratives |
| Psychology | Using technologies like neuroimaging, eye-tracking, or computer-based tasks to collect data on things like attention, emotional response, or reaction time |
| Education | Using tests or assignments to collect data on knowledge and skills |
| Physical sciences | Using scientific instruments to collect data on things like weight, blood pressure, or chemical composition |
If you’re not sure which methods will work best for your research design, try reading some papers in your field to see what kinds of data collection methods they used.
Secondary data
If you don’t have the time or resources to collect data from the population you’re interested in, you can also choose to use secondary data that other researchers already collected—for example, datasets from government surveys or previous studies on your topic.
With this raw data, you can do your own analysis to answer new research questions that weren’t addressed by the original study.
Using secondary data can expand the scope of your research, as you may be able to access much larger and more varied samples than you could collect yourself.
However, it also means you don’t have any control over which variables to measure or how to measure them, so the conclusions you can draw may be limited.
Receive feedback on language, structure, and formatting
Professional editors proofread and edit your paper by focusing on:
- Academic style
- Vague sentences
- Style consistency
See an example

As well as deciding on your methods, you need to plan exactly how you’ll use these methods to collect data that’s consistent, accurate, and unbiased.
Planning systematic procedures is especially important in quantitative research, where you need to precisely define your variables and ensure your measurements are high in reliability and validity.
Operationalization
Some variables, like height or age, are easily measured. But often you’ll be dealing with more abstract concepts, like satisfaction, anxiety, or competence. Operationalization means turning these fuzzy ideas into measurable indicators.
If you’re using observations , which events or actions will you count?
If you’re using surveys , which questions will you ask and what range of responses will be offered?
You may also choose to use or adapt existing materials designed to measure the concept you’re interested in—for example, questionnaires or inventories whose reliability and validity has already been established.
Reliability and validity
Reliability means your results can be consistently reproduced, while validity means that you’re actually measuring the concept you’re interested in.
| Reliability | Validity |
|---|---|
| ) ) |
For valid and reliable results, your measurement materials should be thoroughly researched and carefully designed. Plan your procedures to make sure you carry out the same steps in the same way for each participant.
If you’re developing a new questionnaire or other instrument to measure a specific concept, running a pilot study allows you to check its validity and reliability in advance.
Sampling procedures
As well as choosing an appropriate sampling method , you need a concrete plan for how you’ll actually contact and recruit your selected sample.
That means making decisions about things like:
- How many participants do you need for an adequate sample size?
- What inclusion and exclusion criteria will you use to identify eligible participants?
- How will you contact your sample—by mail, online, by phone, or in person?
If you’re using a probability sampling method , it’s important that everyone who is randomly selected actually participates in the study. How will you ensure a high response rate?
If you’re using a non-probability method , how will you avoid research bias and ensure a representative sample?
Data management
It’s also important to create a data management plan for organizing and storing your data.
Will you need to transcribe interviews or perform data entry for observations? You should anonymize and safeguard any sensitive data, and make sure it’s backed up regularly.
Keeping your data well-organized will save time when it comes to analyzing it. It can also help other researchers validate and add to your findings (high replicability ).
On its own, raw data can’t answer your research question. The last step of designing your research is planning how you’ll analyze the data.
Quantitative data analysis
In quantitative research, you’ll most likely use some form of statistical analysis . With statistics, you can summarize your sample data, make estimates, and test hypotheses.
Using descriptive statistics , you can summarize your sample data in terms of:
- The distribution of the data (e.g., the frequency of each score on a test)
- The central tendency of the data (e.g., the mean to describe the average score)
- The variability of the data (e.g., the standard deviation to describe how spread out the scores are)
The specific calculations you can do depend on the level of measurement of your variables.
Using inferential statistics , you can:
- Make estimates about the population based on your sample data.
- Test hypotheses about a relationship between variables.
Regression and correlation tests look for associations between two or more variables, while comparison tests (such as t tests and ANOVAs ) look for differences in the outcomes of different groups.
Your choice of statistical test depends on various aspects of your research design, including the types of variables you’re dealing with and the distribution of your data.
Qualitative data analysis
In qualitative research, your data will usually be very dense with information and ideas. Instead of summing it up in numbers, you’ll need to comb through the data in detail, interpret its meanings, identify patterns, and extract the parts that are most relevant to your research question.
Two of the most common approaches to doing this are thematic analysis and discourse analysis .
| Approach | Characteristics |
|---|---|
| Thematic analysis | |
| Discourse analysis |
There are many other ways of analyzing qualitative data depending on the aims of your research. To get a sense of potential approaches, try reading some qualitative research papers in your field.
If you want to know more about the research process , methodology , research bias , or statistics , make sure to check out some of our other articles with explanations and examples.
- Simple random sampling
- Stratified sampling
- Cluster sampling
- Likert scales
- Reproducibility
Statistics
- Null hypothesis
- Statistical power
- Probability distribution
- Effect size
- Poisson distribution
Research bias
- Optimism bias
- Cognitive bias
- Implicit bias
- Hawthorne effect
- Anchoring bias
- Explicit bias
A research design is a strategy for answering your research question . It defines your overall approach and determines how you will collect and analyze data.
A well-planned research design helps ensure that your methods match your research aims, that you collect high-quality data, and that you use the right kind of analysis to answer your questions, utilizing credible sources . This allows you to draw valid , trustworthy conclusions.
Quantitative research designs can be divided into two main categories:
- Correlational and descriptive designs are used to investigate characteristics, averages, trends, and associations between variables.
- Experimental and quasi-experimental designs are used to test causal relationships .
Qualitative research designs tend to be more flexible. Common types of qualitative design include case study , ethnography , and grounded theory designs.
The priorities of a research design can vary depending on the field, but you usually have to specify:
- Your research questions and/or hypotheses
- Your overall approach (e.g., qualitative or quantitative )
- The type of design you’re using (e.g., a survey , experiment , or case study )
- Your data collection methods (e.g., questionnaires , observations)
- Your data collection procedures (e.g., operationalization , timing and data management)
- Your data analysis methods (e.g., statistical tests or thematic analysis )
A sample is a subset of individuals from a larger population . Sampling means selecting the group that you will actually collect data from in your research. For example, if you are researching the opinions of students in your university, you could survey a sample of 100 students.
In statistics, sampling allows you to test a hypothesis about the characteristics of a population.
Operationalization means turning abstract conceptual ideas into measurable observations.
For example, the concept of social anxiety isn’t directly observable, but it can be operationally defined in terms of self-rating scores, behavioral avoidance of crowded places, or physical anxiety symptoms in social situations.
Before collecting data , it’s important to consider how you will operationalize the variables that you want to measure.
A research project is an academic, scientific, or professional undertaking to answer a research question . Research projects can take many forms, such as qualitative or quantitative , descriptive , longitudinal , experimental , or correlational . What kind of research approach you choose will depend on your topic.
Cite this Scribbr article
If you want to cite this source, you can copy and paste the citation or click the “Cite this Scribbr article” button to automatically add the citation to our free Citation Generator.
McCombes, S. (2023, November 20). What Is a Research Design | Types, Guide & Examples. Scribbr. Retrieved September 2, 2024, from https://www.scribbr.com/methodology/research-design/
Is this article helpful?

Shona McCombes
Other students also liked, guide to experimental design | overview, steps, & examples, how to write a research proposal | examples & templates, ethical considerations in research | types & examples, "i thought ai proofreading was useless but..".
I've been using Scribbr for years now and I know it's a service that won't disappoint. It does a good job spotting mistakes”
Flowchart Maker and Online Diagram Software
draw.io is free online diagram software. You can use it as a flowchart maker, network diagram software, to create UML online, as an ER diagram tool, to design database schema, to build BPMN online, as a circuit diagram maker, and more. draw.io can import .vsdx, Gliffy™ and Lucidchart™ files .
Please ensure JavaScript is enabled.
- Product overview
- All features
- Latest feature release
- App integrations
CAPABILITIES
- project icon Project management
- Project views
- Custom fields
- Status updates
- goal icon Goals and reporting
- Reporting dashboards
- workflow icon Workflows and automation
- portfolio icon Resource management
- Capacity planning
- Time tracking
- my-task icon Admin and security
- Admin console
- asana-intelligence icon Asana AI
- list icon Personal
- premium icon Starter
- briefcase icon Advanced
- Goal management
- Organizational planning
- Campaign management
- Creative production
- Content calendars
- Marketing strategic planning
- Resource planning
- Project intake
- Product launches
- Employee onboarding
- View all uses arrow-right icon
- Project plans
- Team goals & objectives
- Team continuity
- Meeting agenda
- View all templates arrow-right icon
- Work management resources Discover best practices, watch webinars, get insights
- Customer stories See how the world's best organizations drive work innovation with Asana
- Help Center Get lots of tips, tricks, and advice to get the most from Asana
- Asana Academy Sign up for interactive courses and webinars to learn Asana
- Developers Learn more about building apps on the Asana platform
- Community programs Connect with and learn from Asana customers around the world
- Events Find out about upcoming events near you
- Partners Learn more about our partner programs
- Asana for nonprofits Get more information on our nonprofit discount program, and apply.
Featured Reads

- Business strategy |
- How to create an organizational chart ( ...
How to create an organizational chart (with free examples)
An organizational chart outlines how your company functions in real time. This diagram shows the reporting relationships between job titles and the roles in your organization. We’ll explain the different types of organizational charts and provide free templates for you to customize your own.
You’re having a family dinner when your grandma pulls out the family tree. She uncrinkles the piece of paper and traces her name down the line. As she searches, her finger lands on a name. “See! There he is, right next to your cousin Charles!” She points to the name of your third cousin, proving that this name matches that of a famous poet.
In this guide, we’ll explain how to make an org chart, the different types of organizational charts, and provide free templates so you can customize and build your own.
How to make an organizational chart
An organizational chart is a way to visualize your company’s structure. To create an org chart, you’ll need to gather team member information and decide how you’d like to build the chart.
As you consider the reporting relationships in your organization, you can plan your chart from top to bottom.

1. Define scope
You can treat your organizational chart like any other new project you work on. Defining the scope of your org chart can help ensure it clearly represents your team structure . The scope will determine the overall purpose of your organizational chart.
Consider these questions to get started:
Will your org chart act as a resource for team members to know who’s who within the company?
Will you share your organizational chart with external stakeholders or partners?
Will you need multiple charts for different levels of the company?
Asking these questions from the start can help you gather the right information and map out your chart.
2. Gather information
Gathering information is the most important step of making an organizational chart because without the right information, you won’t be able to proceed. You can gather information by surveying individual team members through email or working with your HR department.
You’ll need up-to-date information about the people in your company, including employee names and their latest job titles. You’ll also need to understand reporting relationships throughout your company, such as the hierarchy between managers and direct reports. Consider gathering headshots of your team for added personalization.
3. Decide how to build your chart
Deciding how to build your organizational chart is crucial because different tools can make the process easier. Drawing out your org chart by hand isn’t time efficient and will make your results hard to share, so consider harnessing the power of a tool for this process.
Using an editable PDF can save you time because the template is pre-built with placeholders. You can then easily share the PDF with the rest of your company.
4. Plan for updates
After creating your org chart, use a team calendar to plan for regular updates. After all, it’s likely that your company structure and team dynamics will change often.
People switch in and out of positions, new employees are hired, and reporting relationships change. With a digital org chart, it’s easy to update the structure and redistribute it to team members.
Organizational chart templates
Creating an organizational chart can be easier when building from an org chart template. Most companies follow similar structures, whether it’s a top-down structure or a matrix structure.
You can use the org chart examples below as jumping-off points. To create your custom org chart, determine which organizational type best represents your company structure. Then, update the template to fit your unique team needs.
Types of organizational charts
There are four common org chart types. Each one of these charts uses a different chart design and represents a different way that a company might function. Since an organizational chart is basically a hierarchy chart—a visual translation of your company’s internal structure—the chart type you use should mirror your organization’s reporting relationships and decision-making procedures.

1. Functional top-down
A functional top-down org chart is the most common structure, with the company functioning as a hierarchy. At the top of this organizational structure there is one team member, who usually has the title of president or CEO.
Branching off from that team member are the leaders who are next in charge, like the company vice presidents. The organizational hierarchy extends further into departments and eventually branches into teams.
2. Matrix organizational chart
The matrix organization is a more complex structure than the traditional top-down design. If your company uses this reporting structure, team members report to multiple managers.
While employees likely have a primary manager they report to for their department, they may also report to a project manager . These secondary project managers also have department managers they report to, which makes the matrix org chart look rectangular instead of tree-like.
3. Divisional structure
A divisional organizational structure is a high-level version of the traditional hierarchical structure. Divisional structures make sense for companies that have departments working independently from one another.
For example, companies with separate product lines may work in divisional structures because each product line has separate IT, marketing, and sales departments.
4. Flat organizational chart
The flat organizational chart is unique because it shows few or no levels of management. This type of organizational structure may be present in a small business or a modern business that’s experimenting with no chain of command.
With this type of organizational structure, the company promotes wide-spread team member self-management and decision-making.
How to use an org chart
You can benefit your company by using an organizational structure because it provides a visual representation of different departments and job titles in action. This chart can help team members understand how to collaborate with one another and feel confident in their role and responsibilities.
Visualize reporting relationships
As a manager, you may use an org chart to show work responsibilities and reporting relationships to new team members. When onboarding new hires, the org chart helps team members get to know their fellow teammates and what they do. It also helps new team members remember who’s who within the company.
Manage growth and change
Organizational charts can also help the leadership team stay organized and manage growth or change within the company. For example, if a department head notices that one team has become larger than other teams, they can shift or hire new team members to create balance.
See where everyone fits
An org chart creates clarity by showing everyone in the company where they fit in the organizational structure. If a new member joins the team, they can glance at the organizational chart and understand that they have five other members on their team, two assistants below them, and a project manager above them. They can also see that their project manager reports to a department manager.
Improve communication
Having an established organizational structure for your company can improve communication because it makes reporting relationships clear. Without an organizational chart in place, team members may not know who to go to when they have questions. The org chart makes it clear who leads what, so team members can feel empowered to ask questions and collaborate with others.
Create visual directory
An org chart is essentially a visual directory of your organization. You can update the chart when team members get promoted or when they leave. Keeping a visual directory up to date keeps everyone informed of who’s working at the company and what their current position is.
Limitations of using an org chart
While organizational charts can increase communication among teams, there are limitations of using them. Knowing these limitations can help you find solutions to any potential issues before they occur.
Can get outdated quickly
Org charts can get outdated quickly as companies restructure and shift team roles. Team members must be mindful and keep the org chart updated with current company structure and staff names.
Solution: Assign someone to regularly update and redistribute your organizational chart in order to maintain this valuable resource.
Only shows formal relationships
The organizational chart is a one-dimensional document, so it doesn’t offer much explanation beyond the reporting structure it provides. While it’s useful in visualizing the basic company structure, it only shows formal relationships. Many companies function and thrive on various informal reporting relationships that wouldn’t show up on a traditional org chart.
Solution: Use an org chart as a jumping off point, but keep in mind there may be other working relationships that the org chart doesn’t capture.
Doesn’t display management style
While the org chart shows managers and the team members that report to them, it won’t show what each manager is like. For example, the org chart may show that one manager has two team members and another manager has five team members. Assumptions may be made that the manager with more team members is a stronger leader, but the org chart won’t show that the manager with less team members has a more hands-on management style .
Solution: Use your org chart as a first point of reference, but be mindful that face to face contact is the best way to understand reporting relationships among internal teams.
Can be difficult to update
Not only can printable org chart worksheets or drawn-out organization charts become outdated quickly, they can also be difficult to update. After all, if your chart is created in a static tool, you’ll have to start from scratch every time your organization’s structure changes.
Solution: Instead of creating your chart in a fixed workspace, opt for a dynamic tool. Platforms like Microsoft Word, PowerPoint, and Excel are easily updated. Or, take it one step further with org chart software or a project management tool that uses integrations and apps to connect your team to data visualizers that map out workflows, like LucidChart and Miro .
Streamline your organizational structure with a chart
While there are limitations to organizational charts, these charts offer a helpful way to understand your company structure. It can also improve communication with upper management by clarifying roles and responsibilities. To build an organizational chart for your company, use our free editable PDFs and customize them as you see fit.
Need help streamlining teamwork? Find out how Asana helps teams communicate effectively.
Related resources

15 creative elevator pitch examples for every scenario

How Asana streamlines strategic planning with work management

How to create a CRM strategy: 6 steps (with examples)

What is management by objectives (MBO)?
- << Back to home
Assignment 1: Visualization Design
In this assignment, you will design a visualization for a small data set and provide a rigorous rationale for your design choices. You should in theory be ready to explain the contribution of every pixel in the display. You are free to use any graphics or charting tool you please - including drafting it by hand. (See Resources for a list of possible visualization tools.)
Data Set: Monthly Hours of Sunshine in Major U.S. Cities
The climate of a place can have a tremendous impact on people's lived experience, ranging from personal moods to how an entire region defines itself. Here, you will examine a set of average monthly climate measurements for six major U.S. cities, roughly covering the edges of the continental United States.
For more information about the dataset, including download links for CSV and JSON formats, see https://observablehq.com/@uwdata/hours-of-sunshine .
Your task is to design a static (i.e., single image) visualization that you believe effectively communicates the data and provide a short write-up (no more than 4 paragraphs) describing your design rationale. Start by choosing a question you'd like to answer. Design your visualization to answer that question, and use the question as the title of your graphic.
While you must use the data set given, note that you are free to transform the data as you see fit. Such transforms may include (but are not limited to) log transformation, computing percentages or averages, grouping elements into new categories, or removing unnecessary variables or records. You may also incorporate external data. Your chart image should be interpretable as a stand-alone graphic, without recourse to your short write-up. Do not forget to include an appropriate subtitle, axis labels, or legends as needed!
As different visualizations can emphasize different aspects of a data set, your write-up should document what aspects of the data you are attempting to most effectively communicate. In short, what story are you trying to tell? Just as important, your write-up should also note which aspects of the data might be obscured due to your visualization design.
In your write-up, you should provide a rigorous rationale for your design decisions. Document the visual encodings you used and why they are appropriate for the data and your specific question. These decisions include the choice of visualization type, size, color, scale, and other visual elements, as well as the use of sorting or other data transformations. How do these decisions facilitate effective communication and help to answer your proposed question?
The assignment score is out of a maximum of 10 points. Historically, the median score on this assignment has been 8.5, which corresponds to an A-. We will determine scores by judging both the soundness of your visualization design and the quality of the write-up. We will also look for consideration of audience, message, and intended task (e.g., what question you are trying to answer). Here are examples of aspects that may lead to point deductions:
We will reward entries that go above and beyond the assignment requirements to produce effective graphics. Examples may include outstanding visual design, meaningful incorporation of external data to reveal important trends, demonstrating exceptional creativity, or effective annotations and other narrative devices.
Submission Details
This is an individual assignment. You may not work in groups. Your completed assignment is due on Mon 1/11, by 11:59pm on Canvas . We will be discussing submissions in class this week, so be sure to avoid a late submission .
You must submit your assignment using Canvas . Please upload a single zip file named using the pattern "uwnetid_a1.zip" (replacing "uwnetid" with your UW network login - this is the same as your @uw email address, not a numeric id number). The zip archive should contain two files: a plain text file named "readme.txt" and a PNG or JPG image file of your visualization design named "uwnetid_a1.png" or "uwnetid_a1.jpg".
Please use the correct file extension for your image (either .png or .jpg) and be sure your image is sized for a reasonable viewing experience. Viewers should not have to zoom or scroll in order to effectively view your submission!
The readme.txt file should contain your write-up, as described above. Please be sure to include your name and UW net id in your readme.
If you are on the waiting list for the class do not have access to the Canvas site, please email your submission to us at [email protected] .

Teaching with ChatGPT: Assignment Design Tips & Ideas
Generative AI offers opportunities for learning, but instructors should guide students on using it safely, ethically, and within the parameters set by course policy. Continue to uphold assignment and assessment design that reinforces good teaching and learning practices. Use AI for teaching where appropriate and when it adds value.
Oregon State University’s “ Bloom’s Taxonomy Revisited ” provides a framework for assignment and assessment design in the age of AI.
Assignment Strategies with Generative AI in mind
- Use authentic assessment, formative assessment, assessment add-ons like problem-solving logs, exam wrappers, minute papers, “muddiest point” questions. Learn more: Assignments & Assessments
- Engage diverse media. Replace an essay or short-answer writing assignment with one that requires students to submit an audio file, podcast, video, speech, drawing, diagram, or multimedia project.
- Create connections to real-world experience that AI will not have. Connect assignments to very recent events or new conversations in the field; to issues specific to the local community; or to discussions that took place in your own classroom. Alternatively, ask your students to find a connection between course concepts/topics and their personal experience or knowledge.
- For example: instead of the traditional essay, which may now be easy to cheat through, assign a multimedia project accompanied by a brief self-reflective essay.
- Assign social annotation . For short reading responses, instead of using open-ended questions in Canvas, try social annotation tools that require students to engage with a text along with their classmates. Try Hypothes.is or Perusall , both of which are supported by the University.
- Set clear course AI policies and expectations for assignments.
- Teach your students to cite generative AI correctly.
- Teach your students to use generative AI safely. ChatGPT acknowledges that they may share account holders’ personal information with third parties, including vendors and service providers — see their Privacy Policy . Teach your students to never share personal and sensitive information with generative AI chatbots.
- Model how to use generative AI as a personalized tutor .
- Idea 1: Critical evaluation of AI outputs. Ask your students to 1. generate a ChatGPT response to a question of their own choosing, related to the field, 2. examine that response, and 3. write a short analytical essay about ChatGPT’s response’s strengths and weaknesses. *In this basic form, this exercise can be a great critical thinking exercise. It can also be tailored to other specific learning goals. For example, if you are looking to teach assessment and evaluative skills, you can ask your students to also come up with a set of assessment criteria, as opposed to the free-form discussion of the strengths and weaknesses.
- Idea 2: Applying concepts to analyze data. Ask your students to: 1. pick a concept related to the field. 2. ask ChatGPT to describe three applications of that concept. 3. rank those applications from most successful to least successful. 4. Explain your thought process behind the rankings. *This can be a written homework assignment or a classroom discussion activity.
- Idea 3: Identifying and understanding generative AI. Give your students two short human-written pieces or reading responses on a topic related to the field, and one AI-written piece on the same topic. The human-written pieces can be anything — student works, excerpts from publications, or any relevant online materials. Do not tell your students which one of the three pieces is AI-generated. Ask them to examine all three written pieces and 1. identify the AI-generated piece, 2. reflect on their thought-process: how difficult (or how easy) was it for them to identify the AI generated piece? what made them think it is AI-generated? in what ways does it stand out? *This exercise can also can be done as a discussion activity in the classroom or as a written assignment. Whichever format you choose, make sure that the essays are short enough and manageable to read in that specific format.
- OFE collection of sample assignments using AI (Google Doc, requires a Montclair account). If you have an assignment that uses AI to help student learning, we invite you to share it with colleagues at Montclair. To have your assignment added to our collection, request editing access to this Google doc, or simply email a copy of that assignment to Vera at [email protected].
- University of North Dakota’s AI Assignment Library of peer-reviewed assignment ideas
- For example: Instead of one large submission due on May 5th, try assigning a project outline due April 1st, notes on research articles due Apr 15, first draft due Apr 25, and final draft due May 5th.
- Review your grading criteria and rubrics to make sure you’re setting your students up to adopt strong learning strategies. See Grading for Learning under Plan for Grading .
- For example: Have students write responses in class. If students have 20 minutes to write brief responses to the kinds of questions you might have provided as homework, they will learn a great deal, and as a bonus, your subsequent class discussion will benefit from that engaged individual work.
- Have students respond orally, requiring each student to respond to a different question.
- Have students work in small groups in class to present on topics in class.
- Incorporate brief in-class quizzes, tests and other assessments. The key is to make these short, frequent, and possibly even unannounced. They serve assessment purposes, reward attendance, and provide useful immediate feedback about learning. Small point values for individual assessments allow poor performance to be informative to students rather than disastrous.
- Engage visuals: ask students to respond to images or videos in their assignment. Be sure to include alt-text for accessibility.
- For example: “Refer to two of the theorists discussed in class.”
- Try requiring handwritten responses where scope permits. Students will groan, and you may too as you attempt to read student handwriting again, but not only will this deter the use of ChatGPT, but some research shows that we actually remember better when we write by hand. Varying the way we engage with thinking has value as it plays to different students’ preferences, and stretches all of us to try new ways to help us focus on the task of thinking.
- Employ Simple Active Learning Strategies : In-class and in homework, active learning assignments inspire learning.
- Collaborative Learning : Sometimes called team or group learning, collaborative learning can be designed to accelerate learning.
Montclair’s Digital Accessibility Initiative , ITDS , and DRC offer a variety of resources for faculty to create accessible materials for students. Following Universal Design for Learning principles benefits all students.
Generative AI tools that enhance functions such as text to speech, speech to text, text to image, voiceovers, image descriptions, and PDF paraphrasing can potentially increase the accessibility of assignments and classroom materials for students with disabilities.
- McDermott, B. (2024). AI as an Accessibility Tool: Using Generative AI to Support Universal Design for Learning Approach. In S. Mahmud (Ed.), Academic Integrity in the Age of Artificial Intelligence (pp. 162-174). IGI Global. https://doi.org/10.4018/979-8-3693-0240-8.ch009
- TriCollege Libraries (Bryn Mawr, Haverford, Swarthmore)’s “ Generative AI in Higher Education ”. Page has sub-sections on AI assistive technologies and accessibility.
- University of Cincinnati Libraries’ “ AI Tools for Accessibility “
Last Modified: Monday, July 8, 2024 4:46 pm
Third-party content is not covered under the Creative Commons license and may be subject to additional intellectual property notices, information, or restrictions. You are solely responsible for obtaining permission to use third-party content or determining whether your use is fair use and for responding to any claims that may arise.
Creative Commons CC BY-NC-4.0
IMAGES
VIDEO
COMMENTS
04. Create graphs and charts people want to look at. Graphs and charts tend to draw someone's eye. If you see a page full of text, or a presentation full of bullet points, these picture representations of your work tend to be where people look first. Sometimes, they even set the tone for what someone is about to read.
Assignment design principles and strategies: Backwards design, alignment, scaffolding, feedback, and transparency. Applying a principle or strategy to improve an assignment. Developing and using rubrics. Helping students with assignments. Joining an assignment design community: Assignments Across Disciplines.
Exercise 1: Improve an assignment. Brainstorm in your breakout group choose one or more way to improve the assignment: Identify the hidden skills or knowledge explicit by creating learning outcomes or objectives. Devise an activity that gives students practice with required skills. Clarify the instructions.
This site, from the University of New Hampshire's Center for Excellence in Teaching and Learning, provides a brief overview of effective assignment design, with a focus on determining and communicating goals and expectations. Gardner, T. (2005, June 12).
Templates for college and university assignments. Include customizable templates in your college toolbox. Stay focused on your studies and leave the assignment structuring to tried and true layout templates for all kinds of papers, reports, and more. Category. Color. Create from scratch. Show all.
Align writing activities and assignments clearly with learning objectives; The goal of Transparent Assignment Design is to "to make learning processes explicit and equally accessible for all students" (Winkelmes et al., 2019, p. 1). Make clear the purpose, task, and criteria for success. For more information visit TILT (Transparency in ...
Design assignments that are interesting and challenging. This is the fun side of assignment design. Consider how to focus students' thinking in ways that are creative, challenging, and motivating. Think beyond the conventional assignment type! For example, one American historian requires students to write diary entries for a hypothetical ...
Chart design templates for print, presentations, and more. Plot a course for interesting and inventive new ways to share your data—find customizable chart design templates that'll take your visuals up a level. Whether you use charts in research, in presentations, or to keep track of personal projects, there's a chart template that'll help you ...
Assignment Design. There's a fine line between assignment design and assessment strategies. In short, designing good assignments is one means of assessing your students' learning on a larger scale. Assignments help measure student learning in your course. Effective assignment design in your course involves aligning your assignments with ...
Most assignment charts will include a 'Week of:' section and are generally formatted to cover the span of a week. Place this section somewhere toward the top of the chart. You can type 'Week of ...
Teaching Commons > Teaching Guides > Assignment Design > Aligning with Learning Goals. Aligning Assignments with Learning Goals When we're clear about our goals for student learning, we can then choose assignments that ask students to do work that will likely result in their achievement of those goals. Provided below is a range of assignments ...
Choose from 20+ chart types & hundreds of templates. Easily create your customized charts & diagrams with Canva's free online graph maker. Choose from 20+ chart types & hundreds of templates ... When it came to design reports, Canva had a wide variety of simple easy to use templates that allowed me to easily plug in my graphs and information ...
Consider using this checklist as a tool to trouble-shoot your assignment design and identify possible areas to refine. Other considerations may be required for your specific assignment, but this will give you a great start, no matter what type of assignment you plan to give. Stage one: Planning. When planning the assignment, decide how it can.
Assignment Design Checklist. Use this very simple checklist to assess your assignment design. Purpose: What is the assignment asking students to do? Does what the assignment asks match the author's purposes (given the nature of the class, etc.)? Is there a discernible central question or task? Clarity:
Rubric Best Practices, Examples, and Templates. A rubric is a scoring tool that identifies the different criteria relevant to an assignment, assessment, or learning outcome and states the possible levels of achievement in a specific, clear, and objective way. Use rubrics to assess project-based student work including essays, group projects ...
In the study, teachers agreed to: discuss assignments' learning goals and design rationale before students begin each assignment. Here are some examples of how they said they did it: • Chart out the skills students will practice in each assignment • Begin each assignment by defining the learning benefits to students: skills practiced,
Design Best Practices for Area Charts. Use transparent colors so information isn't obscured in the background. Don't display more than four categories to avoid clutter. Organize highly variable data at the top of the chart to make it easy to read. 3. Stacked Bar Chart.
A research design is a strategy for answering your research question using empirical data. Creating a research design means making decisions about: Your overall research objectives and approach. Whether you'll rely on primary research or secondary research. Your sampling methods or criteria for selecting subjects. Your data collection methods.
draw.io is free online diagram software. You can use it as a flowchart maker, network diagram software, to create UML online, as an ER diagram tool, to design database schema, to build BPMN online, as a circuit diagram maker, and more. draw.io can import .vsdx, Gliffy™ and Lucidchart™ files .
To create an org chart, you'll need to gather team member information and decide how you'd like to build the chart. As you consider the reporting relationships in your organization, you can plan your chart from top to bottom. 1. Define scope. You can treat your organizational chart like any other new project you work on.
Missing chart title, axis labels, or data transformation description. Missing or incomplete design rationale in write-up. Ineffective encodings for your stated goal (e.g., distracting colors, improper data transformation). We will reward entries that go above and beyond the assignment requirements to produce effective graphics.
Generative AI offers opportunities for learning, but instructors should guide students on using it safely, ethically, and within the parameters set by course policy. Continue to uphold assignment and assessment design that reinforces good teaching and learning practices. Use AI for teaching where appropriate and when it adds value. Oregon State University's "Bloom's Taxonomy Revisited
A Gantt chart is a type of chart that represents your project and plots tasks across a timeline. It's one of the most commonly used project management tools. The typical Gantt chart format lists tasks vertically down on the left, while a timeline runs horizontally across the top of the chart. Horizontal bars, or Gantt bars, represent each ...
Nebraska coach Matt Rhule said he expects offensive coordinator Marcus Satterfield and receivers coach Garret McGuire to work from the coaching press box in Saturday's game, while senior assistant Jamar Mozee remains on the field with the receivers.