You are using an outdated browser. Please upgrade your browser to improve your experience.

How to get your Mac to read text out loud to you

Last updated 2 years ago
While monitors are the primary way for people to get information from their Mac, not everyone has that luxury. For those who are visually impaired, they cannot rely on what is shown on the screen as a source of information, and so require alternative methods.
Apple has a solution to this, buried in its Accessibility settings, titled Spoken Content. The feature effectively allows you to set macOS to use Siri to read out text that appears onscreen.
While intended as an accessibility feature, it can also be useful for those with complete sight, as a way to enhance their computing experience.
For example, Siri could read text aloud while looking away from the screen, or to check a typed-out speech sounds fine when actually read aloud. You can also set Siri up to speak announcements.
Getting started with Spoken Content
The majority of Spoken Content's controls reside within the Accessibility menu.
How to enable Spoken Content in macOS
- Click the Apple icon in the menu.
- Click System Preferences .
- Click Accessibility .
- In the left-hand panel, select Spoken Content .
- Click the tickboxes next to the options you want enabled.
Spoken Content is divided into four general sections, with each having its own personalization options. They cover spoken announcements, selected text, items being pointed at with the mouse, and for typing feedback.
Depending on what you need enabled, simply click the option next to the specific feature.

At the top of the screen are the main voice settings, where you can select the voice Siri will use, test out the voice, and affect the rate of speech. In the System Voice dropdown, you can also select to Customize the voice, allowing you to select and download new voices, including those for other languages.
Next to the System Voice dropdown, the Play button can be used to hear a sample of the speech that will be used, allowing you to change the voice or the speaking rate before you leave the menu.
Speak announcements
If you select to enable Speak announcements, macOS will read out any notifications or alerts that pop up.
The Options button for the feature allows you to set a specific voice to be used for announcements, as well as to set a delay for when the announcement will be said after it appears on screen.

You can even set the phrase that can be said before the announcement itself. You can set it to be the application name, or an interruption from an editable phrase list, such as "Excuse me" and "Alert!"
Again, you are offered a play button to test out your settings.
Speak selection
Probably the most useful option on the list, Speak selection will read aloud any text that has been selected, after pressing a keyboard shortcut.
The Options button starts off by allowing you to set a specific keyboard shortcut for the feature. By default, it's Option and Escape pressed together, which works quite well.

Highlight content refers to macOS highlighting the part of a selected stretch of text being read at that moment. This can be set to words, sentences, words and sentences, or off.
Word color relates to the Highlight content feature, to determine what color the currently-said word will be highlighted by. Sentence color is the same thing, but for the current sentence, and can be set to a different color than the word version.

Sentence style lets you choose between the highlighting consisting of an underline or a change in background color.
Show Controller will determine whether the user will be able to see an extra controller window when text is being read aloud. The controller can be used to stop, play, and pause speech, skip forward and back in the text, and to speed up or slow down the speaking rate using the turtle and rabbit icons.

Speak items under the pointer
As the name suggests, it's a feature that will say what is currently under the pointer within macOS. This is intended to help visually impaired users identify what they are pointed at when using the mouse.
The feature can be set to run at all times, or when the macOS Zoom accessibility function is engaged, so that it isn't always active.

You can set the Speech verbosity to low, medium, or high, and for there to be a short or long delay before macOS says what is under the cursor.
Speech typing feedback
Ideally for those who need to be able to know what they are typing Speech typing feedback will tell users what they are typing. This can be set to run in a couple of ways.
Under Options, Echo characters will say each character on the keyboard the user has typed, including punctuation. Echo words does the same, but after the user has completed a word.

Echo selection changes will make macOS speak each time you select something on screen. This can include the contents of a webpage you've just clicked on, or text in a document.
The Echo selection changes also reads out highlighted text, in case you don't want to hear an entire page.
Echo modifier keys will speak out the name of each modifier key, which can help both people who cannot see the keyboard fully, and those who are not quite familiar with the keyboard's layout. When selected, it will say "Shift," "Control," "Command," and "Option" whenever they are pressed.
Top Stories

Amazon launches back-to-school Apple deals, with prices as low as $22.99

M4 Mac mini rumored to get a redesign making it smaller than ever before

When will Apple launch the iPhone 16 and iPhone 16 Pro?

iPhone 16 mass production begins, on time for mid-September launch

iPad Air OLED upgrade rumored to arrive in 2026, not 2028

Rumor Roundup: What the 2025 iPhone 17 family may bring to the table
Featured deals.

Price war: Apple's M3 14-inch MacBook Pro drops to record low $1,299
Latest news.

Apple to reclaim wetlands near its Iowa data center
Apple is applying to the City of Waukee in Iowa, just west of Des Moines, to return some of its land surrounding its iCloud data center back into a freshwater marsh, also known as a "prairie pothole."

Retro gold rush: which emulators are on the App Store, and what's coming
Apple is allowing emulators on App Store. Here's what's arrived, and what's on the way to play your favorite retro games on your iPhone, updated with a new Nintendo VirtualBoy emulator for Apple Vision Pro.
Steve Jobs' mega yacht bashed a billionaire's boat in Italy
In what is possibly the slowest speed nautical crash ever, Steve Jobs' yacht struck another billionaire's vessel.

Top 5 mice for Macs — for gamers, professionals, and everyone in between
Grab the perfect mouse for your Mac with our favorite picks for ergonomics, everyday use, and gaming.

Apple Maps now works in Firefox and Edge for Mac
After initially working on Safari, Chrome, and Edge for Windows, Apple Maps is now working in other browsers, including Firefox and Edge for Mac.

If Apple TV+ abandons theatrical releases, it won't be because of money
No Apple TV+ movie has become a blockbuster hit bringing in enough money to rival the iPhone, but theatrical releases help the company attract subscribers — and also talent.

Apple's Adaptive Lighting support spreads to Matter smart lights
Matter smart lights will start to work with Apple's Adaptive Lighting feature of the Home app, with Nanoleaf hardware among the first to support it.

Apple's 14-inch MacBook Pro has just received a fresh price drop, driving the M3 model down to $1,299.99 as Amazon and Best Buy launch aggressive back-to-school deals.

What's new in Quick Look for visionOS 2
Apple announced some new Quick Look features for visionOS 2.0 at WWDC 2024. In this article we'll look at new ways to use QuickLook in Apple Vision Pro.

How to use built-in network security features for Mac, iPhone, and iPad
Apple devices use many common internet security standards. Here's what each of them does, and how to use them on your Mac, iPhone, or iPad.

How to add money to your Apple Account on iPhone, iPad & Mac
Loading funds into your Apple Account can simplify purchasing apps, music, and other services. Here's a guide on how to add funds to your Apple Account.
Latest Videos

Distraction Control, Photos & more — hands on with all the changes in iOS 18 beta 5

Safari's Distraction Control will obliterate annoying website elements
Latest reviews.

Torras Ostand MagSafe Power Bank review: 2-in-1 charging and stand convenience

Midea 2 Zone Air Fryer review: great air fryer, abysmal app, and lots of sticker shock

Tribit StormBox Speaker review: Simple, yet solid summer speaker

{{ title }}
{{ summary }}
How to Use Dictation in macOS: A Comprehensive Resource

- Apple’s macOS includes speech recognition software baked right into the operating system.
- You can select from multiple languages, with options varying by which version of macOS you are running.
- Dictation is not only a handy speech tool, but it is also a fantastic Accessibility feature.

I’m taking a look at how to set up and use Dictation for macOS. For those that may not know, Apple includes voice recognition software within macOS that is capable of dictating your voice directly to any document that needs text. Dictation is not only useful as an Accessibility feature, but it can be pretty helpful for those that may simply prefer speaking their ideas rather than using their hands to type. This not only saves you from buying third-party dictation products, but Apple’s form of dictation software includes some additional handy tools as well.
Getting it all together, I’m going to take a look at how to use the Apple Dictation feature with macOS, as well as look at some of the advantages of Dictation. This includes setting up the built-in dictation software and then properly using it. I’ll also provide some dictation tips, while also covering additional dictation options as well. Considering this can be incredibly useful for those that need accessibility features, I break the steps down so that the average person can get an idea of what to do. I also go over the common commands you can implement with Dictation while covering additional commands as well.
Keyboard Dictation VS Voice Control: What’s the Difference?
Before starting, folks should be aware that two different Accessibility features on macOS involve speaking to your device . While both are extraordinarily helpful, they serve different functions. While macOS Dictation allows a voice-to-text option, there’s also Voice Control. The Voice Control feature provides voice-to-text options, but you can also control your Mac using voice commands.
Concerning Voice Control and Dictation, the most important thing to remember is that the Dictation feature is not going to work if Voice Control is enabled. You can check to see if Voice Control is active from the menu bar by navigating to Apple > System Settings > Accessibility > Voice Control and ensuring it is disabled.
How to Enable Dictation on macOS
If you need to know how to enable Dictation on your Mac, simply follow these steps. Remember that if you are using an Intel-based processor, you may need an internet connection to properly engage with the Dictation feature.
Time needed: 1 minute
To turn on Dictation on your Mac, follow this guide.

From here, you’re all set to go! Dictation should be ready to go. Next, I will show you how to use Dictation on macOS.
How to Use Dictation on macOS
Now that Dictation is enabled, you can begin to dictate your text to your Mac, offering a great Accessibility feature for those that need it. Simply follow the steps below to begin a Dictation.
- Using any app on your Mac, place the insertion point wherever you would like to add text.
- Press and release the microphone button (which looks like a microphone) that is within your row of function keys.

- You can finish your Dictation by pressing the Return key. Or you can also press your keyboard shortcut, or click Done from the feedback window. Dictation also ends when your Mac doesn’t detect any speech for 30 seconds.
Dictation Privacy: What You Need to Know
One should be aware that the first time they enable Dictation, there’s a chance your machine is going to ask you to share your audio recordings with Apple. Be aware that agreeing to this allows Apple to store copies of your inputs into Dictation. This also includes Siri commands if you agree. Agreeing also means that Apple can listen to portions of your recordings.
It’s up to you whether or not you want to share this information. Remember that regardless of what you choose when you first set up Dictation, you can always change this setting by going to Apple > System Settings > Privacy & Security > Analytics & Improvement > Improve Siri & Dictation . This will prevent Apple from storing and reviewing your Dictations. However, if you use Dictation, Apple is going to be listening to help process your requests, so keep that in mind.
You should also be aware that if you want to remove your recordings from your disk drive, simply go to Apple > System Settings > Siri & Spotlight > Siri & Dictation History > Delete Siri & Dictation History . Note that on anything before macOS Ventura, the Siri & Spotlight option will just be labeled Siri. Either way, this can be a good way to free up some disk space and remove your Dictation history.
Go Offline: Enhanced Dictation
Depending on what version of macOS you are running, you may have the option for Enhanced Dictation. You will know your Mac has this as an option, as it will simply be a checkbox that you need to click to enable from the Dictation Settings page. Also, be aware that if you are using a Mac with Apple silicon, you will not need an internet connection for Dictation anyway.
This can be extremely beneficial for those that do a lot of work offline. You can always check what processor you are using (Apple or Intel) by going to Apple > About This Mac . If you see the word ‘Intel’ anywhere in the Processor section, you are running an Intel-based Mac.
Key Voice Commands for Dictation
While Apple’s Dictation feature does automatically include punctuation, knowing certain Voice Commands for each type of punctuation is still going to be rather useful, as it substitutes certain key combinations. Being aware of these advanced dictation commands can make the process faster for you. Additionally, there are several other Commands that one should familiarize themselves with as well. Take a look at the complete list below.
Punctuation
| Command | Result |
|---|---|
| Apostrophe | ‘ |
| Open bracket | [ |
| Close bracket | ] |
| Open parenthesis | ( |
| Close parenthesis | ) |
| Open brace | { |
| Close brace | } |
| Open-angle bracket | < |
| Close angle bracket | > |
| Colon | : |
| Comma | , |
| Dash | – |
| Ellipsis | … |
| Exclamation mark | ! |
| Hyphen | – |
| Period/point/dot/full stop | . |
| Question mark | ? |
| Quote | “ |
| End quote | “ |
| Begin single quote | ‘ |
| End single quote | ‘ |
| Semicolon | ; |
Special Characters
| Command | Result |
|---|---|
| Ampersand | & |
| Asterisk | * |
| At sign | @ |
| Backslash | \ |
| Forward slash | / |
| Caret | ^ |
| Center dot | ・ |
| Large center dot | ● |
| Degree sign | ° |
| Hashtag/pound sign | # |
| Percent sign | % |
| Underscore | _ |
| Vertical bar | | |
Codes for Formatting
| Command | Result |
|---|---|
| New line | Begins a new line. |
| Numeral | Formats the next phrase as a number. |
| Roman numeral | Makes the next phrase a Roman numeral. |
| New paragraph | Starts a new paragraph. |
| No space on | Formats the next phrase without spaces. |
| No space off | Resumes default spacing. |
| Tab key | Places the cursor at the next tab stop. |
Capitalization
| Command | Result |
|---|---|
| Caps on | Formats the next phrase in Title Case. |
| Caps off | Returns you to the default case lettering. |
| All caps | Makes the next word in ALL CAPS. |
| All caps on | Will make your next phrase in ALL CAPS. |
| All caps off | Turns off caps-lock. |
Mathematical
| Command | Result |
|---|---|
| Equal sign | = |
| Greater than sign | > |
| Less than sign | < |
| Minus sign | – |
| Multiplication sign | x |
| Plus sign | + |
Intellectual Property
| Command | Result |
|---|---|
| Copyright sign | © |
| Registered sign | ® |
| Trademark sign | ™ |
| Command | Result |
|---|---|
| Dollar sign | $ |
| Cent sign | ¢ |
| Pound sterling sign | £ |
| Euro sign | € |
| Yen sign | ¥ |
| Command | Result |
|---|---|
| Smiling face | 🙂 |
| Frowning face | 🙁 |
| Winking face | 😉 |
| Cross-eyed laughing face | XD |
Tips for Effective Dictation on macOS
When using Dictation on Mac, you may need to familiarize yourself with the speech recognition software feature before diving into it fully. Extended use of this program can truly be a help, as it allows your Mac to get a better sense of your voice. The degree of accuracy within the program is only going to increase the more you engage with it.
Additionally, consider your voice and compatible speech when using Dictation. Accuracy rates will only continue to climb if you speak in a clear tone with a consistent pace. Remember to consider the punctuation rules at well. While it may take a bit of use to get the Dictation feature to 100% accuracy, taking extra time working with the program is only going to make things easier.
If you do find that you’re using Dictation for an extended period, or you’re not happy with the results, considering a more advanced microphone may be the way to go. You may also want to consider removing any background sounds or distractions.
Use Dictation with Different Languages
One nice thing about Apple Dictation is that it is available in a multitude of languages, though this is going to vary from Mac to Mac. For example, any Mac running Apple silicon is likely to have more language options than an Intel-based Mac. If you want to use Dictation with another language, you can select a different language from Apple > System Settings > Keyboard > Dictation and select the Language pop-up menu. Choose a language from the list, or select Customize or Add Language to add additional languages. English will more than likely be the default option. Though the default setting may also depend on what language you originally chose when setting up your Mac.

You can also remove languages by going to the Language pop-up menu, selecting Customize and deselecting any languages you do not want to use. It’s also important to note that you can switch languages while you are dictating. So long as you set the feature up for multiple languages, you can select a language from the feedback window and select the language you wish to use.
Dictation and App Compatibility
Concerning Apple Dictation for macOS, any program native to the company is going to work without issues. However, this might not be the case for third-party applications. While countless applications are likely to work, some are likely not, possibly common applications. If you find that Dictation simply isn’t working with a third-party app, remember that the program simply may not support this feature. It can also be a good idea to check an App’s page on the App Store to see if it offers any information in terms of this feature. While you may want to use your application of choice for a specific situation, remember that apps native to macOS may work better with the feature over third-party apps.
Dictation in Siri
In addition to Dictation implementing Apple’s voice recognition software, don’t forget that Siri can also be your handy virtual assistant. Arriving on the scene in Oct. 2011, Siri is Apple’s virtual assistant, and it can be quite powerful on its own. You can think of Siri as a nice combination of Voice Control and Dictation: while Siri is not able to do all of the things that these features can, it can still perform many of them , and perform them well. For example, you can send messages with Siri by asking it “Hey Siri, send a message to. . .” It can also help set reminders and more.
Differences in Enabling Dictation on Different macOS Versions
While different versions of macOS may have different ways they word enabling Dictation, the instructions should be relatively the same. Simply go to Apple > System Settings from the menu bar and navigate to Keyboard. Look for Dictation, and ensure it is enabled. Different versions of macOS may prompt you differently, but the steps are the same. Whether you’re using macOS High Sierra or Sonoma , just remember where the Dictation setting is located, and ensure that it is enabled.
Note that older versions of macOS may refer to System Settings as System Preferences. Essentially, be mindful of the language.
Troubleshooting Dictation: Problems and Solutions
One thing a user needs to remember is that Voice Control and Dictation will not operate at the same time. You can either have one, or the other. If you are enabling Dictation and it is not working for you, ensure that Voice Control is disabled by going to Apple > System Settings > Accessibility > Voice Control and ensuring that it is disabled. Be mindful of your Accessibility settings.
Another issue you may have is your machine picking up their speech. I discuss this elsewhere in this article, but it’s important to reiterate that you may need to spend some time with Dictation to get it exactly where you want it: it may take some practice before it is perfect. Also, be aware that Dictation will highlight ambiguous text with a blue line. If the program finds a statement unclear, you can click the text highlighted in blue and make the corrections suggested by Dictation. You can also dictate or type your corrections. If you have been using Dictation for a while and it is still making several mistakes, you may want to consider a different microphone.
You may also want to remember that you may not hear audio coming from other apps while you are using Dictation. However, this is an easy one to fix. If you are not hearing audio from any of your apps, simply wait 30 seconds without saying anything to get Dictation to close on its own, or have it stop listening for audio by pressing the Return key.
Apple’s built-in speech tool isn’t just powerful, it can be outright necessary for certain individuals. Of course, an important thing to remember is that macOS Dictation is going to work best as a digital assistant for official Apple apps. You may also want to remember the importance of clarity while recording your voice. I recommend giving Dictation a try and seeing if it works well for you, though be mindful of my recommendations as well. Experimentation is almost always a good thing. Of course, feel free to let us know in the comments what your experience was, or if there is anything that you would recommend.
3 thoughts on “ How to Use Dictation in macOS: A Comprehensive Resource ”
One warning about Mac speech dictation: it mutes the sound for other apps. You can get fooled by that if you accidentally leave speech dictation (the little mic icon) on. Then, if you attempt to watch or listen to something somewhere else, you will not have sound. It took me a few minutes to figure out why I had no sound in a different app – I had previously left speech dictation on in a previously used app and it was on another one of my Mac’s 3 displays.
I’m trying to convert a lecture from an MP3 file into text using Pages. Is this possible? Have tried without any luck. Thank you very much for your help.
To do it manually, you would be able to use dictation on the Mac if you spoke what the lecturer was saying. For audio transcription you would need specialized software. One example I found is called Descript .
Leave a Reply Cancel reply
You must be logged in to post a comment.
This site uses Akismet to reduce spam. Learn how your comment data is processed .
- Nick deCourville
WIN an iPhone 15 Pro Max!
Enter our epic giveaway for a chance to win the latest iPhone 15 Pro Max!
How to transcribe audio to text using Dictation on a Mac
You can use the Dictation feature built into your Mac to transcribe audio files, and in my experience, it's been about 98-99% accurate, so it saves a lot of time if you want to index your audio files, or you need a transcript for some other purpose.
These instructions were last updated for macOS Monterey 12.4.
First, open up System Preferences, go to Keyboard, then the 'Dictation' tab:

Turn on Dictation, and when prompted, accept the terms for Apple's Dictation service. Also take note of the 'Shortcut' (e.g. 'press dictation key' or 'press control twice'. You'll use that to activate dictation later.
Make sure you have your Mac's microphone selected, then open up TextEdit and create a new document:

Activate the dictation shortcut (e.g. press the dictation key), then start playing back your audio file through your Mac's speakers. The mic should pick up the audio and start transcribing live into the open document.
Bonus: Routing audio internally on the Mac with Loopback
If you have Rogue Amoeba's Loopback , you can also use it to route the audio signal internally , so you don't have to have audio playing out through the speakers.
After you have Loopback installed and running, create a new device called 'Transcription Device'. Delete the default Pass-thru source, and add in Quicktime Player as a new source:

Quit Loopback (the device will still be present on the system after quitting), then go back to the Dictation settings in System Preferences. In there, choose the new 'Transcription Device' sound input:

Then go back to TextEdit, and in a new document, activate Dictation using your configured shortcut (e.g. the dictation key). Pop over to QuickTime Player, and play your audio or video file, and watch as the words are transcribed as if by magic!

Alternative: Welder (or other online services)
As an alternative, you could use an online upload-to-transcribe service like Welder . I tested the same files on Welder that I used with Dictation, and Welder was better about adding punctuation and separating multi-person interviews.
Their transcription feature can be used for free; upload a video or audio file, and within a few minutes, you can read or download the transcribed text.
Further reading
- Transcribing recorded audio and video to text using Whisper AI on a Mac
- Recording multiple camera angles, full-size, simultaneously, on a Mac
- Achieving Pro Zoom meeting quality on my Mac
- Add new comment
This felt a little bit inefficient to me, so I did some digging and found that someone's made a command line tool for Apple's speech recognition API: https://github.com/sveinbjornt/hear
The real kicker here is that you can transcribe audio files, meaning that you don't have to wait for a video to play to get a transcript: hear -i /path/to/someone_speaking.mp3 > transcribed_text.txt
Oh nice, even better! I'll have to give it a try.
Thank you! :) Came here for this info.
Thanks for the link! I also found -d flag useful, forcing it to process video on a device. Otherwise, I got transcriptions only for the first minute of my mp3 file.
Yo when I try to follow your instructions without loopback, seems simple enough.. when i press play and go into TextEdit and begin dictation, macOS silences the audio output and this doesn’t work running macos 12.5.1 September 18 2022
When using Rogue Amoeba's loopback, you need to add a 'monitor device'. I just added the built-in speakers but you could use another audio device.
I have the same problem. How did you fix it?
This is now even easier with Whisper: https://github.com/openai/whisper
Thanks to this comment, I test drove Whisper yesterday, and wrote up this new blog post today: Transcribing recorded audio and video to text using Whisper AI on a Mac .
Thank you for the tutorial. I am trying to transcribe audio that is about a hour long. Once I start the transcribing process, the microphone stops working every 2-3 minutes. Is there a way I can make the microphone continue recording for longer periods of time? Thanks!
I would use the github suggestions, but am not familiar with using the files and have very little experience with Terminal. If anyone can direct me to some tutorials, I would appreciate that also.
When we try to do this, as soon as we start playing the audio file dictation turns off. Little microphone disappears and nothing is transcribed. There are two of us, both on Macs running Monterey. Mine's an M1 iMac, hers is a Mac Book Pro. Any ideas? She has Blackhole installed and I have SWB audio capture - will that mess it up?
I have the same issue of the audio silencing when I open the dictation on textedit. Any remedies to this without having to download another software?
same here. I'm on Monterey. As soon as I start playback, the dictation stops.
Ditto. Has anyone figured out how to keep the dictation microphone operational so that it transcribes audio files?
Is there a way to directly input a file from a digital voice recorder and have it transcribed? Or, do I have to save it as an audio file and follow one of the methods in this article? Thanks!
Can a previously recorded speech sound file be used for dictation? That is sound from a source other than a microphone. If so how is this done?
I could not install Loopback as it cannot add system items on my machine. Blackhole works as well.
I am on Sonoma. May I ask how you configured Blackhole? Based on your and another commentor I installed Blackhole, set up a multi-output profile, one of which is a Blackhole 2 channel device, then configured the system dictation source to the Blackhole device. When I activate dictation it stops the audio output and nothing happens. Thanks for any help you can offer.
Although the first solution would be great, I'm unfortunately now the 7th commenter reporting this problem:
-> "Start dictation" within TextEdit (..and Pages.app) seems to deactivate audio output from VoiceMemos. <-
Jeff Geerling or anyone else - Can you help us to somehow successfully use the 1st solution? Thank you!
- Get started free
How to Do Text to Speech on Mac
Learn how to set up and customize your Mac's text-to-speech feature.
Text-to speech technology is transforming how we communicate and consume content—but did you know that your Mac has in-built text-to-speech capabilities?
Imagine your computer reading out documents, emails, or even your favorite web articles with just a simple command. This is the power of text-to-speech on macOS.
Let’s delve into what text-to-speech is and how to use it on your Mac. Whether you're a professional seeking efficiency, a student aiming for a better learning experience, or someone exploring accessibility options, this guide’s for you.
Setting Up Text to Speech on Your Mac
Enabling text-to-speech on your Macbook or Apple desktop is a straightforward process. Here's how you can set it up and customize it to fit your needs:
Enabling Speak Selection
- First, access your Mac's System Settings and click on 'Accessibility' in the sidebar.
- Within the Accessibility settings, select 'Spoken Content'.
- Turn on the 'Speak selection' option. This feature allows your Mac to read out selected text or, in its absence, any text items in the current window, such as an email in Mail.
Customizing Keyboard Shortcuts
- To personalize your experience, you can set a custom keyboard shortcut for Speak selection.
- Go to System Settings, then click 'Keyboard' in the sidebar.
- Under Keyboard Shortcuts, choose 'Accessibility' to modify the shortcut for Speak selection. The default combination is Option-Esc, but you can change it to something that suits your workflow better.
Using the Onscreen Controller
- When Speak selection is active, you have the option to display an onscreen controller.
- This controller includes buttons for adjusting the speaking rate, skipping sentences, playing/pausing, and stopping the speech.
- The controller is particularly handy for managing the speech in longer texts, allowing you to easily navigate and control the playback.
Highlighting Spoken Content
- For visual tracking, you can set your Mac to highlight words or sentences as they are spoken.
- In the Spoken Content settings, choose your preferred highlighting style and colors for both words and sentences.
- This feature enhances comprehension and is useful for following along with the spoken text.
Customizing Sentence Style
- You can also customize how spoken sentences are indicated, either by underlining or background color, enhancing the readability and understanding of the text.
Controller Visibility Options
- Decide when the controller appears: automatically with the shortcut, always, or never. This customization ensures the controller is available according to your preference and usage patterns.
Advanced Features and Customization
Now you’ve enabled text-to-speech on your Mac, here’s how you can customize it according to your unique preferences.
Accessing Customization Options
To begin customizing text-to-speech on your Mac, open 'System Preferences' from the Apple menu and navigate to 'Accessibility.' From there, select 'Spoken Content' in the sidebar. This section houses a variety of settings that allow you to tailor the text-to-speech functionality to your specific needs.
Choosing the Right Voice
MacOS offers an extensive selection of voices, varying in gender, accents, and languages—meaning you don’t just have to settle for the default voice. Some of these voices are even available for additional download from the App Store. Use the play button to preview different voices and select the one that resonates best with you.
Adjusting Speaking Rate
The speaking rate of the text-to-speech feature is fully adjustable. You have the option to slow down the speech for clearer comprehension or speed it up to quickly absorb information. This level of control ensures the spoken content is delivered at a pace that suits your listening preferences.
Enjoying the Benefits
Customizing text-to-speech on your Mac enhances the overall user experience, whether for educational, professional, or leisure activities. By experimenting with the various settings available, you can discover the full potential of text-to-speech, making information more accessible and enjoyable for your specific needs and lifestyle.
With these customization features, your Mac becomes a more powerful and accommodating tool, bringing written content to life in a way that best suits your individual preferences and requirements.
Reasons to Choose Dedicated Text-to-Speech Software Over Mac's Built-In Functionality
While Macs have in-built text-to-speech capabilities, that doesn’t mean they’re best suited for all needs. If you’re a serious content creator looking for natural-sounding voices (e.g. if you create podcasts or Youtube videos), then you should use dedicated text-to-speech software like ElevenLabs.
Here’s why.
Advanced Voice Quality and Naturalness
Dedicated text-to-speech software, such as ElevenLabs , offers voices that are remarkably natural and human-like. This advanced voice quality and speech options significantly surpasses the often mechanical-sounding tones of Mac's built-in system voices. Users experience a more engaging and pleasant listening experience, making the software ideal for a wide range of applications.
Greater Customization and Control
Specialized text-to-speech programs provide extensive customization options. Users can choose from a diverse array of voice types and have greater control over speech modulation and patterns. This level of customization, which is not available in Mac’s in-built functionality, allows for a tailored auditory experience to suit specific preferences and needs.
Enhanced Language and Accent Options
Unlike the limited language and accent options in Mac's system, dedicated text-to-speech software offers a broad selection. This variety caters to a global audience, making it an invaluable tool for users who require content in multiple languages and dialects. Whether you’re looking for English, Spanish, or Arabic text-to-speech options, ElevenLabs has you covered.
Superior Contextual Understanding
The advanced algorithms in specialized text-to-speech software result in a superior understanding of context and nuances in text. This leads to more accurate and contextually appropriate speech output, ensuring that the synthesized voice conveys the intended message effectively and accurately.
Reliability and Support
Dedicated text-to-speech software providers typically offer reliable performance and robust customer support—a key combination. This level of service ensures users have assistance readily available, a benefit not always matched by built-in operating system features. Some providers even have dedicated how-to tutorials. The reliability and support offered make these programs a dependable choice for professional voiceovers and personal use.
Ongoing Development and Innovation
Specialized text-to-speech (TTS) software is often at the cutting edge of technology, with ongoing development and innovation. These continuous improvements ensure users have access to the latest advancements in speech synthesis, a level of innovation that built-in systems like Mac’s may not regularly receive.
In conclusion, dedicated text-to-speech software offers numerous advantages over Mac's built-in functionality, including superior voice quality, extensive customization, diverse language options, constantly updated new voices, enhanced contextual understanding, reliable performance, and continuous innovation. These benefits make it an ideal choice for users seeking an advanced, adaptable, and high-quality text-to-speech experience.
Final Thoughts
Choosing ElevenLabs' dedicated text-to-speech software over Mac's built-in functionality offers a vastly superior experience.
ElevenLabs provides exceptionally natural and engaging voices, extensive customization options, and a broad range of languages and accents. Its advanced algorithms ensure accurate contextual understanding and pronunciation, enhancing the effectiveness of the spoken word.
Coupled with reliable performance, continuous innovation, and strong customer support, ElevenLabs represents a significant upgrade in quality and versatility. It’s the ideal choice for those seeking a more immersive, personalized, and sophisticated text-to-speech experience.
Explore more

Increasing patient access to healthcare around the U.S.
EliseAI’s AI-powered voice agents make patient scheduling easy and accessible for everyone

Cornell lecturer creates an AI-powered teaching assistant
Making AI education accessible and engaging
Create with the highest quality AI Audio
Already have an account? Log in
MacBook tips: How to use speech-to-text to dictate in macOS
Take notes without a keyboard using this handy feature

Speech-to-text is a handy tool for dictation available in macOS. Once you set it up, you can scribble words to a page using this tool anywhere you would otherwise type with a keyboard. In addition to typing text, you can also enter punctuation marks and formatting such as line breaks and special symbols by speaking the commands.
While this feature was full of glitches and actually made typing more laborious in years past, Apple really has ironed out most of the wrinkles and made it fairly useful. If you find yourself needing a break from the keyboard, it’s definitely worth trying.
It is a handy tool when you need to work hands-free, or jot down a quick note before its lost forever. That said, it’s still not perfect, and I find that it works best when you speak slowly and accentuate bigger words.

1) Click the Apple icon in the upper left corner.
2) In the menu that opens, select System Preferences .

3) In System Preferences, select Keyboard .

4) In the Keyboard window, go to the Dictation tab .
Stay in the know with Laptop Mag
Get our in-depth reviews, helpful tips, great deals, and the biggest news stories delivered to your inbox.

5) There, switch on the dictation option .

6) Click Enable Dictation to allow Apple to use the recording.

7) In any document processor, click the Dictate icon and start speaking.

8) To change the default language, click the down arrow to open the language drop-down menu .

9) Select a language you would like to convert from speech to text.

Apple could release the first M4 Macs as soon as October: Here are the potential release dates, models and prices
How to change Apple ID password: Cybersecurity experts say to do it every 90 days (but now is better than never)
iPhone 16 vs iPhone 15: Will the next iPhone be worth upgrading?
Most Popular
- 2 iPhone 16 vs iPhone 15: Will the next iPhone be worth upgrading?
- 3 Nab the iPad 9 for an all-time low price of $224 at Amazon while you still can
- 4 You might accidentally fall in love with ChatGPT's advanced Voice Mode
- 5 Lenovo Yoga 7 2-in-1 (AMD) vs. Lenovo Yoga 7i 2-in-1: Which should you buy?
How to dictate on a Mac computer, using the voice-to-text dictation feature that can type out your speech
- You can dictate on a Mac computer so that your computer types out your speech.
- But before you can start using dictation, you'll have to enable it via your Mac's System Preferences, and decide the shortcut you'll use to turn it on, as well as the language it will dictate in.
- Here's how to set up and use the dictation feature on a Mac computer.
- Visit Business Insider's homepage for more stories .
Voice-to-text is a helpful feature for those who are often out and about.
And for those who have a Mac computer, you can take that feature and use it in your everyday workflow. The key is a built-in feature known as dictation.
But before you can take advantage of dictation, you'll have to enable it. After that, it works similarly as any voice-to-text feature, any you may be able to access more in-depth voice commands to format your document.
Here's how to set it up and start using it.
Check out the products mentioned in this article:
Macbook pro (from $1,299.99 at best buy), how to set up dictation on a mac.
1. Click the Apple logo in the top-left toolbar, then choose "System Preferences."
2. Select "Keyboard."
3. Toggle over to "Dictation" in the menu at the top of the window.
4. Next to "Dictation" select "On" and if desired, turn on enhanced dictation by ticking the corresponding box — this allows you to use additional commands, like bold, italics, underline, copy, delete, and undo — and dictate without an internet connection (enhanced dictation is only available for those with OS X Mavericks v10.9 or later ).
5. Set the language and create the desired shortcut.
How to dictate on a Mac
Once you've enabled the dictation feature, here's how to use it:
1. Open a document.
2. Place your cursor to the desired location for your dictation.
3. Use the shortcut you established when setting up dictation; alternatively, you can also select "Edit" and then "Start Dictation."
4. Start talking.
You should see a microphone icon appear on the screen after you start the feature.
As you speak, it's important to remember to say your desired punctuation out loud, otherwise you'll end up with a long, run-on sentence. To stop dictation, click "Done" below the microphone icon.
Related coverage from How To Do Everything: Tech :
How to easily record audio on your mac using either of its 2 simple recording apps, how to uninstall apps on a mac computer in three different ways, how to create folders on a mac computer and organize your files, how to set an alarm or event reminder on a mac using the calendar app.
Insider Inc. receives a commission when you buy through our links.
Watch: A diehard Mac user switches to PC
- Main content
Dictation on Mac: How to Use Voice-to-Text Typing
Get your mac to type for you.
In case you are unaware, Apple provides a range of Accessibility features on Mac — especially with the recent versions of macOS. Accessibility features, essentially, are features that aid people with disabilities to better use certain functionalities to allow them to operate their devices independently. However, that is not to say that normal users cannot benefit from these features. Since some of the Accessibility features on Mac, such as Voice Over, Zoom, Voice Control, and Speech can also come in handy for those looking to get more out of their actions, and in turn, their device.

If you have been a Mac user for some time, you would be aware (or might have stumbled upon) the Dictation feature. Dictation, again, is an Accessibility feature on Mac. It allows you to speak text (instead of typing) and leverages the power of voice-to-text transcription to get the output in the form of text. Thus, allowing you to type-in text, without having to, well, actually type text. Since the feature can be used by anyone, for any of their use-cases, here’s a guide, with everything about the feature, including the steps on how to use Dictation (voice-to-text typing) on Mac.
What is Dictation and how does it work?
As already mentioned, Dictation is an Accessibility feature on Mac that allows you to speak text and get an equivalent output for the same in the form of text across any input field. You can use it anywhere on your Mac to enter your input using voice. Most importantly, it is not to be confused with Voice Control, which is another Accessibility feature, which allows you to control your Mac using commands.
When you initiate Dictation and speak text, the same is processed by Apple and sent to their servers, where it is analyzed using language data and converted into text in real-time.
How to enable and set up Dictation?
Before you can use Dictation to enter text using voice, the first thing you need to do is enable Dictation from the Settings. Here’s how –
1. Head over to the System Preferences , and select Keyboard .

2. In the Keyboard settings tab, tap on Dictation and select the On radio button next to Dictation.

Once enabled, you can further change related settings for the same, like the input language, shortcut to initiate Dictation, and the input microphone.
1. Change input language – hit the dropdown button next to Language to choose your preferred input language. In case you do not see your language in the list, tap the Add Language button to search and add the language.

2. Set shortcut to trigger Dictation – to set the trigger shortcut to initiate Dictate, tap the dropdown button next to Shortcut and select a trigger option from the list. Alternatively, you can also set a custom key as the trigger for Dictation.

3. Set input microphone – tap on the dropdown button below the microphone (on the left) to select the input microphone.

How to use Dictate to input text?
Once you have set the shortcut to trigger Dictation, in the previous point, you are ready to use the feature to dictate text.
1. Open the app/website/service where you want to enter text and place the cursor in the input field.
2. Double-tap the trigger key you set for Dictation, and in the two prompts that appear, hit Ok and Enable Dictation , respectively. [ Note – you are only required to perform this step when you are using the feature for the first time ].
3. Once you tap the trigger shortcut, you should see a microphone icon, indicating that your Mac is ready to accept dictation. Start dictating your text now. Apple recommends no longer than 40-second dictations for best results.

4. When you are done dictating your text, tap the Done button, or hit the return key to stop Dictation.

Since a lot of the text we type involves the use of various punctuations make the text easier to comprehend and better convey the message, Apple also allows you to input punctuation marks using voice with Dictation. For instance, if you need to enter a comma (,), you can simply speak ‘comma’ in your dictation to include the same in your writing. Similarly, there are a bunch of other punctuation marks that you can use with Dictation, the commands for which you can learn here .
Now that you have discovered Dictation and how to use it to input text without having to actually type it, on your Mac, you can use the same to input text under different circumstances — like when your keyboard is broken, or you do not feel like typing. Not to mention, it can also be of help to those having disabilities, as they can now input text efficiently without having to be completely reliant on someone’s assistance.

How-To Geek
Use voice dictation to speak to your mac.

Your changes have been saved
Email is sent
Email has already been sent
Please verify your email address.
You’ve reached your account maximum for followed topics.
Relive the Days of FM Radio With SiriusXM All Access
10 beautiful old games that will put your new pc through its paces, windows update can be hijacked to undo security patches, quick links, set up enhanced dictation, using voice dictation, dictation commands.
Macs have voice dictation built-in, allowing you to talk instead of type. This feature functions more like voice dictation on a mobile operating system , and less like the more complicated Speech Recognition feature found in Windows .
OS X Mavericks contains an "Enhanced Dictation" feature. It lets you use Voice Dictation offline and displays text as you speak, so you can see exactly how your speech is being interpreted.
First, you'll need to enable the Dictation feature. Click the Apple menu at the top of your screen and select System Preferences. Click the Dictation & Speech icon in the System Preferences pane and ensure Dictation is set to On.

Enable the Enhanced Dictation option and your Mac will download the appropriate dictionary from Apple's servers. It will then be able to interpret your voice offline. If you don't enable Enhanced Dictation, your speech will be sent to Apple's servers an interpreted there.
You're also free to customize your dictation shortcut and which microphone dictation uses from here. The purple microphone will light up as you speak if your Mac can hear you.

To use voice dictation in an application on your Mac, first select a text field in an application. Next, press the Fn (Function) key twice or click the Edit menu and select Start Dictation.
Speak to your Mac and the words you speak will start appearing in the text field. If you've set up Enhanced Dictation, they'll appear immediately. If you haven't, you'll have to click Done or press the fn key again and your voice will be sent to Apple's servers, where it's interpreted and the text is filled into your application. You can only speak for up to 30 seconds each time if you haven't set up Enhanced Dictation.

The purple indicator on the microphone should move as you speak. If it doesn't, your Mac can't hear you. You'll need to reposition your microphone or configure which microphone is used from the Dictation pane.
When you're done dictating, tap the fn key again or click Done to make your Mac stop listening to you.

Like on other operating systems, Voice Dictation won't automatically fill in the appropriate punctuation marks as you speak a sentence normally. You'll need to speak the punctuation marks you want to type. For example, to type "I'm doing well. How are you doing?", you'd have to say "I'm doing well period how are you doing question mark."
Related: Use Voice Dictation to Save Time on Android, iPhone, and iPad
Here's a full list of voice dictation commands you can use, adapted from Apple's help site. If you have an iPhone or iPad, note that these are identical to the voice commands used on Apple's iOS .
- Punctuation: Apostrophe (‘), open bracket ([) and close bracket (]), open parenthesis (() and close parenthesis ()) open brace ({) and close brace (}), open angle bracket (<) and close angle bracket (>), colon (:), comma (,), dash (-), ellipsis or dot dot dot (…), exclamation mark (!), hyphen (–), period or point or dot or full stop (.), question mark (?), quote and end quote (“), begin single quote and end single quote (‘), semicolon (;)
- Typography: Ampersand (&), asterisk (*), at sign (@), backslash (\), forward slash (/), caret (^), center dot (·), large center dot (•), degree sign (°), hashtag or pound sign (#), percent sign (%), underscore (_), vertical bar (|).
- Currency: Dollar sign ($), cent sign (¢), pound sterling sign (£), euro sign (€), yen sign (¥)
- Emoticons: Cross-eyed laughing face (XD), frowny face (:-(), smiley face (:-)), winky face (;-))
- Intellectual property: Copyright sign (©), registered sign (®), trademark sign (™)
- Math: Equals sign (=), greater than sign (>), less than sign (<), minus sign (-), multiplication sign (x), plus sign (+)
- Line spacing: new line , new paragraph , tab key
You also have control over formatting and spacing:
- Say numeral or roman numeral and speak a number. For example, if you say “eight,” it will appear as 8 or VIII.
- Say no space on , say something, and then say no space off . For example, if you say “good day sir,” your words would appear as “gooddaysir”.
- Say caps on , say something, and say caps off . The words you spoke will appear in Title Case.
- Say all caps on , say something, and then say all caps off . The words you spoke will appear in ALL CAPS.
- Say all caps and say a word — the next word you speak will appear in ALL CAPS
Whereas the Windows Speech Recognition feature is extremely powerful and can feel more like an accessibility tool than something intended for the masses, the Mac Voice Dictation feature is more streamlined and simplified. It's easy to start using without a long training process and will feel familiar to people who've used voice dictation on smartphones and tablets. In fact, it's extremely similar to the voice dictation feature on Apple's iOS.
- Maintenance & Optimization
- Apple Watch
- Accessories
- Digital Magazine – Subscribe
- Digital Magazine – Info
- Smart Answers
- Back To School
- Apple Watch 2024
- New AirPods
- M4 Mac mini
- 11th-gen iPad
- Best Mac antivirus
- Best Mac VPN
When you purchase through links in our articles, we may earn a small commission. This doesn't affect our editorial independence .
macOS Sonoma: How to train your Mac to talk in your voice

With macOS Sonoma, you can create a Personal Voice, which is a voice that your Mac uses that sounds like you. The Mac’s text-to-speech capabilities can be used to recite in a voice similar to yours anything typed using the Live Speech feature.
According to Apple, the voice that is created uses the Mac’s machine learning, and since everything is kept on the Mac, the user’s voice information is kept private and secure. So you don’t have to worry about your recording being used for nefarious reasons by Apple or anyone else.
The Personal Voice isn’t perfect. It sounds robotic, lacking inflection and emotion, but it’s more personal than the artificial voices that come with the Mac. To hear what it sounds like, I created samples. The first recording is me speaking, and the second is My Personal Voice created in macOS Sonoma. Give it a listen.
The process of creating a Personal Voice involves a long recording session. If you are using a MacBook, you can get away with using its built-in microphone. For best results, however, you should use an external USB mic.
Here’s how to create a Personal Voice in macOS Sonoma. For more information about Apple’s new Mac operating system, check out our macOS Sonoma superguide .
How to create a Personal Voice in macOS Sonoma
- Tools required: microphone if your Mac doesn’t have one
- Materials required: macOS Sonoma
Accessibility settings

In System Settings, click on Accessibility in the left column. In the main section of the window, scroll down to the Speech section and click Personal Voice .
This will open the Personal Voice section. Click Create a Personal Voice .
Get ready to record

After entering the user password, an introduction appears. It tells you that you’ll need to recite 150 phrases that will be used to create the Personal Voice. This voice can then be used in FaceTime, Phone, and other apps. The process takes 15 to 20 minutes. Click Continue .
Another intro screen appears, advising you on how to get the best results. You should perform the recordings in a quiet place that creates very little echo, and you should speak naturally. If you need to, you can stop the session, save the results, and finish it later. Click Continue again to start.
Recording check

Before you begin recording, you need to provide a name for the voice. Enter it and click Continue .
Now the Mac will check the sound quality. At the bottom of the window is a red record button and a label that indicates which mic it is recording from. If it is not the mic you want, you’ll need to cancel the session and then go into the Sound System Settings and select the mic you want to use. Then you need to go back to the first step and start over.
If the red button shows the correct mic, you may proceed. Click the red circle and read the bold phrase. Remember, speak as you normally would in a conversation. When you are done, the process will automatically sense that you are finished talking and proceed to the next step.
Recording Considerations

When you finish the initial recording, the Mac analyzes it and will let you know if there are any issues. For example, the analysis shown here says that there is too much background noise. You can take this opportunity to address any issues you may have and then click Check Again to do another test.
You can also ignore these suggestions and plow ahead. Or maybe you got the all-clear in the first place. In any case, click Continue to start the procedure.
Do this before recording the first phrase

The first Read the Phrase screen appears, but don’t click the red record button just yet. There are a few things you should know:
- Under Read the Phrase is an indicator of your progress. If you want to go back to a previous phrase, click the left button. Click the right button to move forward in the list.
- At any time you can click Done, even if you haven’t read all 150 phrases. Your place in line will be saved and you can come back and continue the process.
- The blue Preview button will have the Mac read the phrase to you, in case you have trouble reading. You can then click the red button and repeat what you heard.
- Continuous Recording : After saying each phrase, the next one automatically appears and you don’t need to press the record button at all.
- Stop at Each Phrase : After saying each phrase, the next one automatically appears, but you must click the record button.
Now that you know what’s going on with the UI, make any adjustments you want.
Start recording the phrases

Click the record button to start the process. This will take 15 to 20 minutes.
Tip: If you are reading a phrase, mess up, and want to start over, click the record button to stop. When you’re ready, click the record button and continue recording.
How to pause and then restart later

Maybe you need a break or have to go do something else. To stop the session, click Done to exit. To restart the session, follow these steps:
- Go into S ystem Settings > Accessibility , look for the Speech section, and click Personal Voice .
- Under the Personal Voice section you’ll see an entry with the name of your personal voice and underneath it is the number of phrases you need to record. Click the “i” icon next to it.
- Enter your user password in the pop-up that appears.
- A window appears with a Continue Recording button. Click it.
You’ll need to do the sound quality check again, but after that, the phrase recording will proceed and you can continue the process.
You’re Done Recording

After you say the 150th phrase, you’ll reach the end of the session. A You’re Done Recording window appears and after you’re done patting yourself on the back, click Continue .
Prepare Your Personal Voice

Now your Mac needs to get to work–and it’s going to take a while, so if you’re using a MacBook, plug it in. You’ll get a notification when the Personal Voice is done and ready to use. On a M1 Pro MacBook Pro, this took about 90 minutes.
Click Done to start the process. The Personal Voice section in the Accessibility System Setting will display the progress made on making your voice. You can use your Mac for other work while this is going on, but you shouldn’t shut it down. When the process is done, the progress notification will be replaced by the creation date.
The Personal Voice System Setting has a couple of other preferences to set:
- Share across devices : This allows your Personal Voice to be used on other Macs running macOS Sonoma, iPhones with iOS 17, and iPads with iPadOS 17. Turn this one if you’d like to do that.
- Allow applications to use your Personal Voice : Turning this on allows applications to request to use Personal Voice to speak aloud through the Mac’s speakers or during calls.
Adjust the Live Speech System Setting

Now that your Personal Voice has been created, you need to adjust the Mac’s settings so you can use it in apps. This is done in the Live Speech setting,
- Go to System Settings > Accessibility , then scroll down to the Speech section and click on Live Speech .
- In the Voice setting, click the pop-up menu. Look for your Personal Voice and select it.
- Turn on the switch at the top for Live Speech .
A Type to Speak box will appear, and you can enter some text and hit Return to sample your Personal Voice. If you want to hide the box, click the menu bar icon that looks like the Live Speech icon (a keyboard with a microphone in the lower right corner).
How to use Text to Speech in FaceTime, macOS

If you want to use text-to-speech input in FaceTime, go to the Video menu in the FaceTime app, and select Transcriptions Text-To-Speech under the Microphone section.
If you want to set macOS to use Text to Speech for the Mac, go to System Settings > Sound , then scroll down to the Output & Input section and click on Input . Click on Transcriptions Text-To-Speech.
That’s it! You should be able to use your Personal Voice in text-to-speech situations. If you don’t like how the Personal Voice sounds, you can delete it and do the procedure again. You even add another Personal Voice by doing the procedure again.
Author: Roman Loyola , Senior Editor, Macworld

Roman is a Macworld Senior Editor with over 30 years of experience covering the tech industry, focusing on the Mac and other products in the Apple ecosystem. He is also the host of the Macworld Podcast. His career started at MacUser, where he received Apple certification as a repair technician (when Apple did that kind of thing). He's also worked for MacAddict, MacLife, and TechTV.
Recent stories by Roman Loyola:
- This new Safari feature lets you snap away annoying ads like Thanos
- Macworld Podcast: Apple Intelligence early impressions
- This app shows how the MacBook’s ugly notch can be pretty useful
How to Convert Text to Speech on a MacBook

- Make Your MacBook Read for You
Whether you prefer to have content read to you when busy, are too tired to read, or are a special needs individual, the text to speech feature on MacBook can prove to be a boon. With just a few clicks or key combinations, users can transform any text into speech, saving time and boosting productivity. You can now turn your favorite books or articles into speech and listen to them read aloud anywhere, anytime—without having to carry the books or flip through each page physically.
Furthermore, not everyone has time to read lengthy documents or time-consuming emails on their Mac. This is where the text to speech in Mac serves as an easier way to consume content without straining one's eyes. In this blog, we'll dive into the top benefits of using this powerful function to transform how users interact with their device, how to use the feature with just a press of a key combo, and some of the alternatives to MacBook text to speech.
Table of Contents
How to enable text to speech on a macbook, speech customizations, range of voice languages and accents, various download formats , top substitutes for macbook text to speech, which is the best substitute for mac text to speech.
To enable MacBook to speak selected text, simply press the key combination 'Option + Esc.' There is also an alternative option to customize the keyboard shortcut to use other features. For example, users can decide to display a controller on the screen that enables them to quickly alter the speech rate, resume, or stop speaking using the play button. Here are the steps to enable TTS on Mac:
Step 1: On MacBook, select Apple Menu > System Settings. Then, click on the 'Accessibility' option in the sidebar. (You may need to scroll down.)
Step 2: Click on 'Spoken Content.'
Step 3: Next, turn on 'Speak selection.'
Step 4: Press the default key combination 'Option + Esc.' The TTS will now start speaking in its system voice. If a particular text is marked when pressing the key combination, Mac will speak the selected text in the default voice. Else, present text items in the current window are spoken. For instance, if a new window consists of Mail, an email message is read aloud. If no text items are available on the screen, one can hear a beep.
Step 5: Press the key combination 'Option + Esc' again to stop the text to speech feature. The default voice will now stop speaking.
Note: If users set the option to automatically show the controller, it appears on the screen when the Mac starts speaking. The controller can be used to move forwards or backward one sentence in the text.

Why Text to Speech Software Over the Text to Speech Feature on Mac?
Although the inbuilt text to speech function on MacBook serves a decent purpose with a simple press of a key shortcut, the range of its functions is not adequate for various use cases. In fact, MacBook's text to speech options are quite limited for users when it comes to speech modulations and customizations.
The inbuilt TTS has a 'Controller' that allows users to pause, resume or stop the speech, tweak the speaking rate, and skip ahead or back in the read text. But that is all it has to offer. While there are a few options to highlight or change the style of the text appearing on the screen, it puts users at a disadvantage when it comes to altering the speech. Users often like to hear the accent they are familiar with to understand through speech.
Thankfully, there are various best TTS software in the market with additional features that far surpass the limitations of MacBook's TTS feature. Users can add a web browser extension to listen to the text directly from a web page. TTS software even allows users to drag and drop text files, including Microsoft Word documents, PDFs, and images, and convert them into speech. Some TTS software also go beyond just reading the text aloud to creating voiceovers for diverse content. For instance, users can create realistic voiceovers for their YouTube videos using a script , create audiobooks that sound like a human is narrating them, and more.
Also read : Three Simple Ways to Convert PDF to Speech
Let's look at some of the benefits of choosing a TTS software over the TTS feature on Mac:
TTS software can prove to be a boon when it comes to the range of options available to modify speech. Using TTS, users can convert a text file into speech with advanced options like professionally modulating the pitch and speed of the voice, changing certain pronunciations , and adding pauses to the speech, which are amiss in the TTS feature on MacBook.
Unlike Mac, TTS software enables users to customize the voice for the speech by allowing the user to select from a range of languages and accents. Some software have filters such as gender, age group, and use cases, enabling users to easily select the voice based on their project requirements.
TTS software facilitate the download of created projects in various audio formats like MP3 , AAC, WMA, and WAV, eliminating the need for a third-party tool to convert the file to a desired format.
Natural Readers
WellSaid Labs
Amazon Polly
TTS Reader
Speechify
Why is Murf the Best Text to Speech Software for Mac?
Murf is undoubtedly the best text to speech alternative for Mac, considering the all-encompassing premium features of the platform. Users can customize their project based on use cases by selecting from a range of available options, including eLearning , audio ads, IVR systems, audiobooks, public announcements, podcasts, presentations, articles, and blogs.
Murf also offers various voice customizations, like adding pauses, managing the speed and pitch of the AI voice, and enhancing the pronunciation of certain words, enabling users to fine-tune their voiceover. A notable feature of the platform is the ability for users to improve the pronunciation of a particular word using either IPA phonemes or alternate spellings.
That said, Murf offers users the choice to choose an AI voice from a range of 120+ natural-sounding voices in 20+ languages across different accents and tonalities. The tool allows users to even add media such as videos, images, or background music to the finished audio projects.
With Murf, one can also save projects as audio, video, and voice with background music. Murf not only ushers in advanced TTS functions but also provides superior options to create full-fledged audio-visual projects . Additionally, users can deploy high-quality voices on apps, websites, and other services at scale with Murf's text to audio API , which is simple and easy to use, irrespective of the application, product, or website.
Also read : Unleash Creativity by Converting ChatGPT Text to Speech
So, if you're looking for a high-quality, customizable TTS solution, Murf is definitely worth considering.

How to enable text to speech on a Mac?
Users can press different key combinations such as 'Command+ F5' or 'Option + Esc' simultaneously to activate the TTS feature on macOS. A second way users can enable Mac to read aloud is: navigate to the Apple Menu, open "System Preferences," click on "Accessibility," and then on "Spoken Content." The TTS will immediately start reading the current page out loud.
Murf is among the best TTS for macOS and other operating systems. It supports multiple languages and accents, hundreds of natural-sounding voices, and is super easy to use.
You should also read:

How to create engaging videos using TikTok text to speech

An in-depth Guide on How to Use Text to Speech on Discord

Medical Text to Speech: Changing Healthcare for the Better
- Skip to main content
- Skip to header right navigation
- Skip to site footer
tech news, reviews & how to's
This article may contain affiliate links.

How To Enable The Speech To Text Mac Shortcut In macOS
Here’s how to enable a speech to text Mac shortcut in MacOS.
Want to talk to your computer and have it type for you? Setting up a speech to text Mac shortcut is easy to do and doesn’t require any additional Mac dictation software. The macOS already has voice to text natively built into the operating system. Here’s an easy speech to text Mac shortcut tutorial for beginners.
Open System Preferences
Keyboard options, dictation & language selection, enhanced dication & offline access, setup a speech to text mac shortcut, place your mouse where you want to start dictating text, press your assigned function key or sequence, start talking, macos speech to text tips, how to use speech to text on macos.
To use speech to text on macOS, you first need to turn it on. This is a very easy tutorial. If you are very Mac savvy, then just enable the Dication feature under the Keyboard setting in System Preferences . Or follow the steps below. Let’s begin!

On your Mac, choose the Apple menu in the top left of your menu bar and select System Preferences from the drop-down menu.
- Apple > System Preferences

After you open the System Preferences panel, you’ll see a collection of preference icons. Select Keyboard .
- System Preferences > Keyboard

There are several sub-options under the Keyboard ‘s Dictation submenu: Keyboard, Text, Shortcuts, Input Sources, Dictation.
- Click on the Dictation sub menu.
- Turn on Dictation .
- If you’re asked if you want to improve Siri and Dictation, click Not Now .
- Choose a Language . To dictate using another language besides English, click the Language pop-up menu, then choose a language and dialect.
- Apple > System Preferences > Keyboard > Dictation > On

Enhanced Dictation is optional. You can skip to the next step if you want.
Do you want the ability to dictate speech to text without an Internet connection? Depending on your installed version of the macOS, you might be presented with an option to enable offline dictation. This could be useful if you are in an area with limited connectivity or want to use this feature while on an airplane.
Just be aware that this feature requires at least a gigabyte of hard drive storage. Make sure you have extra space for these files before trying to install.
- Apple > System Preferences > Keyboard > Dictation > Use Enhanced Dictation

How do you want to tell your Mac to start listening for your speech to text input? The default Mac speech to text shortcut for dictation is to press the Function key twice. But you can use the Command, Control, or whatever keys you want. Just select Customize to change to the keyboard shortcut of your choice.
- Apple > System Preferences > Keyboard > Dictation > Shortcut
How To Dictate Text

Once you’ve enabled the Dictation feature and selected your keyboard shortcut, you can now start speaking into your computer and letting it type for you. Try using this speech-to-text feature to compose an email . You’ll be surprised how much time this feature can save you on a daily basis!
- Open a document or locate a text field where you want to start dictating text.
- Click your mouse in the place where you want to start dictating.
- Press the Function key twice (or whatever keyboard shortcut you previously selected).
- A microphone icon should appear with a fluctuating loudness indicator and make a chirp sound.
Once the microphone is active, your computer will start to turn your voice into text.
- Start talking. Speak clearly and only try to dictate in short bursts. Try one or two sentences at a time.
- When you’re finished dictating, press your keyboard shortcut key again.
Here are some tips for using the speech to text feature on macOS:
- Speak clearly and slowly. If you speak too fast, or mumble, your dictation results will be bad. Going back to re-edit everything isn’t worth the time. Just do it right the first time.
- Speak in smaller chunks. Don’t try dictating a college commencement speech in one try. The Mac speech to text function isn’t made to listen for long periods of time. Smaller sections that are 60 seconds are less work best.
- Avoid background noise. If possible, move to a quiet area. Background noise can cause unpredictable results with the Mac dictation software.
- Speak punctuation marks as needed. If you want to end a sentence, then just say “period” or “questions mark” and the dictation software will add that punctuation for you.
- Create new lines or paragraphs. To create a new line or a paragraph break, just say “new line “ or “new paragraph “.
- Use a professional external microphone. The default microphone on your MacBook will work fine for most users. However, if you are having issues with your dictation results, you can try using an external microphone like the( Amazon link) Blue Yeti ($99+) .

Simple Hack to Disable WiFi Network: How to Cause Chaos and Confusion

How To Stop Apple Music From Automatically Playing

How to Reset Your Eero Wi-Fi System to Solve Network Issues

Hi, I’m Zack Applegate. I’m a technology writer at MethodShop. Please check out my articles on a variety of topics, including artificial intelligence, music, movies, and silly tech stuff like funny Elon Musk jokes and rock bands with weird names. If you have article ideas, please connect with me on Facebook.
You’ll also enjoy these posts
MOST POPULAR posts

7 Pictures Of Naked People Captured By Google’s Cameras

Top 200 Nielsen DMA Rankings (2024) – Full List

How To Change The Default LG TV Home Screen To Live TV

Dating Acronyms: The Ultimate List Of Useful Dating Abbreviations

Is Your Hatch Restore Already Registered? Here’s How To Fix It And Unregister A Hatch Restore.

35 Famous Caddyshack Quotes That’ll Make You Laugh
MORE LIKE THIS

How To Erase iPod Tutorial — The Super Fix for Most iPod Problems

5 Compelling Reasons To Turn Your House Into A Smart Home

The Origin of the Popular Phrase ‘Leopards Ate My Face’

The 6 Best USB Data Blockers To Prevent Hackers From Juice Jacking Your Phone

How To Easily Create A PayPal Shipping Label Without Invoice

25 Chilling Quint Jaws Quotes From The 1975 Blockbuster Film
check out these trending posts

The 28 Most Memorable Quotes From The Godfather Trilogy

12 Famous Casablanca Quotes That We’ll Never Forget

10 Naked Sunbathers Busted By Google Earth

25 Of The Best Pulp Fiction Quotes From Quentin Tarantino’s 1994 Film

The 14 Best National Anthem Performances Of All Time

75 Funny Out Of Office Messages (That Will Make Your Coworkers Smile)

How The Movie ‘Idiocracy’ Accidentally Predicted The Future Popularity Of Crocs

500 Useless Facts And Trivia Questions That You Totally Need To Know

Reader Interactions
Leave a reply.
Your email address will not be published. Required fields are marked *
How to use text to speech on MacBook and text to speech Mac shortcuts

Featured In
Table of contents, what is text to speech on a macbook, and how does it work, how to use text to speech with different applications, text to speech mac shortcuts, the benefits of using text to speech on your macbook, tips for improving your text to speech experience on macbook, get text to speech on macbook with speechify, what is the shortcut for text to speech on mac, how do you dictate and type on a mac, what is the hotkey for text to speech for mac, what is text to speech.
Text to speech on MacBook and text to speech Mac shortcuts are essential if you are looking to save time, increase productivity, and improve accessibility.
Many people own MacBooks, and they are powerful computers. If you are one of numerous Mac users, you might want to check out your text to speech ( TTS ) options for the Mac operating system. It can be so beneficial for you, and it’s easy to use.
Text to speech is a type of speech synthesis software that allows you to easily convert text into speech with an AI-generated voice. What this means is that you can use an existing text, and the program will read it to you.
Using text to speech apps can be quite helpful. So, how does it work? All you need to do is enable your chosen TTS app, and once you do, you will be able to convert any type of text—from web pages to Microsoft Word documents and more—into an audio file.
The app will then go through the text and read it aloud. You will get a chance to customize the speaking rate, languages, accents, and so much more.
There are many text to speech options for MacOS.
How to enable text to speech on your MacBook
The first thing you will need to do is find an app that works on MacBooks and install it on your device. Fortunately, there are plenty of options to choose from. As for the choice, why not pick the best text to speech app available on the market— Speechify .
Once you install Speechify from the App Store , using it is quite easy. The app works on your desktop, and also has both Safari and Google Chrome web browser extensions. Speechify Premium additionally supports OCR, which allows you to snap a photo of a text, and the character recognition will turn the text into audio.
This can save you so much time, and the quality of the app will create a seamless experience for your text to speech needs.
Text to speech APIs work with numerous applications. One of the most common uses is with browsers like Safari or Chrome, and you can add it as an extension. The type of settings and functions you will get mostly depends on the TTS tool you choose. You can also download apps for your Apple desktop or mobile devices—whether that be your MacBook, iPhone, or iPad.
The majority of well-known brands have their own version of text to speech. These include Speechify, Google Cloud Text to Speech Amazon Polly, Microsoft Azure, NaturalReader, and many more.
You can also check out the native TTS app on MacOS, although its functionality is quite limited compared to a more robust TTS app like Speechify.
Starting a text to speech app is quite simple—and if you use keyboard shortcuts, the process is even quicker. Follow these steps to turn on text to speech MacBook shortcuts:
- Head over to the Apple menu or Dock, and open System Preferences. A new window will open up.
- Click the Accessibility section in the new window. On the left side of the panel, locate the Speech section.
- See the checkbox “Speak selected text when the key is pressed.” The default key is Option+Esc, but you can add any key you want. Once you do this, using the text to speech feature is as simple as it can be.
- Highlight the text you want to hear, press the shortcut, and the app will start speaking. Once the text is over, the app will stop speaking, and you can select a different piece of text.
There are so many benefits of using text to speech apps on your MacBook. First, you will be able to save so much time by not having to read everything. It is great for business, and it will make checking emails a lot more enjoyable.
You can turn on the app and multitask while listening to your emails, social media, favorite web pages, news articles, documents for work, and so much more. Individuals who struggle with reading due to dyslexia, visual impairment, or any other disability can also benefit from Speechify as an excellent accessibility tool. There are people who need a lot of time to finish a single page, and you won’t need to struggle with Speechify or any other TTS tool. Speechify even has a screen reader feature that will highlight the text as it reads it out loud, so users can follow along.
There are several ways you can improve the experience on your MacBook if you plan on using text to speech tools. The first tip on the list is to ensure the app works properly.
Text to speech programs aren’t always perfect, and the only way you can ensure they work as intended is to focus on spelling and grammar. It’s not rare for someone to make a mistake while typing, but the program won’t be able to spot the error.
This means that you should focus on both spelling and punctuation. Having a question mark at the end of the sentence will change the way the app reads it to you.
Furthermore, you should adjust the sound and voice in your chosen TTS app by customizing it to your listening preference in terms of reading speed, language, and voice quality. But to simplify things even further, you can always download the Speechify app for many incredible and easy-to-use features.
Speechify is one of the best options if you are looking for a text to speech tool. It is easy to use, and the intuitive UI makes it an excellent option for beginners. The app lets you choose between numerous languages, accents, and speak selections.
But the most appealing thing about Speechify is that the voiceovers sound so natural. This is one of the primary reasons so many users prefer using Speechify and why it is one of the most popular TTS apps for Macs today. With the addition of OCR technology, Speechify also allows you to use screenshots instead of text files, which is a huge bonus.
Speechify works on any Apple device including iPhones, iPads, or anything using iOS—as well as Android and Windows devices. This means that you can easily add it to your MacBook, and the app will instantly start saving you time and improving your accessibility.
Experience the difference of text to speech on MacBook with Speechify today.
The default shortcut for opening text to speech on Mac is Option+Esc—but you can change it at any point.
In the System Preferences section of the menu, you will move the cursor to the Keyboard and Dictation option within it. Once you pick a keyboard shortcut, you can start the app by pressing the selected keys.
To start the text to speech on macOS or mac OS x, all you need to do is press Option+Esc, unless you picked a different key combination.
Text to speech is a voice synthesis software that uses AI to create a reading system voice for the text. With it, you can have your device read text aloud, and it is a great way to convert text files to audio.
Lahnda text to speech voices
Read Aloud: Transforming the Way We Experience Text

Cliff Weitzman
Cliff Weitzman is a dyslexia advocate and the CEO and founder of Speechify, the #1 text-to-speech app in the world, totaling over 100,000 5-star reviews and ranking first place in the App Store for the News & Magazines category. In 2017, Weitzman was named to the Forbes 30 under 30 list for his work making the internet more accessible to people with learning disabilities. Cliff Weitzman has been featured in EdSurge, Inc., PC Mag, Entrepreneur, Mashable, among other leading outlets.
Looks like no one’s replied in a while. To start the conversation again, simply ask a new question.
how to enable text-to-speech on Kindle for MacBook Pro Ventura 13.0
Posted on Nov 5, 2022 4:08 PM
Posted on Dec 2, 2022 5:30 PM
Thanks, Grant, but that doesn't work either. My 2014 vintage MacBook Pro with Big Sur 11.6.8 reads out text in ebooks on Kindle for MacBook Pro without a hitch. No highlighting necessary, no selection, nothing. Ventura 13.0.1 (and the previous version that came with the new Mac before recently updating), however, doesn't read out the text in a Kindle ebook at all. I have not found any System settings having to do with text-to-speech that apply or even approach this question. I'm thinking this is new with the newest MacOS, Venture 13.
I still need help on this. Thanks!
Similar questions
- Text to speech for Kindle on MacBook Pro Monterey 12.1 How to activate/use text to speech on Kindle on MacBook Pro Monterey 12.1 843 2
- Text To Speech on Ventura 13.3 for Kindle App Hello - Has there been any update here? Text to speech still does not work on the kindle app on my Macbook Pro. 137 3
- text to speech how do i enable speech, so that when i highlight text even on a pdf, the computer reads aloud the highlighted text 394 3
Loading page content
Page content loaded
Dec 2, 2022 5:30 PM in response to mizzaka
Jan 11, 2023 2:42 AM in response to mizzaka
Hi, I have the same problem, after upgrading to Ventura.
I called both: Mac Support and Kindle Amazon Support. (Germany)
- both were not aware of this problem
- both had not idea how to fix it for now
Apples Answer was: wait until a new update comes, this may fix it.
My older Macbook with older MOS can still read with text to speech.
Dec 2, 2022 6:14 PM in response to mizzaka
Contact the developers behind Kindle Reader for Mac and ask THEM why it does not work on Ventura, or when it will work.
Jan 1, 2023 12:36 PM in response to mizzaka
I seem to be having the same issue. Speech to Text worked for me on Kindle Macbook before I upgraded my OS. Any update here?
Feb 14, 2023 8:35 AM in response to mizzaka
This doesn't work. That's what we're saying. It claims to start/stop it, but there is nothing coming out of the speakers. Macbook Pro 2021
Dec 2, 2022 6:17 PM in response to Grant Bennet-Alder
Thanks again, Grant. I did a very cursory search on Amazon to see if there were any troubleshooting helps for Kindle for Mac. Didn't come up with anything but more searching may reveal better answers. I will do some more searching. You have a point.
Jan 1, 2023 2:11 PM in response to Dan6452
Dan6452, I haven't found anything recent online - anywhere - that helps with this problem. Can't find anything on Amazon/Kindle, either. Apple hasn't said anything that I can find. At least, nothing newer than a few or more years ago, well before Ventura 13.0 and totally useless. Hope we can get an answer soon.
Jan 11, 2023 8:33 AM in response to Luna1211
@Luna1211 -- Thank you for adding your experience with this problem. I'm still thinking it isn't high on either company's list to fix. I hope I'm wrong. I've loved Apple's devices (phone, pad, laptop) for years because of the nice little extras like this; I may change my mind if Apple continues to eliminate the ease of use of its devices.
In the meantime, I won't be getting rid of my older MacBook Pro and won't be upgrading it, either. It's great to be busy in the kitchen and listen to my books!
Jan 13, 2023 10:47 AM in response to mizzaka
I also discovered this issue today. This was working on older versions of Mac OS but broke with Ventura. In Apple's defense, the Kindle app is 4+ years old. I suspect the Apple API that Amazon was leveraging has been deprecated for some time now. If Amazon was maintaining their app, they should have known that Ventura would ultimately break this and should have fixed it a long time ago.
Anyway, I think our only recourse is to pressure Amazon to release an update for their app. 4+ years may as well be 10 years. They are clearly not interested in supporting this app on Mac OS or IOS. I also suspect that this feature somewhat competes directly with Audible. Perhaps Amazon really just has very little incentive to support text-to-speech going forward.
Nov 5, 2022 5:04 PM in response to mizzaka
Kindle > Tools > Start text to Speech
I think you may have to have a selection active to be able to choose that.
Feb 14, 2023 8:43 AM in response to FiferJanis
Be sure to let the software developer know that this is not OK, otherwise they may never notice.
We Trust in Human Precision
20,000+ Professional Language Experts Ready to Help. Expertise in a variety of Niches.
API Solutions
- API Pricing
- Cost estimate
- Customer loyalty program
- Educational Discount
- Non-Profit Discount
- Green Initiative Discount1
Value-Driven Pricing
Unmatched expertise at affordable rates tailored for your needs. Our services empower you to boost your productivity.
- Special Discounts
- Enterprise transcription solutions
- Enterprise translation solutions
- Transcription/Caption API
- AI Transcription Proofreading API
Trusted by Global Leaders
GoTranscript is the chosen service for top media organizations, universities, and Fortune 50 companies.
GoTranscript
One of the Largest Online Transcription and Translation Agencies in the World. Founded in 2005.
How to Easily Transcribe Audio and Video on Your Mac

Audio to text transcription is something that we generally don’t think about until we need to do it. Whether you have a video that you need a text transcription for, an audiobook, or just some voice notes, the question is the same. How can you quickly get the audio recording into a text format, without pulling your hair out in frustration?
Have no fear! There’s an easy way to transcribe audio recording to text on Mac. Follow these simple instructions to get the job done. Your hair will thank you!
Easy Audio and Video Recording Transcription on Mac
Audio to text transcription on a mac can take many forms, and your success rate will ultimately depend upon the quality of your source recording. If your source material has a lot of distortion or garbled speech, obviously automatic transcription will be less effective. For most purposes, you can achieve satisfactory results using your Mac’s built-in functionality without investing in additional hardware or human transcription services.
Here’s the Prescription for Automatic Transcription
1. On your Mac, open System Preferences .

2. In the System Preferences window, select Dictation and Speech .

3. In the Dictation and Speech window, select the option to turn dictation on, and make sure to select the appropriate microphone input. On most systems, the Internal Microphone will be the default choice. If you have a separate microphone or input source, you can choose it here.
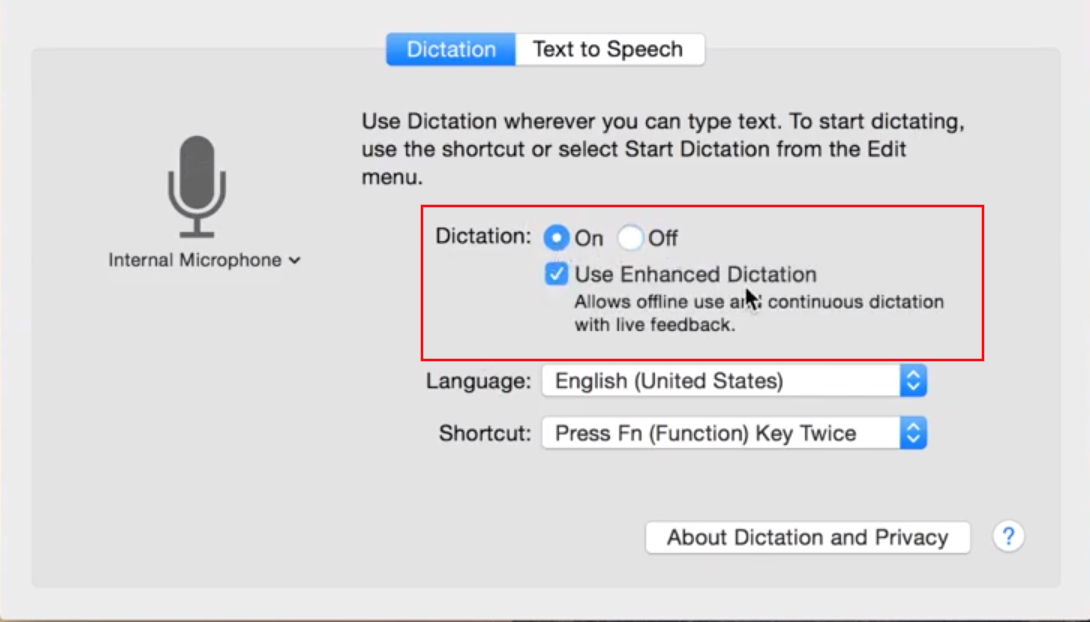
4. While still in the Dictation and Speech window, you can also check the Enhanced Dictation option, which will show you real-time results of transcribed audio to text. Real-time transcription helps correct any mistakes in automatic transcription. Note: This may require a relatively large download on some systems. Though this only needs to happen the first time.
5. Make a note of what the Shortcut key is listed, and change it if you wish. The default is pressing the Function (Fn) key twice.
6. Lastly, if you will be transcribing a language other than your default system language, select that appropriate language from the Language drop-down list.
7. After you have selected all the options in the Dictation and Speech window, you can click out of the window. Your changes save automatically.
Once your settings are in place, it’s time to begin the transcription. For this purpose, you need some kind of text editor. You can use anything from TextEdit , Apple Pages , Microsoft Word , or Google Docs .
Simply open a new document, and press the shortcut key that you selected from the Dictation and Speech window. The Speech Dictation icon will popup indicating that your computer is now listening for speech audio.

From here, it’s as simple as playing the audio that you want to transcribe into your computer’s microphone. If the sound is already on your computer, you can play it in the background using any installed audio player app. As long as your computer can “hear” the audio clearly, that’s the only thing that matters.
If you’ve selected the Enhanced Dictation , you will see real-type transcription results as the audio is recognized. Otherwise, the results will appear after you click Done . For transcriptions longer than a few sentences, it is highly recommended to use Enhanced Dictation .
Expect Imperfection in Each Section
Automated transcription certainly has its benefits. Just be prepared for some hiccups here and there. For one, the computer will not automatically know where to place punctuation. Full stops, commas, and paragraphs will need to manually inserted unless they are spoken in the audio. Also, the computer will not distinguish between different speakers or voices, so you'll have to add speaker labels on your own.
Still, automated conversion of audio to text on Mac will save you the time of typing everything out yourself, and every bit of time saved is a bonus.
The Final Word on Transcribing What’s Heard
We hope that these instructions have helped you transcribe audio record to text on Mac. For the everyday use scenario, your Mac’s built-in function can undoubtedly get the job done. If you are looking for something more foolproof, GoTranscript offers 99% accurate transcriptions performed by real humans at affordable prices. If speed and accuracy are your main concerns, GoTranscript is your go-to source for transforming spoken audio into top-notch text.
- a. Send us an email
- b. Anonymous form
- Buyer's Guide
- Upcoming Products
- Tips / Contact Us
- Podcast Instagram Facebook Twitter Mastodon YouTube Notifications RSS Newsletter
M4 MacBook Pro, iMac, and Redesigned Mac Mini Coming This Year
Apple will update its MacBook Pro, Mac mini, and iMac lines with its latest M4 chip later this year, according to Bloomberg reporter Mark Gurman, with the Mac mini also set to feature its first redesign since 2010.
The most interesting addition from Gurman's latest report is that while the M4 overhaul is mostly focused on making Apple's machines more powerful – with the M4 processor's enhanced neural engine for handling AI tasks a standout upgrade – the next Mac Mini will also get a design overhaul that will make it Apple's smallest ever desktop computer.
The new Mac mini will approach the size of an Apple TV, although it may be slightly taller than the current model, which is 1.4 inches high. Gurman's sources say it will continue to feature an aluminum shell, and individuals working on the new device have described it as "essentially an iPad Pro in a small box."
There will continue to be two versions of the Mac mini: one with the standard M4 chip, similar to the iPad Pro, and one with an M4 Pro chip. The base model is set to begin shipping from suppliers this month ahead of release later in the year, while the high-end model will not be ready until October.
There are MacBook Airs in development for the spring, and Mac Pro and Mac Studio models are planned for the middle of next year, according to Gurman.
Apple has said the ultra-thin 2024 iPad Pro serves as a model for its upcoming design philosophy, with the company planning to offer "the thinnest and lightest products" in each category across the tech industry. Gurman previously reported that Apple is working on a thinner version of the MacBook Pro.
Get weekly top MacRumors stories in your inbox.
Popular Stories

M4 Mac Mini to Become Apple's Smallest Ever Computer With Complete Redesign

10 Reasons to Wait for Next Year's iPhone 17

Apple Releases macOS Sonoma 14.6.1 With Bug Fixes

iPhone 16 Display Mass Production Ramped Up Ahead of Launch

Apple Releases Third iOS 18 and iPadOS 18 Public Betas

When to Expect New M4 MacBook Air, Mac Studio, and Mac Pro Models

Apple Releases iOS 17.6.1 With Advanced Data Protection Bug Fix
Top rated comments.
One interesting tidbit from Gurman's latest report is that while the M4 overhaul is mostly focused on making Apple's machines more powerful
Gurman previously reported ('https://www.macrumors.com/2024/06/17/apple-plans-thinner-iphone-slimmer-macbook/') that Apple is working on a thinner version of the MacBook Pro.
Next Article

Our comprehensive guide highlighting every major new addition in iOS 17, plus how-tos that walk you through using the new features.

Update now for a number of important security fixes.

Get the most out your iPhone 15 with our complete guide to all the new features.
A deep dive into new features in macOS Sonoma, big and small.

Updates to Mail, Photos, Messages, and more, with Apple Intelligence features throughout.

iPhone Mirroring, Safari improvements, new Passwords app, and Apple Intelligence features throughout.

Apple Intelligence features, Smart Script handwriting refinement, Calculator app, and more.

New hand gestures, rearrange apps in Home View, larger Mac Virtual Display, and more.
Other Stories

17 hours ago by Joe Rossignol

18 hours ago by Juli Clover

19 hours ago by Mitchel Broussard

1 day ago by Tim Hardwick

2 days ago by Tim Hardwick
accessibility
- macOS Sequoia
Apple Voice Control solves a huge accessibility problem in iOS 18 and macOS 15
A disability campaigner has highlighted what he says is a huge accessibility breakthrough with Voice Control in the latest iPhone and Mac betas.
He said that what may sound like a small improvement is a massive improvement to those who, like him, rely on voice to control their iPhone, iPad, and Mac …
The difference between Siri and Voice Control
Siri allows you to dictate text to your Apple devices, but severely disabled people need more than that. They also need to use their voice to open apps, edit text, and so on.
That’s why Apple also offers a much more advanced accessibility feature known as Voice Control. First launched in iOS 13 and macOS Catalina, this allows users to use a free-flow mix of dictation and commands. Here’s how Apple describes it:
Voice Control offers an enhanced command and dictation experience. Users can traverse and control the entire screen with just their voices, giving them full access to every major function of the operating system. Additionally, users can gesture with their voices to click, swipe, and tap anywhere—so they can do everything someone could do with a mouse or with touch. Voice Control availability on macOS, iOS, and iPadOS ensures a consistent experience for users on all of their Apple devices.
Crucially, Voice Control is able to distinguish dictated text from commands.
For example, in Messages, if you say, “Happy birthday. Tap send.”, only “Happy birthday” is sent, just as you intended. If you say, “Happy birthday. Delete that.”, “Happy birthday” is transcribed and then deleted.
A long-standing pain point
However, there has been one long-standing problem with Voice Control that disability campaigner Colin Hughes raised back in 2022 . Custom vocabulary allows users to include technical terms and names which the system might not otherwise understand, but it ignored capitalization.
That meant that, even though it could understand the pronunciation of names for people and companies, it didn’t capitalize them.
The frustrating thing is that the names are already in the OS in the Contacts app, but dictation doesn’t recognize them and this solution would get around that problem. I have contacts with a Polish name, Wojtek, and a Welsh name, Morlais, and Voice Control never understands them when dictating, even if they are added as custom words in vocabulary.
Now solved in the latest iOS and macOS betas
As of the latest public betas, this is fixed on both iPhone and Mac. Hughes demonstrates this in a brief video:
This is what grown-up dictation with Apple Voice Control looks and sounds like. After 5 years of lobbying @Apple , the app now capitalises proper nouns added to custom vocabulary. As of iOS 18 beta 3, the app adheres to basic grammar, and finally becomes a productive tool 🙏 pic.twitter.com/wxxutkhxkN — Colin Hughes (@ColinHughesUK) August 7, 2024
Hughes told us that he is in celebratory mood.
If I had some champagne, I’d be polishing off the bottle today! Thanks for listening and finally getting there, Apple!
He also noted what an exciting time it is for accessibility generally. Despite having almost no use of his arms, he was able to shoot the video himself using a voice command on RayBan Meta smart glasses .
Image: 9to5Mac using background from Alexander Grey on Unsplash
FTC: We use income earning auto affiliate links. More.
Check out 9to5Mac on YouTube for more Apple news:

Ben Lovejoy is a British technology writer and EU Editor for 9to5Mac. He’s known for his op-eds and diary pieces, exploring his experience of Apple products over time, for a more rounded review. He also writes fiction, with two technothriller novels, a couple of SF shorts and a rom-com!
Ben Lovejoy's favorite gear

Dell 49-inch curved monitor

Manage push notifications
More From Forbes
Apple iphone 16, iphone 16 pro release date proposed in new report.
- Share to Facebook
- Share to Twitter
- Share to Linkedin
Updated August 10 with new information about Foxconn and production of this year’s iPhones.
The new iPhone 16, iPhone 16 Plus, iPhone 16 Pro and iPhone 16 Pro Max will almost certainly be unveiled in a month’s time. But when, exactly? You can read my detailed predictions of when the iPhone will go on sale, when the keynote revealing it will happen and even when the keynote will be announced here . But a new production line report has emerged which can give greater clarity of what’s happening whenand another report adds more credence to it.
The iPhone 15 is about to be replaced. Here's when the iPhone 16 will be announced.
The latest indication comes from a claim that Foxconn, crucial to manufacture of the iPhone in China, has recruited extra staff. And quite a lot of them: 50,000 new works have been hired according to Business Korea , as spotted by MacRumors . Extra staff is another very clear indication of production ramping up as the release approaches. And the timing is a good fit for the release date of Friday, September 20—more on the dates below.
Here's how MacRumors describes the influx of extra staff: “The company has intensified production efforts with its primary manufacturing partner, Foxconn, in Zhengzhou, China. The factory, known as the world's largest iPhone production base, is now operating at full capacity, having brought in 50,000 additional workers within the last two weeks.”
Today’s NYT Mini Crossword Clues And Answers For Saturday, August 10
Daniel cormier calls out ufc for protecting its ‘golden goose’, election 2024 swing state polls: harris surges ahead of trump in pennsylvania, michigan and wisconsin.
Meanwhile, mass production of the OLED displays which will adorn the iPhone 16 series phones has been ramped up, according to ET News , with Samsung on track to produce 80 million while LG makes 43 million, it’s claimed.
So, why does this matter? Because it suggests that production of the iPhone is on schedule, that is, no delays are anticipated at this stage. If that’s correct, that means the likelihood of the iPhone 16 series being on sale in September is very strong.
More specifically, it leaves the possible date for the keynote that unveils the hardware—alongside the Apple Watch Series 10 and perhaps new AirPods—seems to be holding steady at Tuesday, September 10.
As ever, Apple likes to be unpredictable, so don’t be surprised if it moves a day earlier or a couple of days later instead. For sure, there’s one day it won’t be: September 11 falls on a Wednesday but that’s the day Apple has avoided since it’s the anniversary of the 2001 attacks.
With all on schedule, it seems, that means the pre-orders for the phones will begin on Friday, September 13 and the iPhone 16 will be on sale on September 20, that is, the following Friday.
Those final dates, for pre-orders and onsale seem to be very likely indeed: even if the keynote moves by a day or two, pre-orders and onsale are almost certainly set in stone.
Apple knows what’s happening, but until it actually announces the keynote, it can change anything it needs to up until the very last minute.
Look out for the keynote to be announced in the first week of September, almost certainly just when the big electronics trade show is getting going. I’ll be going into full details the second it’s announced, almost certainly on Tuesday, September 3 or Wednesday, September 4. Check back here then, please.

- Editorial Standards
- Reprints & Permissions
Join The Conversation
One Community. Many Voices. Create a free account to share your thoughts.
Forbes Community Guidelines
Our community is about connecting people through open and thoughtful conversations. We want our readers to share their views and exchange ideas and facts in a safe space.
In order to do so, please follow the posting rules in our site's Terms of Service. We've summarized some of those key rules below. Simply put, keep it civil.
Your post will be rejected if we notice that it seems to contain:
- False or intentionally out-of-context or misleading information
- Insults, profanity, incoherent, obscene or inflammatory language or threats of any kind
- Attacks on the identity of other commenters or the article's author
- Content that otherwise violates our site's terms.
User accounts will be blocked if we notice or believe that users are engaged in:
- Continuous attempts to re-post comments that have been previously moderated/rejected
- Racist, sexist, homophobic or other discriminatory comments
- Attempts or tactics that put the site security at risk
- Actions that otherwise violate our site's terms.
So, how can you be a power user?
- Stay on topic and share your insights
- Feel free to be clear and thoughtful to get your point across
- ‘Like’ or ‘Dislike’ to show your point of view.
- Protect your community.
- Use the report tool to alert us when someone breaks the rules.
Thanks for reading our community guidelines. Please read the full list of posting rules found in our site's Terms of Service.

No featured offers available
- Quality Price,
- Reliable delivery option, and
- Seller who offers good customer service
Sorry, there was a problem.

Image Unavailable

- To view this video download Flash Player
Apple iPad Pro 11-Inch (M4): Built for Apple Intelligence, Ultra Retina XDR Display, 256GB, 12MP Front/Back Camera, LiDAR Scanner, Wi-Fi 6E, Face ID, All-Day Battery Life — Silver
Sustainability features.
This product has sustainability features recognized by trusted certifications.
Conserves energy compared to similar products.
EPEAT addresses the sustainability impacts of electronic products. An EPEAT registered product must meet required criteria and can meet optional criteria. The criteria depend on the type of product and can include energy efficiency, reduction of fluorinated greenhouse gases (F-Gases), and end of life management. Products meeting 50% - 75% optional criteria are “Silver” and those meeting more than 75% are “Gold”.
Learn more about this certification
Certification Level
Wi-Fi + Cellular

Nano-texture glass
Standard Glass
| Brand | Apple |
| Model Name | iPad Pro |
| Memory Storage Capacity | 256 GB |
| Screen Size | 11 Inches |
| Display Resolution Maximum | 2420-by-1668-pixel resolution at 264 ppi |
About this item
- WHY IPAD PRO — iPad Pro is the ultimate iPad experience in an impossibly thin and light design. Featuring the breakthrough Ultra Retina XDR display, outrageous performance from the M4 chip, superfast wireless connectivity,* and compatibility with Apple Pencil Pro.* Plus powerful productivity features in iPadOS.
- BUILT FOR APPLE INTELLIGENCE — Apple Intelligence helps you write, express yourself, and get things done effortlessly. It draws on your personal context while setting a brand-new standard for privacy in AI. Coming in beta this fall.
- 11-INCH ULTRA RETINA XDR DISPLAY — Ultra Retina XDR delivers extreme brightness and contrast and exceptional color accuracy and features advanced technologies like ProMotion, P3 wide color, and True Tone.* Plus a nano-texture display glass option is available in 1TB and 2TB configurations.
- PERFORMANCE AND STORAGE — Up to 10-core CPU in the M4 chip delivers powerful performance, while the 10‑core GPU provides blazing-fast graphics. And with all-day battery life, you can do anything you imagine on iPad Pro.* Up to 2TB of storage means you can store everything from apps to large files like 4K video.*
- IPADOS + APPS — iPadOS makes iPad more productive, intuitive, and versatile. With iPadOS, run multiple apps at once, use Apple Pencil to write in any text field with Scribble, and edit and share photos.* Stage Manager makes multitasking easy with resizable, overlapping apps and external display support. iPad Pro comes with essential apps like Safari, Messages, and Keynote, with over a million more apps available on the App Store.
- APPLE PENCIL AND MAGIC KEYBOARD FOR IPAD PRO — Apple Pencil Pro transforms iPad Pro into an immersive drawing canvas and the world’s best note‑taking device. Apple Pencil (USB-C) is also compatible with iPad Pro. Magic Keyboard for iPad Pro features a thin and light design, a great typing experience, and a built‑in glass trackpad with haptic feedback, while doubling as a protective cover for iPad.*
- ADVANCED CAMERAS — iPad Pro features a landscape 12MP Ultra Wide front camera that supports Center Stage for videoconferencing or epic Portrait mode selfies. The 12MP Wide back camera with adaptive True Tone flash is great for capturing photos or 4K video with ProRes support. Four studio-quality microphones and a four-speaker audio system provide rich audio. And AR experiences are enhanced with the LiDAR Scanner to capture a depth map of any space.
- CONNECTIVITY — Wi-Fi 6E gives you fast wireless connections.* Work from almost anywhere with quick transfers of photos, documents, and large video files. Connect to external displays, drives, and more using the USB-C connector with support for Thunderbolt / USB 4.
- UNLOCK AND PAY WITH FACE ID — Unlock your iPad Pro, securely authenticate purchases, sign in to apps, and more — all with just a glance.*
- * LEGAL DISCLAIMERS — This is a summary of the main product features. See below to learn more.

Top Brand: Apple
Compare apple ipad products.
| Price | From: - | From: - | From: - | From: - | From: - |
| Ratings | |||||
| Display | 11-inch Ultra Retina XDR display with ProMotion, P3 wide color, and True Tone | 13-inch Ultra Retina XDR display with ProMotion, P3 wide color, and True Tone | 13-inch Liquid Retina displaywith P3 wide color, True Tone, and ultralow reflectivity | 11-inch Liquid Retina displaywith P3 wide color, True Tone, and ultralow reflectivity | 10.9-inch Liquid Retina display with True Tone |
| Secure authentication | Face ID | Face ID | Touch ID | Touch ID | Touch ID |
| Chip | Apple M4 chip | Apple M4 chip | Apple M2 chip | Apple M2 chip | A14 Bionic chip |
| Camera | 12MP Ultra Wide front camera and 12MP Wide back camera with adaptive True Tone flash | 12MP Ultra Wide front camera and 12MP Wide back camera with adaptive True Tone flash | 12MP Ultra Wide front camera and 12MP Wide back camera with adaptive True Tone flash | 12MP Ultra Wide front camera and 12MP Wide back camera with adaptive True Tone flash | 12MP Wide camera with Smart HDR 3 |
| Video | 4K video recording, ProRes | 4K video recording, ProRes | 4K video recording | 4K video recording | 4K video recording |
| Apple Pencil Compatibility | Works with Apple Pencil Pro and Apple Pencil (USB-C) | Works with Apple Pencil Pro and Apple Pencil (USB-C) | Works with Apple Pencil Pro and Apple Pencil (USB-C) | Works with Apple Pencil Pro and Apple Pencil (USB-C) | Works with Apple Pencil (1st generation) using USB-C to Apple Pencil Adapter |
| Smart Keyboard Compatibility | Works with Magic Keyboard for iPad Pro (M4) | Works with Magic Keyboard for iPad Pro (M4) | Works with Magic Keyboard | Works with Magic Keyboard | Works with Magic Keyboard Folio |
| Connector | USB-C connector with support for Thunderbolt / USB 4 | USB-C connector with support for Thunderbolt / USB 4 | USB-C connector | USB-C connector | USB-C connector |
What's in the box
- 11-inch iPad Pro
- USB-C Charge Cable (1 m)
- 20W USB-C Power Adapter
Looking for specific info?
Customer reviews.
- 5 star 4 star 3 star 2 star 1 star 5 star 85% 8% 1% 1% 5% 85%
- 5 star 4 star 3 star 2 star 1 star 4 star 85% 8% 1% 1% 5% 8%
- 5 star 4 star 3 star 2 star 1 star 3 star 85% 8% 1% 1% 5% 1%
- 5 star 4 star 3 star 2 star 1 star 2 star 85% 8% 1% 1% 5% 1%
- 5 star 4 star 3 star 2 star 1 star 1 star 85% 8% 1% 1% 5% 5%
Customer Reviews, including Product Star Ratings help customers to learn more about the product and decide whether it is the right product for them.
To calculate the overall star rating and percentage breakdown by star, we don’t use a simple average. Instead, our system considers things like how recent a review is and if the reviewer bought the item on Amazon. It also analyzed reviews to verify trustworthiness.
Customers say
Customers like the performance, appearance, value, and quality of the tablet computer. They mention that it works flawlessly, has stunning visuals, and is worth every penny. Customers are also happy with speed, thickness, and picture quality. However, some customers differ on battery life.
AI-generated from the text of customer reviews
Customers are satisfied with the appearance of the tablet computer. They mention it has a sleek, elegant design, with stunning visuals. They also appreciate the quality, performance, design, and usability. Some say that the XDR Display is breathtaking.
"...and the slim bezels around the display contribute to a modern, sophisticated look .**User Experience:**..." Read more
" Love the sleekness , picture quality, speed and the super looks of this product." Read more
"...This is legit, everything is new and everything is beautiful . Came in the Apple box and I also bought the pencil pro with it...." Read more
"...The device is super fast with increadible screen which is very bright with saturated colours and great black levels...." Read more
Customers are satisfied with the speed of the tablet computer. They mention it's very fast, with fast charging capabilities that ensure the device is always ready to go. The screen is fluid and hyper-responsive, blending powerful performance with stunning visuals. The technology, with its 120Hz refresh rate, ensures that all motion on the screen is smooth.
"...The ProMotion technology, with its 120Hz refresh rate , ensures that all motion on the screen is fluid and hyper-responsive.**..." Read more
"Love the sleekness, picture quality, speed and the super looks of this product." Read more
"Overall, a great IPad for a reasonable price. The device is super fast with increadible screen which is very bright with saturated colours and great..." Read more
"It's very fast and the screen is great, but some apps aren't optimized for it and run better on older devices...." Read more
Customers are satisfied with the quality of the tablet computer. They mention that it is an awesome device with an exceptional piece of technology. They also appreciate the durable casing and slim bezels around the screen.
"...The aluminum casing feels premium and durable , and the slim bezels around the display contribute to a modern, sophisticated look.**..." Read more
"... This is legit , everything is new and everything is beautiful. Came in the Apple box and I also bought the pencil pro with it...." Read more
"...my new M4 iPad along with the Apple Magic Keyboard makes a great and practical platform , almost lap top replacing...." Read more
"In fact, the iPad Pro is perfect . If you are a student, 11” is the best choice." Read more
Customers like the picture quality of the tablet computer. They say the rear cameras produce sharp photos and 4K videos. Some customers also mention that the screen resolution is an improvement.
"...The rear cameras produce sharp photos and 4K videos ...." Read more
"Love the sleekness, picture quality , speed and the super looks of this product." Read more
"It's very fast and the screen is great , but some apps aren't optimized for it and run better on older devices...." Read more
"Pleased with the device. Screen is incredible , very thin, quick." Read more
Customers are satisfied with the performance of the tablet computer. They mention that it works great, goes into apps flawlessly, and has a great battery life.
"...It delivers in every aspect: display quality, performance , design, and usability...." Read more
"... Performance so far is great , battery life is also great. I barely have to charge it since it’s new. I bought it in black and it’s very beautiful...." Read more
"...It just goes into apps flawlessly without me even noticing that bio metrics was needed." Read more
"Thin, good quality and amazing performance " Read more
Customers are satisfied with the thickness of the tablet computer. They mention that the aluminum casing feels premium and durable, and the slim bezels around the display make it easy to hold.
"...The aluminum casing feels premium and durable, and the slim bezels around the display contribute to a modern, sophisticated look.**..." Read more
"Powerful M4 chip, light and thin . Happy with purchase!" Read more
"It took less than 10 minutes to set up. Perfect size and is lightweight . Love it!" Read more
"Pleased with the device. Screen is incredible, very thin , quick." Read more
Customers are satisfied with the value of the tablet computer. They mention that its capabilities make it worth every penny.
"...price, the incredible experience and capabilities make it worth every penny .Highly recommended!" Read more
"Powerful M4 chip, light and thin. Happy with purchase !" Read more
"Overall, a great IPad for a reasonable price ...." Read more
"...It offers amazing value , just make sure you get a good ESR back cover and tempered glass screen protector...." Read more
Customers are mixed about the battery life of the tablet computer. Some mention that it has a decent battery life, while others say that it drains the battery very fast.
"...Battery Life:** Battery life is impressive , easily lasting throughout a full day of mixed use on a single charge...." Read more
"...security camera software on it and it started heating and draining the battery very fast , which doesn't happen on other devices...." Read more
"...Performance so far is great, battery life is also great . I barely have to charge it since it’s new. I bought it in black and it’s very beautiful...." Read more
"...Not only that, but the battery life was much worse than I expected it to be. It’s not a bad product, it’s just not what I wanted, so I returned it." Read more
Reviews with images

- Sort reviews by Top reviews Most recent Top reviews
Top reviews from the United States
There was a problem filtering reviews right now. please try again later..

- About Amazon
- Investor Relations
- Amazon Devices
- Amazon Science
- Sell products on Amazon
- Sell on Amazon Business
- Sell apps on Amazon
- Become an Affiliate
- Advertise Your Products
- Self-Publish with Us
- Host an Amazon Hub
- › See More Make Money with Us
- Amazon Business Card
- Shop with Points
- Reload Your Balance
- Amazon Currency Converter
- Amazon and COVID-19
- Your Account
- Your Orders
- Shipping Rates & Policies
- Returns & Replacements
- Manage Your Content and Devices
- Conditions of Use
- Privacy Notice
- Consumer Health Data Privacy Disclosure
- Your Ads Privacy Choices
macOS User Guide
- What’s in the menu bar?
- Work on the desktop
- Search with Spotlight
- Quickly change settings
- Get notifications
- Open apps from the Dock
- Organize your files in the Finder
- Connect to the internet
- Browse the web
- Preview a file
- Take a screenshot
- Change your display’s brightness
- Adjust the volume
- Use trackpad and mouse gestures
- Use Touch ID
- Print documents
- Keyboard shortcuts
- Apps on your Mac
- Work with app windows
- Use apps in full screen
- Use apps in Split View
- Use Stage Manager
- Get apps from the App Store
- Install and reinstall apps from the App Store
- Install and uninstall other apps
- Create and work with documents
- Open documents
- Mark up files
- Combine files into a PDF
- Organize files on your desktop
- Organize files with folders
- Tag files and folders
- Back up files
- Restore files
- Change System Settings
- Choose your desktop wallpaper
- Add and customize widgets
- Use a screen saver
- Add a user or group
- Add your email and other accounts
- Automate tasks with Shortcuts
- Create Memoji
- Change your login picture
- Change the system language
- Make text and other items on the screen bigger
- Set up a Focus to stay on task
- Set up Screen Time for yourself
- Use Dictation
- Send emails
- Send text messages
- Make a FaceTime video call
- Edit photos and videos
- Use Live Text to interact with text in a photo
- Start a Quick Note
- Get directions
- Work across devices using Continuity
- Use iPhone as a webcam
- Use iPhone with Desk View
- Stream audio and video with AirPlay
- Use one keyboard and mouse to control Mac and iPad
- Hand off between devices
- Unlock your Mac with Apple Watch
- Make and receive phone calls on your Mac
- Sync music, books, and more between devices
- Manage Apple ID settings
- Set your Apple ID picture
- What is iCloud?
- What is iCloud+?
- Store files in iCloud Drive
- Share and collaborate on files and folders
- Manage iCloud storage
- Use iCloud Photos
- What is Family Sharing?
- Set up Family Sharing
- Set up Screen Time for a child
- Share purchases with your family
- Watch and listen together with SharePlay
- Share a Photo Library
- Collaborate on projects
- Find content shared with you
- Find your family and friends
- Play games with your friends
- Listen to podcasts
- Watch TV shows and movies
- Read and listen to books
- Read the news
- Track stocks and the market
- Apple Music
- Apple Arcade
- Apple News+
- Podcast shows and channels
- Manage subscriptions in the App Store
- View Apple family subscriptions
- Guard your privacy
- Use Mail Privacy Protection
- Control access to your camera
- Use Sign in with Apple for apps and websites
- Set up your Mac to be secure
- Keep your data safe
- Create a passkey
- Understand passwords
- Keep your Apple ID secure
- Find a missing device
- Get started with accessibility features
- Connect an external display
- Use the built-in camera
- Connect a Bluetooth device
- Use AirPods with your Mac
- Optimize your Mac battery life
- Optimize storage space
- Burn CDs and DVDs
- Control accessories in your home
- Use Windows on your Mac
- Resources for your Mac
- Resources for your Apple devices
Commands for dictating text on Mac
When you dictate text, you can use commands for emoji, punctuation, formatting, and capitalization, and symbols for math, currency, emoticons, and intellectual property. The commands listed below are always available while you’re dictating text.
Additionally, in some languages you can insert emoji using your voice while dictating—for example, say “heart emoji” or “car emoji.” For supported languages, Dictation also adds certain punctuation automatically as you dictate text.
If you need additional commands to edit and format text and to control your Mac, use Voice Control. For example, you can speak commands to select or delete text, capitalize or italicize words, or press the Return key. See Use Voice Control commands .
Punctuation
Command | Result |
|---|---|
apostrophe | ‘ |
open bracket | [ |
close bracket | ] |
open parenthesis | ( |
close parenthesis | ) |
open brace | { |
close brace | } |
open angle bracket | < |
close angle bracket | > |
colon | : |
comma | , |
dash | – |
ellipsis | … |
exclamation mark | ! |
hyphen | - |
period/point/dot/full stop | . |
question mark | ? |
quote | “ |
end quote | “ |
begin single quote | ‘ |
end single quote | ‘ |
semicolon | ; |
Command | Result |
|---|---|
ampersand | & |
asterisk | * |
at sign | @ |
backslash | \ |
forward slash | / |
caret | ^ |
center dot | ・ |
large center dot | ● |
degree sign | ° |
hashtag/pound sign | # |
percent sign | % |
underscore | _ |
vertical bar | | |
Command | Result |
|---|---|
new line | Starts a new line. |
numeral | Formats the next phrase as a number. |
roman numeral | Formats the next phrase as a Roman numeral. |
new paragraph | Starts a new paragraph. |
no space on | Formats the next phrase without spaces. |
no space off | Resumes default spacing. |
tab key | Moves the cursor to the next tab stop. |
Capitalization
Command | Result |
|---|---|
caps on | Formats the next phrase in Title Case. |
caps off | Resumes the default case lettering. |
all caps | Formats the next word in ALL CAPS. |
all caps on | Formats the next phrase in ALL CAPS. |
all caps off | Resumes the default case lettering. |
Mathematical
Command | Result |
|---|---|
equal sign | = |
greater than sign | > |
less than sign | < |
minus sign | - |
multiplication sign | x |
plus sign | + |
Command | Result |
|---|---|
dollar sign | $ |
cent sign | ¢ |
pound sterling sign | £ |
euro sign | € |
yen sign | ¥ |
Command | Result |
|---|---|
smiley face | :-) |
frowny face | :-( |
winky face | ;-) |
cross-eyed laughing face | XD |
Intellectual property
Command | Result |
|---|---|
copyright sign | © |
registered sign | ® |
trademark sign | ™ |
Hand-Picked Top-Read Stories

Tech Events in Africa: Nigeria Fintech Week, #StartupSouth5, Afrilabs Annual Gathering and Others

NCC Mandates Telcos to Monitor and Record Calls and Other Communication on Their Networks or Risk N5 Million Fine

Crowdyvest Ventures into Transportation with the Launch of PlentyWaka, a Bus-Hailing Service in Lagos
Bolt introduces speech-to-text to its driver app chats, drivers react.
Leading taxi-hailing app, Bolt has introduced a speech-to-text feature to its driver app chat. This was revealed in a statement by the company seen by Technext. The company said the new upgrade will enable drivers and riders to communicate more easily and effectively while on the platform.
According to the statement, the new upgrade will allow drivers to simply speak into the app while the app transcribes it into text for the rider to see and respond to.
“ Bolt is upgrading its Driver App chat with the option to translate speech to text. This means driver partners will now have the ability to dictate a chat message instead of typing it, and the Bolt app will transcribe it to text, and send it as a regular chat message to the rider. This enables driver partners to communicate more easily and swiftly with passengers ,” Bolt said.
The speech-to-text upgrade is coming to Android devices first. To use the feature, drivers can start by tapping the microphone symbol in the respective chat. A prompt would pop up asking drivers to give Bolt permission to use their microphone. Once permission to use the phone’s microphone is given, the driver can go on to dictate the message and check and edit the text produced as needed, before sending it as a message to the rider.
Bolt believes that with this translation function, the chat upgrade will help local drivers communicate with tourists, many of whom already use Bolt while travelling to its over 50 markets around the world that Bolt operates in without needing to speak a shared language. The company says this is one of a number of ways it enables driver partners and customers to communicate with each other, including in-app calls, chat messages and language programs to help bridge language barriers.

Speaking about the speech-to-text addition to its app, Country Manager, Yahaya Mohammed said the introduction underlines the importance the company places on quick and effective communication between drivers and riders.
“At Bolt, we know how important it is to have quick and effective communication between driver partners and riders. With this upgrade, we enable driver-partners in Nigeria to communicate more easily and swiftly with our riders. It’s one of a number of ways we support a high-quality platform through quick and easy communication between driver partners and riders, including in-app calls, chat messages, and language programmes aimed at helping bridge language barriers.”
Drivers react to Bolt’s speech-to-text
Bolt’s latest addition is coming in the midst of an ongoing nationwide protest through which Nigerians are crying out for the most basic of needs; hunger. It is not surprising, therefore, that some drivers are not very enthusiastic about a feature whose importance pales in comparison with their present needs.
Kelvin for instance does not think Bolt should be introducing such a feature at such an inopportune time when people are grappling with hunger:
“ The country is hard yet they are introducing speech-to-text. No be person wey eat belle full dey speech? This Bolt app self !” he said.
In the same light, Justus questioned how the feature would increase drivers’ earnings, a factor that has been a source of disagreement for drivers who would rather an upgrade in pay than in an app chat feature.
“ How does speech-to-text improve the driver’s earnings? As usual, most policymakers are estranged from reality ,” he said.

But there are those who believe the introduction is an important one because it has the capacity to truly enhance communication. Ayobami, for instance, believes the addition will allow drivers to concentrate more on their driving.
“ I think it’s a welcome development because it will reduce the usage of phones while driving for more concentration ,” she said.
Neyosti also thinks it is a welcome development although he believes the regular Nigerian accent might not work on the app.
“ Well I don’t use Bolt just Uber so I don’t have a say on that. But if that is so, it is going to be good for someone who has good speech. I mean good accent. But for a person like me, the app is going to be confused because I have a strong Ibadan accent and I don’t think the app will understand my English ,” he said.
Bolt says the latest upgrade joins recent Driver App upgrades which include ‘Driver Compliments’, a program which recognises exceptional service and motivates driver partners through sharing positive post-trip rating compliments and comments left by customers.
See also: This Nigerian driver is dictating his own price on the Uber and Bolt apps in protest against pricing
Technext Newsletter
Get the best of Africa’s daily tech to your inbox – first thing every morning. Join the community now!
Thanks for subscribing to Technext Newsletter
Register for Technext Coinference 2023, the Largest blockchain and DeFi Gathering in Africa.

COMMENTS
Have your Mac speak text that's on the screen If you have trouble reading text on your screen, you can have your Mac speak text whenever you press a keyboard shortcut. You can customize the keyboard shortcut and set other options—for example, you can choose to show an onscreen controller that lets you easily change the speaking rate, stop speaking, and more.
In an app on your Mac, place the insertion point where you want the dictated text to appear. Press if available in the row of function keys, use the Dictation keyboard shortcut, or choose Edit > Start Dictation. Note: Press and release to start Dictation; press and hold to activate Siri (Siri must be enabled).
In many apps, your Mac can read aloud documents, webpages, messages, and more. In an app on your Mac, do any of the following: Hear an entire document: Choose Edit > Speech > Start Speaking. Hear part of a document: In a document, select the text you want to hear, then choose Edit > Speech > Start Speaking.
If you're having trouble reading what's on your Mac's screen, here's how to get Siri to audibly read out what's on screen to you.
Select text and have it read out loud on your Mac with Speak Selection. You can even customize the options to work best for you, including setting the keyboa...
Need to know how to set up and use Dictation on macOS? We've got all you need to know about this voice-to-text Accessibility feature.
First, open up System Preferences, go to Keyboard, then the 'Dictation' tab: Turn on Dictation, and when prompted, accept the terms for Apple's Dictation service. Also take note of the 'Shortcut' (e.g. 'press dictation key' or 'press control twice'. You'll use that to activate dictation later. Make sure you have your Mac's microphone selected ...
Setting Up Text to Speech on Your Mac Enabling text-to-speech on your Macbook or Apple desktop is a straightforward process. Here's how you can set it up and customize it to fit your needs: Enabling Speak Selection First, access your Mac's System Settings and click on 'Accessibility' in the sidebar.
6) Click Enable Dictation to allow Apple to use the recording. 7) In any document processor, click the Dictate icon and start speaking. 8) To change the default language, click the down arrow to ...
Learn how to dictate on a Mac with this easy guide. You can use voice to text dictation to type out your speech on any app or document.
Dictation — an Accessibility feature available on Mac computers, allows you to input text using voice-to-text typing. Here's a guide on how to Dictation on Mac.
Click the Apple menu at the top of your screen and select System Preferences. Click the Dictation & Speech icon in the System Preferences pane and ensure Dictation is set to On. Enable the Enhanced Dictation option and your Mac will download the appropriate dictionary from Apple's servers. It will then be able to interpret your voice offline.
The new Personal Voice feature works with text-to-speech so your Mac sounds like you.
Learn how to convert text to speech on a MacBook using the built-in Text to Speech feature. Follow these simple steps to make your MacBook read text aloud.
Setup A Speech To Text Mac Shortcut Setup A Speech To Text Mac Shortcut How do you want to tell your Mac to start listening for your speech to text input? The default Mac speech to text shortcut for dictation is to press the Function key twice. But you can use the Command, Control, or whatever keys you want.
Text-to-speech on MacBook and text-to-speech Mac shortcuts are essential if you are looking to save time, increase productivity, and improve accessibility.
Apple's built on text to speech should work. Are you having a problem with it? Have your Mac speak text that's on the screen - Apple Support
Kindle > Tools > Start text to Speech. I think you may have to have a selection active to be able to choose that. Be sure to let the software developer know that this is not OK, otherwise they may never notice. how to enable text-to-speech on Kindle for MacBook Pro Ventura 13.0.
Here's the Prescription for Automatic Transcription. 1. On your Mac, open System Preferences. 2. In the System Preferences window, select Dictation and Speech. 3. In the Dictation and Speech window, select the option to turn dictation on, and make sure to select the appropriate microphone input. On most systems, the Internal Microphone will ...
What is Apple Vision Pro? You may or may not be aware of virtual reality headsets: devices which you wear like goggles, with a display for each eye to produce a realistic 3D image. A VR headset ...
Apple will update its MacBook Pro, Mac mini, and iMac lines with its latest M4 chip later this year, according to Bloomberg reporter Mark Gurman,...
Explore the rise of digital impersonation scams, their impact, and the coordinated efforts of regulations, education, and technology to protect consumers and businesses.
Vice President Kamala Harris' remarks during a speech in Detroit were interrupted by a small group of protestors who persistently chanted what appeared to be a pro-Palestinian message.
A disability campaigner has highlighted what he says is a huge accessibility breakthrough with Voice Control in the latest iPhone and Mac betas. He said that what may sound like a small ...
The new iPhone 16, iPhone 16 Plus, iPhone 16 Pro and iPhone 16 Pro Max will almost certainly be unveiled in a month's time. But when, exactly?
On your Mac, choose Apple menu > System Settings, then click Accessibility in the sidebar. (You may need to scroll down.) Click Spoken Content on the right. Click the "System voice" pop-up menu, then choose a voice. To adjust how fast the voice speaks, drag the "Speaking rate" slider. Click Play Sample to test the voice and speaking rate.
Buy Apple iPad Pro 11-Inch (M4): Built for Apple Intelligence, Ultra Retina XDR Display, 256GB, 12MP Front/Back Camera, LiDAR Scanner, Wi-Fi 6E, Face ID, All-Day Battery Life — Silver: Electronics - Amazon.com FREE DELIVERY possible on eligible purchases
Commands for dictating text on Mac When you dictate text, you can use commands for emoji, punctuation, formatting, and capitalization, and symbols for math, currency, emoticons, and intellectual property. The commands listed below are always available while you're dictating text.
Speaking about the speech-to-text addition to its app, Country Manager, Yahaya Mohammed said the introduction underlines the importance the company places on quick and effective communication between drivers and riders.
Missouri Rep. Cori Bush has lost her Democratic primary to St. Louis County prosecutor Wesley Bell, securing another win for the same pro-Israel groups that helped oust New York Rep. Jamaal Bowman ...