Our Favourite Tips and Tricks for Presenting with Mural
18 September 2020 | Sam Hutchings Workshops -->

Sixty Second Summary
When presenting Workshops, Meet-ups and Remote Design Sprints, Mural is our tool of choice for introducing activity in to the session, helping us to keep everyone engaged. Since we started using Mural earlier this year, we’ve learned a few things that I’d like to share with you about how to best use Mural when presenting, especially if using a tool like Zoom as part of the presentation.
Full Article - 5 Minute Read
Split your activities across multiple mural boards.
When you have lots of people taking part in the same activity, any system is going to have a problem with consistently rendering and displaying everything, and that’s no different with Mural. We’ve found that when you put together two or three activities into the same Mural board and through 30 or more people at it, you’re going to have a problem with lag, clicks not being detected, or elements ending up in the wrong place.
So, our first tip for anyone new to using Mural is to split your activities across multiple Mural boards. By doing this, you give yourself a few advantages that you don’t have when it comes to lumping them all into one board. These advantages include:
Create Templates More Easily
When each activity is on its own Mural board, you can more easily turn that activity into a template for use in the future. This means you don’t have to spend time recreating or copying and pasting the activity every time, you just create a new Mural from the template acitvity and you’re ready to go.
Keep People Focused
With fewer activities on each board, there are fewer things to distract your attendees or participants, and fewer places for them to get lost or end up working on the wrong activity. As long a everyone is on the latest Mural in the set, you’ll know they’re focused on the activity you’re going through right now.
Improved Mural Performance
We’ve found that a Mural board full of activities, people and responses will soon crawl to a stop. Clicks won’t be responded to, and then all of a sudden a dozen post-its appear in the same place. Or certain elements won’t unhide for everyone. Or there will be those who can’t participate in voting. Or the board just won’t load for some people at all.
By splitting your activities across multiple boards, you improve the performance of each Mural, so you’re much less likely to experience problems during your workshop.
Sign up to our Mailing List for more Insights and Resources
Our monthly Mailing List is the place to be for the latest insights and resources on Design Thinking, Design Strategy and Remote Design Sprints. It’s also a great way to stay up to date with The Familiar and find out what we’ve been up to.
Share Your Screen
If you’re using a Mural as part of a remote session, especially a meetup, you can’t be certain that everyone is logging on using a device that’s capable of running Mural (or capabale of running it well). For example, some people may have to join the meetup from a smartphone or tablet, where the Mural experience may not be great, or they would rather focus on the call than the board. For these occasions, and therefore on all occasions, it makes sense that you share your screen with the call, so that everyone can see what’s going on, even if they can’t properly interact.
Turn Off Cursors
When you’re viewing a Mural, it’s normal to see everyone else’s cursors zooming around as they work on the tasks you’ve given them. You feel like a queen bee surveying all your workers as they busy around the hive. But, if you’re watching a Mural through a screenshare, these busy cursors can soon become a distraction. So, when you’re sharing your screen with others, make sure you click on your icon at the bottom of the Mural participants panel and click/tap “Hide cursors”.
Check Your Tabs
Always check your tabs or windows before going live with a screen share. Is there something in a tab or window that you shouldn’t be sharing? Is there something you’d like to keep as a secret for later? Then you need to make sure they’re not on the screen share. When using Zoom, and many other conferencing tools, you can select which exact window you want to share with people. So, make sure that you put your Mural board(s) for this session into that window, and use that for sharing.
Keep The Share Live
For those who can’t open the Mural board for whetever reason, there’s nothing more annoying than a screen share that keeps starting and stopping. If you’re not able to keep the screen share live, maybe because you need to access a script or other resource at the same time and have limited display real estate, have a producer or co-host available who can keep the screen share live for the whole session. If you don’t have one of these, ask someone in the call if they’re willing to take on that role.
Keep Up to Date with New Features
As a piece of online software, Mural is always being updated . And you may not always get an email or notification to make you aware of a change, especially if it’s something Mural is testing. When you log in, give your board a quick scan for any new features you might notice, and then try them out to see if they’ll fit into your workshopping flow.
Voice Calls
A recent addition to Mural is Voice Calls, allowing you to launch a call directly from the website. With a click of this button, everyone in the Mural can take part in a quick voice call to discuss what’s going on.
By right-clicking on anywhere on a Mural board you can now add a comment, which can be a great way to get feedback from your workshop participants. Comments appear as dots on the Mural canvas, so they’re not confused with anything else you’ll be using to run your workshop, and they can contain a threaded conversation of replies, making them very useful.
Private Mode
Very new to Mural is “Private Mode”. Acccording to the tooltip, “During Private Mode, content created or edited by others will be hidden. Only you will see content you add or edit. All content will be visible for everyone when you end Private Mode.” This tool can be very useful in workshops when you want people to work on ideas or an activity on their own, without others being able to see what they’re doing. Before, this would have meant people doing stuff with pen and paper, but now all the work an be done in Mural and then revealed when ready.
Use Templates
When you’re busy delivering workshops, meetups and Design Sprints, the last thing you want to be doing is starting with a blank Mural canvas everytime. That’s where Templates come in.
You can create your own templates, use ones shared by Mural , or even bring in templates made by others and found on the web. These templates contain pre-filled and pre-drawn elements that you can use in your workshops, speeding up preparation and allowing you to reuse content that you often need.
Turn Your Activities Into Templates
If you’ve read this whole article, then you’re hopefully already planning to have each of your activities have its own Mural board. One great aspect of doing this is being able to turn each of your activities into a template, so that you can use it again in the future without having to completely reconstruct the activity from scratch or navigate around existing post-its when copying and pasting from an old board to a new one. You just spin up a new board using the template you’ve saved, and you’re good to go.
Look Around for Templates
Have a quick search around the web and you’ll find others have created and shared templates for you to use. If you’re running a workshop that someone else has run before, this can mean that you create a new Mural board from their existing template, which helps you get up to speed quicker than having to do tempalte yourself. Or, you can use someone else’s template as the foundation and inspiration for your own activities and workshops, adapting the template as you need.
Share Your Templates
If you’ve got a template you live, why not share it with the world? It’s quite likely that someone else may find value in it, and it works as a great form of content marketing. For example, we’ll soon be sharing some of our favourite Mural Templates over on our resources page .
Need help with a thorny problem?
Our remote facilitated applied design workshops will you answer your organisations biggest questions and problems. In 2 days to 2 weeks we can help you identify challenges, prototype and validate solutions. Get in touch for an obligation-free discussion.
What is Mural and How Can it Be Used to Teach? Tips & Tricks
Mural is a digital whiteboard that's useful for connecting students and teachers

Mural is a visual collaboration tool that's backed by the might of Microsoft. As such, this is widely used in some of the biggest businesses worldwide and has been really well-refined, making it a useful tool for use in education.
Since Mural is rich with features yet simple to use, it can be a helpful way for teachers and students to be together in a digital space. So for example, it can be useful in a flipped classroom but also in a traditional one, where students can follow a presentation on their own devices and even interact.
So is Mural what you need?
What is Mural?
Mural is a digital collaborative whiteboard space that can be accessed via a web browser on nearly any device and is totally free to use for the basic version. This can act as an interactive space for working or as a point to access for students.

Mural works like a slideshow presentation tool, with students and teachers able to build from templates to present to the "room," which is a defined space people can be in, or not.
The idea is to offer video-based slideshows that can be seen by all but also allow to edit live while in the space, as if in the room together even when that's not the case. Lots of templates are available but most are business-focused, yet there are some specifically tailored to education. Either way, all of these can be fully edited.
Usefully, and as you might expect from Microsoft, there is a lot of integration with Mural and other platforms including Slack, Microsoft Teams, and Google Calendar, to name a few.
Tech & Learning Newsletter
Tools and ideas to transform education. Sign up below.
How does Mural work?
Mural is free to sign up for and is very easy to begin using, especially if you already have a Microsoft account. While it does work online, using a browser, it can also be downloaded in app form for most devices.

Mural is a great tool for the flipped classroom or for remote learning, however, it can also be used in the room with students as you present to everyone's devices. Helpful tools are available for live feedback while working through the presentation but more on that in the next section.
This tool is very intuitive so it can be a tool for students to work with, allowing them to collaborate and create presentations together from their own homes -- making for great social learning even outside of school time.
What are the best Mural features?
Mural has a great selection of live feedback features. This includes the ability to take a poll, which is anonymous, at any time -- a great way to monitor how students are keeping up as you work through a new topic, for example.
Summon is a particularly useful teaching feature that allows you to bring all students back onto the same part of the presentation so you know everyone is looking at the same thing at the same time.

Outline is another key feature for teachers as it provides an opportunity to foreshadow what's next without revealing exactly what is ahead. Complemented with a timer option, this makes for a very clearly guided layout.
Super Lock is a helpful way of locking certain objects so that only the teacher can edit. This gives students the freedom to interact with other parts knowing they are allowed to make changes or offer feedback where and when it's allowed. On the flip side of that there is Private Mode, which stops individuals contributing by hiding what they add, as you may need.
Sharing, commenting, and even live text chatting are all options in Mural. You can also voice chat if needed, a useful option for students working on a project remotely together.
The ability to draw freehand or use stickers and moving visuals all make for a very open whiteboard that can be amended live as the lesson is being taught. But with the advantage of still having access to rich media such as GIFs, videos, images, and other items.
How much does Mural cost?
Mural is free to use for the basic package. This gets you three Murals and unlimited members.
The Mural Education specific pricing level offers Student for free and gets you 10 memberships, 25 external guests, unlimited visitors and a workspace with open and private rooms. The Classroom plan also is free, which gets you up to 100 memberships plus live webinars and a dedicated space in the Mural Community.
Upgrade to the Teams+ tier at $9 per member per month and you get unlimited Murals, privacy controls for rooms, in-app chat, and email support plus the option of monthly billing.
Business and Enterprise plans are available, however, these are more focused on company use.
Mural best tips and tricks
Pair projects Have students pair up and set them the task of creating a presentation project to share with the class. This will teach them to collaborate remotely, communicate, and work together while also hopefully creating something useful for the rest of the class to learn from.
Build live Use the tool to build a presentation with the class, allowing them to learn how to use Mural but also teaching the content of the presentation as you work through it.
Go anonymous Set an open project in which everyone has freedom to express themselves, then let them submit anonymously. This will help even more shy students be expressive and share with the class.
- What is Padlet and How Does it Work?
- Best Digital Tools for Teachers
Luke Edwards is a freelance writer and editor with more than two decades of experience covering tech, science, and health. He writes for many publications covering health tech, software and apps, digital teaching tools, VPNs, TV, audio, smart home, antivirus, broadband, smartphones, cars and much more.
What to Know About Buying a School Esports System
Drone Soccer Looks Like Robot Quidditch. Here’s How Educators Are Using It
Lexia English Drives Literacy for Emergent Bilingual Learners
Most Popular
- 2 Recruiting and Onboarding Talented, Passionate Educators
- 3 What to Know About Buying a School Esports System
- 4 Drone Soccer Looks Like Robot Quidditch. Here’s How Educators Are Using It
- 5 Edtech Show & Tell: September 2024
Lesson topics
Client engagements, design & research, meeting & workshops, strategy & planning, brainstorming & ideation, share examples and resources.
Introduce the methods and activities to the practitioners by adding helpful tips and instructions.
Supporting resources and guidance
Templates can also act as a way to introduce your process and methods to your team. You can add files and links to outside information to bridge the gap between the template and building the knowledge about the method itself.
Add tips and hints for facilitators
Save space for collaboration by adding tips and instructions for the facilitator to the mural in the outline. This helps the facilitators better understand the instructions and explain it to the team.

Was this lesson helpful?
(upbeat theme music)
Hi, Emilia here. In order to set your team members up for success we also want to add some more instructions and helpful hints. So let's look at what to add here. So in the housekeeping area here to the left I also wanted to set up an area where we can add some helpful links and resources. So I'm going to duplicate this element and then we can add 'Resources.' So here you can add links to for example, blog posts articles, videos, anything that would help your team use these templates on their own. So I'm going to start with this video tutorial which is a really good introduction video to MURAL that you can share with new team members. So in order to add links into the mural I can basically just paste them into the canvas and they will show up with a nice little thumbnail image. And I'm also going to add this blog post with some tips on how to facilitate meaningful online meetings. We'll also need to add some instructions here to make it possible for the participants to solve these activities. So I'm going to go ahead and select this section. And we're going to move it down a little bit to make some more space for the instructions. So for the instructions, I'm going to use the text boxes. And when I write the instructions try to be short and straight to the point. Try to focus on just what's important to know for this particular activity. A good example of instructions that are short and straight to the point are these instructions in the 'Human-Centered Design: Building Empathy' template which is basically in your own experience map. First, you should basically define situation: What experience are you trying to improve change? Example, going to the grocery. So as you can see the instructions here are very short and straight to the point and they were even providing an example of what this solution can look like. Another example which might have a little bit too many instructions: In this template for Rose, Thorn, Bud Affinity Clusters in the second activity here there is a little bit too much text. I don't know if all participants are going to read all of these instructions. Think about, that whatever you put in the canvas is going to be seen by the participants too. So you can only write the instructions in a way so that you're talking to them and not talking about them as in this example. One good way of thinking of this is to if you have a short version of instructions in the mural this could basically be your think about these short version of the instructions as the call to action.
What do you want the participants to do? If we think about the old times when we would use PowerPoint presentations or Keynote presentations in workshops to share the instructions this is basically what you would have put in the PowerPoint presentation. So instructions in the mural should be short and you can think about it as what you would have put in the slides in the PowerPoint. The outline that you can connect to different parts of the mural you can basically think about this as the speaker notes and tips for the facilitator. So in the outline, you can add a little bit more in depth instructions and tapes that can help the person facilitating the session understand how to better explain the activity to the team. So for example, I can basically right click on the radar here, and then I can add it to the outline. So if you click on this menu item let's think about what instructions would make sense to add here that would combine well with the instructions in the mural. So here you can now, say for example, 'Before you start' 'ask the participants' 'to pick a sticky note color.' Now we have some instructions in the outline that accompany the instructions in the mural and also give a couple of extra tips for the facilitators who are going to lead this activity.
Related lessons
IT Teaching Resources
Classroom resources, how to use mural, a digital collaboration space, improve productivity and collaboration in remote teams with real-time idea sketches.
MURAL provides shareable, collaborative, digital whiteboards where members of a team can simultaneously work together in different places. MURAL has been reinventing and expanding its capability to support schools and educators. On the MURAL website , there is a delegated space for educators: MURAL for Education . MURAL also offers free accounts for university teachers and students.
Additionally, MURAL is useful for courses and workshops that require collaborative activities, such as an activity asking students to brainstorm ideas, write them on the sticky notes, put them on the whiteboard, and discuss in groups. If the instructors want to keep these activities and hope to mimic the in-classroom experience in the virtual setting, MURAL can serve that need. With MURAL, students can do similar things in remote environments. For example, instead of writing ideas on sticky notes and sharing them on a whiteboard, students can type, drag files, and paste links on the “sticky notes” on MURAL.
Pros:
- Allows posting contents in different formats, such as texts, drawings, images, videos, and links
- Automatically documents contents that posted on the digital whiteboard
- Extensive user support with a detailed facilitation guide, live and recorded learning opportunities, pre-built-templates, case studies, blogs, and more
- Cloud-based service and can be used on any internet-connected device, anywhere, and anytime
- Enables not only synchronous collaborations but also asynchronous contributions, including view, read and edit access
- People at Stanford do not use MURAL as commonly as other standard tools, such as Canvas and Zoom
- It may require additional time and effort to familiarize the students and facilitate the class
- MURAL can be hard to navigate for someone new to digital whiteboards
How can an instructor implement this?
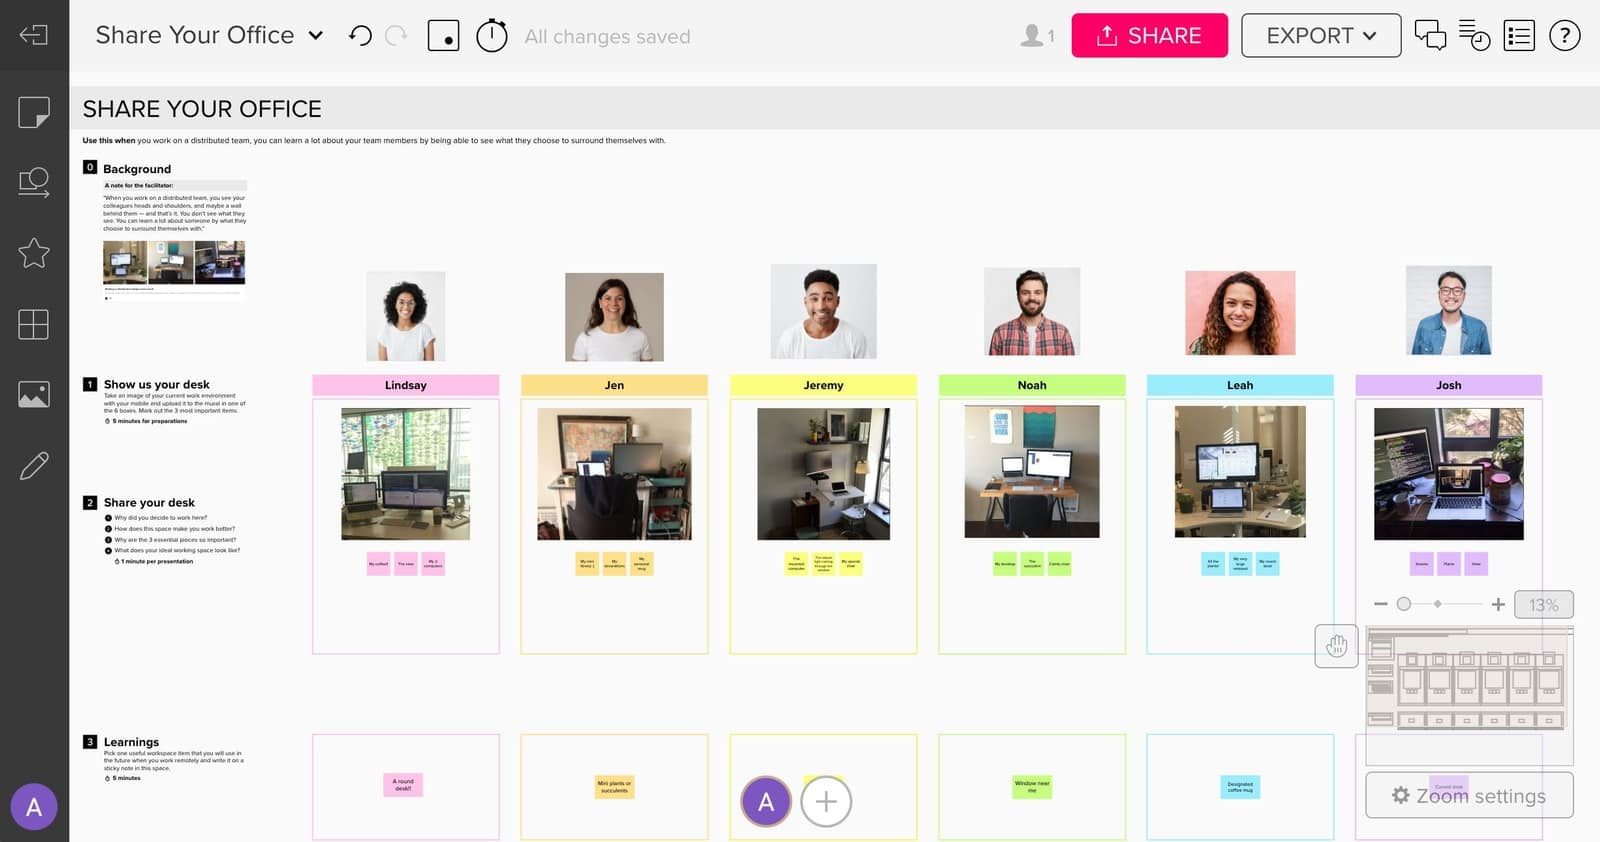
Example 1: icebreaker and community building activities (e.g., show-and-tell) .
Below is an example of an icebreaker activity designed for a virtual team. The facilitator asks the members to show a picture of their home office space. In a digital classroom, similarly, instructors can ask students to show their home study space or another space they enjoy working and encourage them to talk and share what they have learned from each other. This format is also good for community-building activities, such as show-and-tell. Each student can post a picture of their objects and tell a story. After the activity, the instructor can save the work and post on Canvas as a record.
Bear in mind, not all students may feel comfortable sharing their home workspaces. Consider offering students a variety of options for what they choose to share.
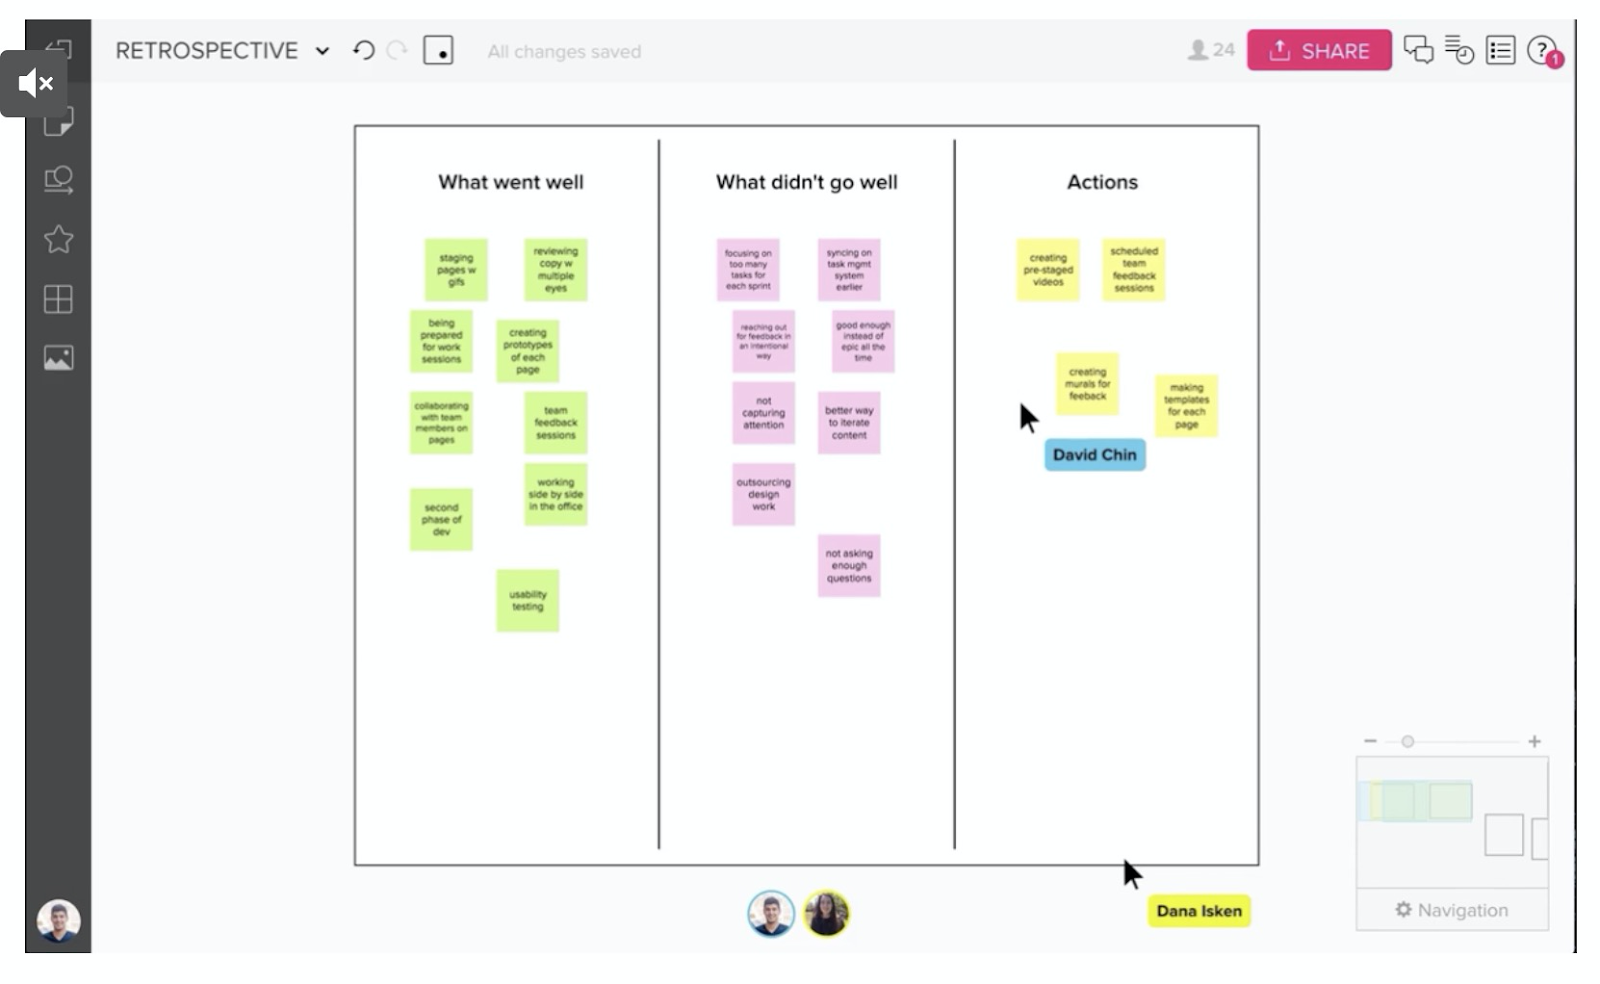
Example 2: Brainstorming and reflections
Below is an example of using MURAL for reflection. In a digital classroom, instructors can use this space to facilitate a conversation with students students about “what went well” and “what didn’t go well” from a particular activity, as well as collecting ideas of actions for the next steps after the activity.
Example 3: Storyboarding, presentations, and portfolio exhibition
Instead of using PowerPoint or Google Presentation, instructors can use MURAL for telling a story, showing a poster, and more. With MURAL, students can put feedback and comments next to the “presentation.” Facilitators/instructors can use these comments to foster discussion.

External resources:
MURAL Webinars and Events Introduction to MURAL – Live Demo Free Training Provided by MURAL
About the author
Melody Wu, IEPA ’20
Designing Your Own Chatbot
Design, customize, and refine a chatbot tailored to your needs and interests.
Enhancing Reflective Practices with AI
Reflection is a key component of experiential learning, what role might new technologies play in enhancing this process?
Exploring Forms of Feedback with AI
Interactive workshop focusing on the intersection of artificial intelligence tools and the feedback process
How to leverage visual collaboration in the classroom

Start collaborating with Mural today
The past year has been incredibly turbulent for educators who found themselves suddenly thrust into the world of remote learning. I have seen how challenging it is trying to engage students remotely and how impossible it can feel to make meaningful connections with the stresses of the pandemic on top of only seeing people through screens. For me, I became a remote worker learning a new job, an unexpected part time kindergarten teacher, and husband to a college professor trying to adapt her pedagogy to all Zoom, all the time. As the Transformation Manager for Education at MURAL, I have had conversations with dozens and dozens of educators struggling to find ways to facilitate meaningful engagement and ensure that learning is taking place in virtual spaces where we are lucky if we can even see each other’s faces.
This has given me unique insight on the potential impacts technology can have on the classroom environment. I believe MURAL is the platform for teachers and students to facilitate deeper learning in the modern classroom, one that is in-person, remote, or a hybrid of both; much like the modern workplace. We offer educators and students the opportunity to use MURAL at absolutely no cost and provide tools and training to help educators adapt their pedagogy and make the transition to teaching with MURAL as easy as possible. Over 4,000 schools & universities across the world are already using MURAL in their classrooms.
“Honestly, MURAL has completely changed what I thought was possible in remote learning.” – Christopher Durr, PhD, Assistant Professor of Chemistry at Amherst College
At MURAL, we believe that we are all imagination workers — people who thrive on collaborating with others from different backgrounds and disciplines to solve problems together. Our human-centered approach comes from our history in design thinking; we’re constantly prototyping and iterating to come up with innovative features, services, and better ways of working. Our platform is designed to unlock creativity, to allow individuals and groups to produce meaningful work through critical thinking, attacking complexity, challenging assumptions, and embracing curiosity. I am excited to help lead the team at MURAL working to bring our values to lecture halls, labs, dorm rooms, and all spaces where learning takes place at institutions of higher education.
MURAL in the classroom
MURAL enables educators to create a visually rich collaborative environment and cultivate a more engaging classroom by bringing students into lessons and allowing them to interact directly with both the material and each other. MURAL’s Superpowers are being used to facilitate lectures, research, workshops, projects, brainstorms, critiques, curriculum development, and much more. Students are using MURAL to take more dynamic notes, create mind-maps, collaborate on projects, share their work, and express their creativity in new and fun ways. Everything can be coordinated both synchronously and asynchronously, ensuring all students can be connected to and participate in the full curriculum.
“Moving online has been rough, but MURAL is bringing back some of the interaction that I use in class. It’s been a huge relief to feel like I can be a teacher rather than just a maker of videos for exercises.” – Bill D Ward, MFA, Professor, Art Institute of Dallas
Creating a collaborative environment
I love using MURAL to collaborate visually together with my team . Everyday I hear inspiring stories of how MURAL brings people together to effectively and creatively work on projects, run through exercises, do research, and solve problems. We at MURAL also understand that there are challenges to creating the right environment for open collaboration to thrive. I recently spoke with a biology professor who was really struggling with getting any sort of interactions from students during online classes. It seemed impossible to get people to ask or answer any questions through Zoom. Then she started incorporating fun little interactive activities at the beginning of each lecture using MURAL. It opened people up and brought them closer together, and soon students were responding to the professor, the material, and each other.
It’s so important to establish mutual trust in the classroom in order to successfully create a collaborative space and gain the benefits from the sharing of multiple perspectives. With a culture of inclusivity and trust in the classroom educators can bring students into lessons to reflect and process the material together. Students must feel safe and allow themselves to be vulnerable in order to freely express their creativity. Using our warm-ups and energizers at the start of class is a simple way to form emotional connections that will help people bond. Once that trust is established, students will be more inclined to showcase their personality and creativity as they investigate and present ideas and solutions together!
Cultivating engagement
In normal times, it can be challenging to create and maintain engagement in the classroom and that has only increased as we have suddenly found ourselves in a remote world . Luckily, MURAL provides ways to encourage engagement within any classroom and does so in a fun way that stokes creativity. Facilitating lesson plans and lectures with MURAL becomes most effective when students are invited into the lesson canvas to interact and respond directly with the course material.
Imaginations will be stimulated as students dig deeper, make personal connections, and visibly share their own thinking. We want students to creatively express themselves and work socially to support and challenge one another, which leads to better connection with and comprehension of the material being taught. Most students just need a slight nudge in the right direction to find themselves feeling more connected to their classmates and the material being presented. With MURAL you have exactly what you need to create new and exciting pathways to student engagement within the classroom.
Thinking visually
MURAL is a platform for visual thinking and promotes expression through images, videos, process flows , frameworks, colored sticky notes , drawings, and more. Using MURAL to teach creates multimedia learning experiences for students by activating both auditory and visual learning channels, which drives deeper comprehension of the material. Utilizing visual metaphors helps students draw on prior knowledge and experiences as they make associations to better understand the concepts being presented.

Expressing thoughts and ideas visually can be especially effective when students are collaborating, as it stimulates creative thinking and fosters clarity of understanding between people. Increasing opportunities for students to collaborate visually and share diverse perspectives leads to more holistic understanding and deeper insights with the material being presented. Educators will gain a better understanding of students’ thought processes and comprehension, as their thinking becomes visible on the canvas.
Imagination learning
We are really excited about all the ways pedagogy is being adapted for the modern classroom with MURAL. Educators are facilitating visual collaboration across a vast range of disciplines, including Architecture, Biostatistics, Design, Fine Arts, Marketing, History, Languages, Business, Food Studies, Chemistry, Physics, Engineering, Environmental Sciences, Cultural Studies, Theater, and more. With MURAL, you have a space to make ideas visual, methods to bring clarity to imagination, and the freedom to share your vision. When put into practice within institutions of higher education MURAL can transform how we learn.
We are all imagination learners – people who thrive on collaborating with others from diverse backgrounds and disciplines to engage with new information together in order to comprehend the world in new and exciting ways. Come and join this global community of educators by going to mural.co/education today.
This article originally appeared on Medium.
Related blog posts

Suddenly Remote?: Education Edition: Webinar Recap
Related blog posts.

What is the difference between traditional project management and Agile?

13 best online collaboration tools to try in 2024

DACI Decision Making Framework: Managing accountability with Mural
Get started quickly
What is visual collaboration.
What, why, and how visuals create meaning with others.
Everyone see things differently whether it's in their head or in front of their own eyes - take for example, color blindness. Visualizing concepts in our head help us reach similar understandings, but not clarity.
Ideas and important pieces of information tend to get lost in translation without visual collaboration.
You do not need to be an artist to work visually - Mural enables everyday people to leverage general artifacts and tools to work visually.
Was this lesson helpful? Let us know!
What do your thoughts look like? If you could hire an artist to make a masterpiece of your ideas and challenges, what would they create? Would it be black and white or full of color? Would it be full of lines and orderly grids; or would they flow and squiggle where they want to go?
At MURAL, we believe in showing your thoughts and concepts rather than telling. When you show your thoughts, you create clarity. Clarity that helps you and your teammates, customers, and clients work together to accomplish results. Clarity that solves complex problems and creates exciting innovations.
You do not need to be an “artist” to work visually. All you need to do is learn a few basic features and principles that help you show what your ideas look like… then, the determination to keep practicing with MURAL.
Soon, you will be able to work visually with your teammates, customers, and clients. Everyone will be able to show what they mean. Everyone has clarity because they created the visual together.
That’s how we envision work at MURAL. Helping people like you work together to create a shared understanding. To show thoughts rather than tell. To go from me to we.
That is visual collaboration. We believe you can bring your thoughts to life in MURAL.
What is MURAL?
Your digital workspace for visual collaboration.
Solve challenging problems together
Collaboration is about bringing bright minds together to solve problems and innovate. While documents and slides help teams present information, innovation requires creative thinking and approaches. MURAL is a cloud-based application that allows teams to work across locations, time zones, and disciplines to solve these challenges.
You can access MURAL across devices through our web-based application or native apps for Windows , iOS , and Android devices.
Why use MURAL?
We’re the leading digital and visual collaboration platform for enterprises, educators, non-profits, and consulting agencies. We’re proud to be:
- Enterprise proven: scale across thousands of users with best-in-class security and admin features
- Partners in transformation: become part of a supportive community providing you with impactful learning and transformation expertise
- Facilitation focused: allowing teams to plan, lead, and sustain impactful workshops and meetings
- Intuitive features: accessible and simple to use for first-time collaborators while empowering visual experts
Hello there, I'm Hailey Temple. And let me be one of the first to welcome you to MURAL and answer your questions about it like, "What is MURAL?" Well, remember those moments when you were working with your team, maybe in an office, and you had those a-ha moments. It was maybe a great idea or things just started to come together. Well, MURAL is your digital space to make that kind of work happen. At MURAL, we believe that happens when you use visuals like maps, process flows, diagrams, images that help people align and create a shared meaning. The great part about MURAL is, you can use it, whether you're in an office or around the world. And you can use it across devices. MURAL is an awesome way to work with your teammates, and clients, and customers, to meet your meeting and project goals while having fun.
MURAL's great because you can use it both in your meeting, and before, between, and after meetings. So it plays well with any time you need to work and with other tools. Next, you're probably wondering, "How do I start using MURAL?" Well, you can use MURAL for lots of different things. To get your team aligned, to get organized, get creative, get inspired, present and design, and so much more. We believe that this type of work, what we call at MURAL, imagination work, is limitless. And you can use MURAL for whatever you set your mind to. I'll be here along your journey, as you learn to use MURAL features, learn best practices, and functionality that make your imagination work possible. I'll see you in MURAL.
Add, create and customize sticky notes
The original visual collaboration object goes digital.
Why use sticky notes?
If you’re brand new to the world of visual work, then sticky notes are a great introduction. They allow you to quickly organize your thoughts and ideas. Use sticky notes to categorize, color code, and show connections between concepts. You can add sticky notes in two ways: shortcuts or from the toolbar.
Add sticky notes with shortcuts
To add a sticky note directly to the canvas, double-click the location where you want the sticky note to land. Once you’ve added your first note, you can use the tab key to quickly add more notes in the mural.
Add sticky notes from the toolbar
MURAL also has a variety of sticky notes in the toolbar. To add a sticky note:
- Click the sticky note icon in the left toolbar. This opens the sticky note options menu.
- Once you select your sticky note, click and drag the sticky note onto the mural.
Hey there. I'm Hailey Temple, and whether you love or hate sticky notes, you have to admit they are handy when you're organizing lots of information and making sense of your work, especially online.
Now, let me show you a few ways to add sticky notes to a mural. One way is on the toolbar over here. So this first icon looks like a sticky note, and it's where our sticky notes live. When you click that icon, you get a menu of options. So I can add them from different shapes and some default colors. Once you make that selection, you click, hold it, and drag it on to where you want it to go on your canvas.
Now, think of this sticky note here as kind of the standard-sized sticky note you might see when you're collaborating in person. So I do not recommend trying to make this sticky note bigger or smaller. Just keep it as is and use the navigation to zoom in and out.
So another way to add a sticky note is simply to double-click on the canvas. When you do, MURAL will recognize other sticky notes nearby and adapt that same color and shape. Now you can start adding in your ideas on sticky notes, moving them around as you need, and color coding to your heart's content. Happy collaborating and creating in MURAL.
Tour the mural
Explore the major features that help you create, navigate, and collaborate.
What is a mural?
Murals are the individual files upon which you add, create, and edit your content. These can be created newly from templates, or from a blank slate. Within a mural, you have the canvas. This is the space where you add content with collaborators.
The mural also contains features that help you move around, to manage collaboration sessions, and keep track of changes to your mural. Let’s explore the basic ways you can successfully use a mural and its features.
Collaboration at different scales
MURAL gives you the freedom to move, zoom in to see details, and zoom out to see all of the content on a mural. Think of it more like Google Maps than working in a document or presentation. When you’re working on your laptop or desktop, you can adjust your zoom settings for your device.
To change your zoom settings:
- Navigate to the lower right corner of your mural
- Underneath the mini-map, you'll see a Navigation bar
- Click "Zoom settings" to change your navigation settings
You can also use the outline to follow along in a mural. The outline breaks a mural into different sections, like chapters in a book. Open and click through the outline to view each section of the mural.
Meet your collaborators
The avatar represents you while working in the mural. When others join the mural, you can see their avatars next to yours in the mural. Avatars contain additional features for helping you connect and follow the conversation in a meeting. For example, you can:
- Show and hide cursors
- Follow other collaborators
What’s on the toolbar?
The toolbar is where you can add objects to the mural. These include:
- Sticky notes
- Frameworks and areas
You can also import files into the mural from your computer or other apps like Google Drive, OneDrive, and Dropbox.
Plus, you can quickly save and add your frequently used content by saving it to the content library.
Hi there, I'm Hailey Temple and you are about to get a grand tour of a mural, which is the file where you get work done. I'll show you a blank mural and a mural that we've added some work to for some reference and creative flair. To start this blank space here waiting for you to add work is called the canvas. Now, to get around this canvas, you can use these navigation settings like this mini map and our zoom settings. So in this mural, I can use the mini map to see what content I'm looking at a given time. And that way I can zoom into the details or zoom back out for the big picture. Next, let me talk about avatars. So your avatar is your little person or animal and mural that represents you while you're working.
Your avatar is always the one to the left hand side, and your collaborators are next to you. So there are some really handy features on your avatar. So, test out and see how they work. This toolbar is actually where you can add elements to the mural, like sticky notes, text, shapes, icons, frameworks, images, so much to do sketches. It's crazy. So, that is how you start actually adding work and filling your canvas to something like this someday, I know you can. Now couple things at the top of this mural that I want to let you know this time timer, for example, will be running sometimes in a meeting. And it's really helpful to keep track of your group while you're collaborating. So you'll see when someone sets the timer, it starts ticking down. And when it ends, they'll hear a nice friendly noise letting you know. Now, magic in MURAL happens when you can share your work with others.
So, this Share button is where you find links to send people or you can invite them by email to come in and work with you. Plus, you can take your mural on the go by exporting it or simply exporting other pieces of the mural to a project management tool of your choice. A few more things I promise. Now. This activity log is great to keep track of something maybe you accidentally deleted or and you want to recover. You can also do that by clicking this Undo button over here always helpful for changing your work or misplaced something, you can add it back.
And then this outline feature. It's great for breaking a mural up into different chapters. And if you are working on a mural, it becomes a really handy navigation tool. Because anytime I click on these tiles I'm brought to a different part of the mural. Let's say you wanted to find something specific in a mural. You can use this fine feature to search for things by keyword or by color. Last but certainly last but certainly not least, if you need help in mural, our customer support team is here to help. So this question mark button will give you an ability to chat with customer support or to take a Look at our Help Center, and so much more. You are going to have an awesome time collaborating and mural. And if you think about this canvas, this mini map, the avatars, the toolbar, and the invitations as your space to work, then you are off to a great start. Happy collaborating.
Connect concepts with lines and arrows
Build flowcharts and diagrams together in a mural.
Why use lines and connectors?
Your team needs to discuss a process or build a journey map. MURAL is the space for your team to collaborate and co-create these diagrams together. You can connect content in the mural to demonstrate the movement and flow through these processes. Our diagramming capabilities allow you to quickly build out flows as you work in real time.
Add lines and connectors
You can add lines and connectors in two ways: the toolbar or with keyboard shortcuts. To add lines and connectors from the toolbar:
- In the left toolbar, click the shapes and connectors icon. This opens the options menu.
- Select the line or connector you want to add to your diagram.
- To connect the line to an object, click one end and drag it to the edge of the object. The line will “magnetize” to your object.
- Complete the connection to your second object by clicking and dragging to the second object. Now, these two objects are connected with the line or arrow.
To add lines and connectors with shortcuts:
- Hover your cursor over the object you want to connect.
- Hold the C key on your keyboard. Then, click and drag your cursor to the second object you want to connect. The line or connector will snap the two objects together.
Quickly add the same shape to a diagram
When you add a line or arrow using the “C” shortcut, the suggestion popup now allows you to add the same object as the first choice. It will have the same color, border, and text formatting and size as the previous object.
Formatting lines and arrows
Once you create your lines and connectors, use the formatting menu to change the width, line type, color, and style. Connectors can also be formatted to be straight or curved. Access the formatting menu for the line by selecting the line in the mural.

Hello there, I'm Hailey Temple and you have ideas to connect in MURAL. So, let me show you how you can use lines and connectors to make that happen. One way to add lines and arrows is the toolbar. So this second icon on the toolbar has a menu that you can click to get a straight line, a straight arrow or a curved arrow. Let's take this straight line, click and drag it to my work here. And now it's connected with this sticky note. Let's say I want to connect it to this neck sticky note. What I'll do is hold down this arrow, drag it over to the sticky note. And now I have two concepts connected together. That's awesome. Let's say I wanted to Use a shortcut, things can work way faster, right? So if I hold down the C key, I get this cursor. And now I can click and drag an arrow, and another and another until I've connected all of my ideas. So no matter where I move these sticky notes, everything will still be connected. Let's say you wanted to change the color of the arrow to a dotted arrow, change direction, change thickness, or change the type of arrow. All of that is possible in mural. So use these lines, arrows connectors to get your work done, and happy collaborating.
Navigating around the mural
Learn to navigate the mural and understand the scales you can work on.
Choose your own view
To change your zoom and pan settings:
- Scroll to the lower right corner of your mural
- Find the navigation bar underneath the mini-map
- Click Zoom settings to change your navigation settings
Work at different scales
It might be tempting to make objects big on the mural. That might make it challenging for other collaborators to add their own ideas and you’ll quickly run out of space. Instead, practice working at different scales in the mural with the mini map.
The mini map offers a fully zoomed out or bird’s-eye view of your mural. On the map, you will see where you are on the mural. You can also see other collaborators and what they’re seeing in the mural at any time.
Move around, but keep content in place
You can move around the mural without worrying about moving your collaborators’ contents with Move mode. Click the hand icon next to the mini-map to start move mode. You can also hold the M key on your keyboard to start Move mode.
Shortcuts for navigating a mural
Move around the MURAL with ease on your device with these keyboard shortcuts. You can access the shortcuts key any time under the question mark (?) icon in the mural.
Move around the mural : ARROW KEYS
Move around the mural faster : SHIFT + ARROW KEYS
Pan without moving elements : Hold SPACEBAR + Drag
Zoom in : Z + Marquee
Select part of mural : Z + Click
Zoom out : ALT + Z + marquee select part of mural
Fit to content : SHIFT + CTRL + 0
Actual size : CTRL + ALT + O
Pop-up an element : X + Hover element
While MURAL is the name of the application, a mural is also the canvas where you will collaborate
with your team. The first thing you should do is make sure that you feel comfortable moving around the canvas and zooming in and out to collaborate with agility. Let's go into our zoom settings. Here you have the option to switch between trackpad mode or mouse mode. In trackpad mode, you can zoom in and out by pinching similar to how you zoom on your smartphone. In mouse mode, you can zoom in and out by scrolling up and down. You can also zoom in by using the zoom bar above the mini map.
There's also a few helpful shortcuts you could take advantage of to zoom in and out quickly. If you hold down X and hover over an element on the canvas, it will pop up so you can read it easily without ever having to zoom in. Or, you can click on an element and select the magnifying glass icon to zoom directly in.
Next, let's take a look at the mini map in the bottom right corner. Here you'll find an outline of some of the key elements on the canvas. You can jump around the canvas by clicking anywhere on the mini map. This box represents where you are on the canvas, and the location of your collaborators is represented by the color of their avatar. Let's say you want to move around the canvas without accidentally moving any elements you can enter into move mode by clicking on the hand icon to the left of the mini map move mode. What's you click and drag across the canvas without wearing about accidentally editing anything you can exit move mode by clicking on the hand icon once again.
Now that you've mastered moving around the canvas, let's talk about a few of the other key buttons on the interface to the left. You'll find content to add to the mural on the top toolbar. You'll find your mural's name on the far left. You can click on the arrow next to the title to go into the mural settings and quickly access a few other features. Next you'll see the undo and redo buttons. To the right is the voting icon, which you can use to start voting sessions.
If you are the mural owner or a facilitator, you'll see the timer icon that you can use to time box certain activities with your collaborators. Further to the right, you will find the number of collaborators who have access to your mural and can see who is currently online. Next, there's a big pink share button. This is where you can share your mural with your collaborators.
You can also export your murals as an image or PDF. Finally, you'll find the chat the activity log, where you can catch up on what's been changed since you were last online. The outline in case you set up different areas and want to present your mural and finally, the help button.
Now that you understand how to navigate the mural in the basics of the interface, start creating Thank you for watching. If you have any questions, click on the question mark in the upper right corner of the MURAL application to view our help center or chat with our support.
Upload files from different sources
Bring all of your project work into a mural for easy reference.
Working in one space together
You use MURAL alongside other apps to get work done with your team. When you need collaborators to access all of your work in MURAL, you can import files from programs like OneDrive, Google Drive, or Dropbox. You can also import files from your computer.
Add files to the mural
- While you’re in a mural, click on the files option on the toolbar.
- You’ll see a popup that allows you to choose between your computer, a OneDrive, Google Drive, or Dropbox account. If you choose to import from OneDrive, Google Drive or Dropbox, then you'll need to sign in to your account before uploading.
- Select the files that you want to add to your mural
- The mural generates a thumbnail or preview of the document into the mural.
- To open the file, double-click the preview image. The document opens in a new tab.
Hello there, I'm Hailey Temple and let me show you how to import files into a mural. So first things first, navigate to the part of the mural where you want the file to go. So, I will go down here next over in the toolbar and you will select this files icon and you have a few options you can upload from your computer or from another file storing software. So I'll select from your computer, and MURAL prompts me to choose one of these files. Now, MURAL will upload the file. And what's awesome is I'll actually get a little photo preview of my PDF that I've added here. So anybody who visits this mural. If they double click on the file, they can get a preview and a full picture of what this document is. And it's not just PDFs, you can upload PowerPoint or other slide sharing presentations. You can add images, Word documents, and so much more. So, use MURAL to share your documents and start collaborating.
Work visually with icons
Show what you’re thinking about without drawing anything from scratch.
Show rather than tell
Icons are powerful ways to represent concepts and ideas. When collaborators in your mural need an introduction to working visually, icons act as an introduction to explore what’s possible when you think and work visually. In MURAL, you can choose from millions of free icons in the Noun Project library to enhance your murals.
Search and add icons to murals
If you're looking for something specific, you can search by keyword for exactly the concept you want to represent visually.
- In the left toolbar in the mural, click the star icon. The mural displays examples of popular icons from the Noun project.
- Within the icon menu, click into the search bar. Type in a keyword for your concept.
- Select the icon you want to use by clicking and dragging it onto the desired location in the mural
Once you add an icon, you can edit its size, shape, color, and more using the formatting menu.
Oh hey. I didn't see you there. Gino for MURAL here. And why don't we use this time to talk a little bit more about icons. Icons in MURAL are a great way for you to actually showcase what you were thinking about visually without having to draw anything from scratch. In order to pull from our icon library, head to the left toolbar and click on the star icon. Once you click that, all of our icons will pop out, and you can simply scroll down to view all the different ones we have. But as there are over 2 million different icons to choose from, you might want to search by a keyword. First thing that comes to my mind is Thor. He's a pretty buff dude. So we're imagining myself as Thor. It's not the worst thing I've ever thought. But save some time rather than just one. Why don't we use a bunch of different icons together we've got Iron Man, wearing a bikini with a buff arm and a cartoony arm. And he's looking pretty good there. Other than just having fun with icons, you can actually use these when people are getting together with their ideas rather than just stating you're going to go to the park. Why not actually show people the idea of going to the park? This is how you can use icons to showcase your thoughts more visually. Go forth and prosper.
Draw in a mural
Fast, precise inking lets anyone sketch, write, and erase to bring concepts to life.
Draw in the web browser app
MURAL’s browser-based drawing allows you to use your cursor to draw freehand objects using your mouse or trackpad. Within a mural, you can access the draw tool on the left toolbar
Create a drawing in a mural:
- Click the pencil icon on the toolbar. This opens the drawing features at the top of your mural. You can also hit D on your keyboard to begin drawing.
- Select one of the pen tip options for your drawing. To change the color of your line, select the dropper icon and select a color.
- Click the canvas and hold to begin drawing
- To erase your drawings, select the eraser from the top toolbar
- When you’re done, select “Done Drawing” or hit D on your keyboard to exit the drawing experience.
Draw with touchscreen devices and displays
Instead of using the web browser app, you can draw on tablets and mobile devices. You can access the draw feature from the toolbar on these devices. To do this you will need to download the MURAL app for your device.
- Download MURAL for Windows
- Download MURAL for iOS
On these devices, the draw tool also appears in the toolbar. When you select the pen icon in the toolbar, you can switch to draw mode. On a tablet you can use a pen, while on mobile devices you can draw with your finger.
Hello there, I'm Hailey Temple. And let me show you how to make hand-drawn work in MURAL. You can do this either from your web browser or from a touchscreen device using the MURAL apps. So, let's start with the web browser. I am in a mural, and I'm going to head over to the toolbar. There's a pencil icon, and when I click it, I get a specific drawing toolbar where I can start working. I can create lines of different thicknesses, but let me just start with medium. So I'm using a mouse to do this. So, it's not going to be pretty, but it's going to be there. Here we go. Last one, boom star great and mural makes it a little bit more refined for me. But it has that nice hand drawn feel. If I wanted to change the color of the line, click this drop icon, and I'll change it to blue. And let's say I wanted to make a shadow on this, I can use our highlighter tool, and it'll create a really nice shadow for me. Here we go. All right. So when you're done drawing, click done drawing. And now it's ready to go. And you can start adding other elements to it. Let me show you how to draw using a touchscreen device like this Microsoft Surface Hub. I've already downloaded the mural app on this touchscreen device. And I have a pen instead of a mouse, which is way more precise. So I have this drawing toolbar at the bottom of the mural app already, which is so he to be and so I can just select the pen thickness, I can change the color No, all I do is put the pen to the surface and start creating. So you can see it's a lot easier to quickly create in this touchscreen device. To erase anything here, all I do is click the eraser and skim over whatever I want to remove. So, you can draw in the web browser or on a touchscreen device, but whatever you do, drawing can bring your work to life. Happy collaborating.
Shortcuts for adding objects and elements
Work with speed on the mural to add sticky notes, icons, and more
In this lesson, you’ll learn to:
- Locate shortcuts in a mural
- Add sticky notes to the mural with shortcuts
Need for speed building content
Shortcuts help you work efficiently when adding content to a mural. We have a variety of shortcuts that help you add and modify content. When you’re working in the mural, you’ll find these shortcuts under the question mark (?) icon.
Practice adding shapes and sticky notes with shortcuts
Use the shortcuts to add shapes, sticky notes, and other content to build out your space where you’ll complete the Rose, Thorn, Bud activity.
Hey, it's Daniela, let me show you a few shortcuts to add elements to your murals. My all time favorite has to be adding a sticky note, you just double click anywhere on your canvas and you will get sticky notes. If after that you hit tab, you can create as many as you need in just one click. My second favorite would be to create connectors.
If you hold down the letter C, your cursor will change into a connector. And so when you drag and release, you will get a whole menu of shapes to connect to So once again, hold down the letter C, drag and release. And that's how you create connectors. There are a lot more shortcuts that we have for adding content so your mural for example, control option will let you upload images.
Just very easily Ctrl option m will create a larger sticky and then again you can use the tap. Control option x will create circles stickies and then again tap tap tap. Do you need to remember all of these? No you don't we have you covered. If you go to the top right corner under the question mark, you will find an entire list of shortcuts so no need to use your brainpower for this.
Get to know the MURAL dashboard
The workspace dashboard is your home to move between rooms and murals.
What’s the dashboard?
The dashboard contains the list of all your rooms and murals. Here’s what you can do with the dashboard:
- Switch between workspaces via the upper left corner
- Join open and private rooms
- Invite other to collaborate via email or link sharing from the Share button in the top right corner
You can also see Templates and example murals from the dashboard and switch to other workspaces via the upper left corner.
Switching between workspaces
You can see the name of your current workspace on the top left corner of the screen. If you are a part of multiple workspaces, you can quickly switch between them. Here’s how:
- Click the arrow next to the workspace name in the top left corner
- From the drop-down menu, click the name of the workspace you want to switch to
View recently opened murals
While working on several things at a time, it’s normal to lose track of where your team’s mural is. That’s where ‘ Recently opened murals’ comes in handy. Just click on this tab on the top left corner to see the 32 most recent murals you’ve accessed.
A template is a predesigned set of activities that can be repeated in a mural. You can also access templates from the top left corner of your dashboard.
Favorite murals and rooms
Save time searching for content you're frequently using by adding it to your favorites. Access them from the 'Favorite murals' section on the left side of your workspace dashboard.
To add a mural to your favorites
- Locate the mural in your room or on the dashboard. On the top left corner of your mural, you will see a star icon.
- Click the star to select that mural as a favorite.
- Find it in the 'Favorite murals' section. The order of murals in your Favorites will show the most recently updated first
To favorite a room on the dashboard
- Hover over the space to the left of the room name.
- Select the star room name. Your favorite rooms now appear at the top of your open or private room section of the dashboard.
Hello there. I'm Hailey Temple. If MURAL is your digital work space than the dashboard is like the welcome mat where you can quickly jump in and start working. In this dashboard, I know that I'm in the MURAL Magic workspace and I can actually change between workspaces from the dashboard.
I can also see all of the murals that have recently been edited that I can access so they are actually sorted by when they were last edited. I can also look at what I've recently opened, maybe a mural that I favorited and templates, which are pre built murals that we've created to help save you time.
Plus, if you are new to MURAL, this learn section is so helpful to get quick tips and watch some videos to get started. These are your rooms, which hold different murals like a file Cabinet, and you can access any of these rooms from your Dashboard. You can even favorite rooms, so they show up at the top of your list. If you're working in a room and you want to invite someone else to work with you, you can ask them to join by their email address. or with a link.
Finally, if you need to find something in MURAL, go ahead and click this search button. Let's say I wanted to find something related to design. I can find murals I've worked in and have access to rooms and templates related to this keyword. If you do need any help while you're working in MURAL, go ahead and click this question mark and you can reach out to our customer support team and our help center. So that's our dashboard. Have fun navigating MURAL and happy collaborating.
Browse the template library
Find repeatable and scalable activities for your project directly in the MURAL app.
What are templates?
A template is a pre-designed mural that has been created to save time building works in the mural. Some templates have activities, prompts, instructions, and sticky notes. You can create different murals directly from these templates.
Global and workspace templates
Within the template library there are two tabs of templates. The first contains MURAL’s global template library. The second has workspace-specific templates.
MURAL’s global template library contains templates for a wide range of use cases and purposes. Any MURAL member can access and use these templates. If you have a template to share with the world, you can also submit your template to be part of the global library.
Workspace templates have been published by members of your organization to the workspace. Workspace members can share these templates with anyone, but they are only published in the specific workspace. These templates are valuable for sharing specific processes for your organization or team.
If a template is part of your workspace library, you can still share a link to the template with collaborators. Here’s how:
- Go to the templates section on the MURAL dashboard
- Locate the desired template and click on its thumbnail to open the template.
- Click share on the upper right corner of the template.
- Copy the link for the template to share with collaborators.
Hi there, I'm Hailey Temple and let me introduce you to templates. A template is a pre- designed mural that we've created for you to save time building your work in MURAL. So you can see here, this template already has some activities. It has some prompts and questions here, instructions and sticky notes. So I can create a mural directly from this template. And now I've saved time building and creating a mural for my work. You can find a huge selection of templates within your MURAL workspace under the templates section.
We have lots to choose from so you can scroll through or you can search for murals by category. So all of the brainstorming murals are right here. These are global templates, but we also have specific templates that others may have published in your workspace.
So this is fantastic If you are using a specific process, you're going to repeat it again and again. Having a template available is incredibly helpful to share and use again for yourself or to share with others.
Another way that you can create a mural from a template is actually within a room. So if I click on a room where I want a mural to live, I have this create new mural piece right here. And I only have this if I have editing rights in that room. I'll click Create new mural. I can search the same template library, and once I've decided which one I want to use, simply click Create mural and I'm ready to go.
So remember the template library in your mural workspace. It is a great place to quickly get started with repeatable and scalable activities.
Create a new mural
The first step of collaborating with your teammates is to create space to house your ideas.
The mural is the file where collaboration happens. Murals contain individual canvases where you add, create, and edit content. These can be created from scratch or with pre-created methods in the MURAL Template Library. You can create a new mural in any room where you’re working.
Create a blank mural
From your MURAL dashboard, go to the room where you want to create your new mural.
- Select “Create new mural” in the room. A new window opens with options to create a new mural.
- Select the “blank mural” option
Create murals from templates
- Search for templates by keyword or by category. You can read the titles and descriptions for templates as you browse. To preview the mural before you create a new mural, the eye icon on the top right of the template thumbnail
- Select the template you want to use. Then, click create mural to create the mural from that template.
Hey team. Agustin from MURAL here, and today I want to teach you how to create your own murals. It's super simple. Once you log in, you'll be pulled right to your dashboard, which is where I am right now.
Once you're inside, simply click on the room in which you want to create the mural and select the Create a new mural button. And you'll be able to pick a blank canvas or one of our many many templates. Once you've decided select Create mural. And now you will have a brand new canvas which you can modify as you see fit. And you can repeat this process as many times as you want, because there's not a limit to how many murals you can create.
Invite collaborators to MURAL
Allow your team to access work at different levels to maintain security or create an open collaboration space.
Different levels of access to MURAL
MURAL structures content into three different levels: workspace, rooms, and murals. Depending on your project and permissions, you want to ensure you’re giving the right permissions and invitations to your collaborators. Let’s start at the mural level.
Invite collaborators to a mural
When you want collaborators to join a specific mural, there are two ways you can invite them to join you: email and link. Sending an email invitation will allow your collaborators to reference the mural from the workspace. The links provide a quick and convenient way to invite collaborators in real time to join your mural.
Which link do I use?
There are two links in a mural to invite collaborators. The invite people link is great for collaborators with a MURAL account. If you want to be able to see who is contributing content to the workspace, the invite people link invites your collaborators to sign into MURAL.
The visitor link allows collaborators to join a mural without an account. Use the visitor link to invite collaborators without signing into MURAL. The collaborator can identify themselves by name and with an animal avatar. However, keep in mind that your collaborator’s avatar won’t remain beyond the session.
Invite collaborators via email
- Click the pink share button at the top right of the mural. This opens a menu for invitation options.
- Decide whether you want your collaborators to edit the mural or view the mural.
- Enter the email address of the collaborator you want to invite. You can also import a list of collaborators by uploading a CSV list of email addresses.
- If you want to add a message, click the add a custom message checkbox. Type in your message below.
- Click Send to send the invitation. Your collaborator will get an email invitation to join the mural.
Invite collaborators via link
Invite members and guest to the mural:
- Click share at the top right of the mural. This opens a menu for invitations.
- Under the invite people tab, copy the link for the mural.
- Share the link with your collaborators. When they click the link, they will be prompted to sign into MURAL.
To invite visitors to a mural:
- Click share in the upper right of your mural. Toggle to the Visitors tab.
- If it hasn’t been generated already, generate a share link in the 2nd tab. (Only a mural owner can do this.)
- Select Edit or View-only permissions from the drop-down menu.
- Share the link with your collaborators. When they join the mural, they will be prompted to join as a visitor or have the option to sign in if they have a MURAL account.
Invite collaborators to a room
You can also invite collaborators to an entire room so they can see all related murals related to a project. The invitation structure is similar to invitations to a mural, but there are no visitor links. Here’s how:
- Open the room you want to share.
- Click share at the top right of the room. You can invite via email or copy the link to share with anyone.
Invite collaborators to a workspace
If you have admin permissions in your workspace, you can invite collaborators to the entire workspace from the MURAL dashboard. Here’s how:
- On your MURAL dashboard, click invite on the top right corner
- You can either type someone's email, and even include a custom message. Alternatively, you can create a share link and send this to your collaborators.
Hello there, I'm Hailey Temple. The magic of MURAL starts when you invite others to work with you. So, let me show you how to do this in a mural at a room level. And if you have the right permissions, you can do it at a workspace level.
Let's start with a mural. So I want to invite someone in to work with me. So I'm going to click this big pink share button. Now, I have a couple of options. If I want somebody to sign in, so I know who they are when they're working with me in the mural, then I'm going to use this invite people tab.
I can invite someone via email address or with a link. I'll make sure I have the right permissions so they can collaborate with me in this mural, so I'll send them an email and send an invitation, I can even add a custom message. And off we go. Now, I don't want somebody to have to sign in, just come in and start working with me, no worries about signing in, then the visitor link is ideal. So, if I copy this link and share it with anyone, then they will be able to join me and depending on my permissions start working with me. So, that's how you invite people into a mural. From a room and workspace level depending on your permissions in that mural, it's fairly similar.
So here, I can invite somebody into this room by very similar clicking the share button and inviting somebody with a link and I need to create a link or with an email At the workspace level, if you're an administrator, then you can invite people in at the workspace level. I'll go up to the workspace name, click this down arrow. And now I can click invite people to the workspace. Very similar, you can create a link and invite someone that way or send it by email.
If you want to revoke access for a group of people or an individual, you can always delete that link and you can be rest assured your work is safe. So that's how you invite people to collaborate with you in MURAL.
COMMENTS
To enter presentation mode: Click the Outline icon in the top right corner of your mural. Click the Presentation mode icon. Click the arrows ( < and > ) at the bottom of the screen to move from one outline item to the next. When you're in presentation mode, your regular canvas toolbars disappear. Instead, you'll see presentation options in ...
Open the outline in your mural. Select the presentation icon within the outline. This will start the slides sequence within your outline. This hides the toolbar and other key parts of the mural. Advance through your slides by advancing the arrows on the bottom of the mural. Close the presentation mode by clicking the X at the top right of the ...
To start presentation mode: Select any element or multi-select if you want to choose more than one element to add to an outline. Right-click and select add to outline. You can view the list of items by clicking on the outline icon next to the activity feed. To present your content, click the presentation icon at the top of the outline bar.
In this tutorial, we will be discussing about Presentation Mode in Mural#muraltutorial #muralapp #muralboardLearn the basics of using Mural including how to ...
Presentation mode. Use your mural's outline to present your content in presentation mode. 3229 Views ...
Keep it easy by presenting and collaborating in MURAL! You can create slides in mural or upload existing slides as images. Once uploaded, right click on each slide to add them to the outline, summon participants, and use presentation mode to deliver the content. To encourage participation, you can create an area for questions below the slides ...
The Mural Add-in for PowerPoint extends beyond the ability to drag and drop or import PowerPoint files from your computer or OneDrive. This add-in offers two options for importing content into Mural direct from the PowerPoint interface: Set up for Presentation mode: Adds each slide to the Mural outline.
When presenting Workshops, Meet-ups and Remote Design Sprints, Mural is our tool of choice for introducing activity in to the session, helping us to keep everyone engaged. Since we started using Mural earlier this year, we've learned a few things that I'd like to share with you about how to best use Mural when presenting, especially if using a tool like Zoom as part of the presentation.
Tips for creating a powerful presentation: Encourage participants to think outside the box and explore different emotional journeys. Use Mural's collaboration features to work seamlessly with your team on the presentation. Keep the main message of your presentation in mind throughout the process to ensure coherence. Start from blank template.
Click the Outline icon in the top right corner of your mural. Click the three-dot menu icon to the right of the step you want to add instructions to. ... you'll only see a preview of the instructions prior to entering presentation mode. But when you're presenting, the instructions will expand to show fully. URL Name. add-instructions-to-a ...
Creating a presentation in MURAL. It's easy to get lost in a virtual class if you have to switch between screens and platforms. Keep it easy by presenting and collaborating in MURAL! ... Once uploaded, right click on each slide to add them to the outline, summon participants, and use presentation mode to deliver the content. ...
Mural works like a slideshow presentation tool, with students and teachers able to build from templates to present to the "room," which is a defined space people can be in, or not. ... On the flip side of that there is Private Mode, which stops individuals contributing by hiding what they add, as you may need. Sharing, commenting, and even live ...
Navigating : M oving and zooming. Use the mini-map to click/move around the board Zoom using the scroll bar Clicking the hand puts you in "move mode" so that you can easily move around the mural without moving elements (can also move without this) Holding the SPACE bar while moving around activates " move mode " too. 4 .
If we think about the old times when we would use PowerPoint presentations or Keynote presentations in workshops to share the instructions this is basically what you would have put in the PowerPoint presentation. So instructions in the mural should be short and you can think about it as what you would have put in the slides in the PowerPoint.
To embed a YouTube video in your outline: Click the Outline icon in the top right corner of your mural. Click the three-dot menu icon to the right of the step you want to add instructions to. Select Add/Edit instructions. Paste the YouTube URL. Click Save. And just like that, your YouTube video is embedded in the outline.
Additionally, MURAL is useful for courses and workshops that require collaborative activities, such as an activity asking students to brainstorm ideas, write them on the sticky notes, put them on the whiteboard, and discuss in groups. If the instructors want to keep these activities and hope to mimic the in-classroom experience in the virtual ...
You can leverage presentation mode alongside your favorite video conferencing tools to show a visual story of your concepts in a mural. Then, you can move between presentation mode and invite collaborators to contribute to the conversation with hands-on activities. In order to use the presentation mode in MURAL, you need to build an outline.
Presentation mode. Build presentations collaboratively, then deliver engaging sessions that go beyond one-way talk tracks. ... Mural is a collaboration platform that facilitates cross-functional teamwork by elevating every voice. Organize your approach, collect feedback, refine your strategy, and build a plan that brings it to life.
There are multiple ways you can use Mural and Microsoft PowerPoint together. To bring PowerPoint content into Mural, you can: Import PowerPoint files into Mural via drag and drop or from OneDrive.. Extract specific slides into Mural from an imported PowerPoint file.; Use the Mural Add-in for PowerPoint to send slides to Mural as static images.; Copy and paste content from PowerPoint to Mural.
Shortcuts for navigating a mural. Move around the MURAL with ease on your device with these keyboard shortcuts. You can access the shortcuts key any time under the question mark (?) icon in the mural.. Move around the mural: ARROW KEYS. Move around the mural faster: SHIFT + ARROW KEYS. Pan without moving elements: Hold SPACEBAR + Drag. Zoom in: Z + Marquee ...
How to leverage visual collaboration in the classroom
Keyboard shortcuts (Windows)
MURAL gives you the freedom to move, zoom in to see details, and zoom out to see all of the content on a mural. Think of it more like Google Maps than working in a document or presentation. When you're working on your laptop or desktop, you can adjust your zoom settings for your device. To change your zoom settings: